Using PydanticAI to Build AI Agents for Data Analysis
In recent years, LLMs (Large Language Models) have evolved from simple chat interfaces into powerful agents capable of reasoning, planning, and interacting with tools.
With frameworks like OpenAI’s Function Calling, LangChain, and PydanticAI, it's now easier than ever to build structured LLM agents that follow specific tasks, validate output formats, and integrate seamlessly into real-world applications.
One of the most promising use cases for these agents is automated data analysis—especially when it involves gathering information from multiple sources, applying business logic, and delivering polished outputs.
These are the types of tasks that often take analysts hours to perform manually but can be offloaded to well-orchestrated LLM agents in seconds.
In this tutorial, you'll build a financial reporting agent that:
- Accepts historical sales data (uploaded via CSV)
- Queries a PostgreSQL database for regional product details
- Enriches it with live exchange rates
- Returns a structured financial report
By the end, you'll have a FastAPI application running on Koyeb, with your own with a local AI agent powered by Ollama and PydanticAI running on Koyeb.
What is PydanticAI?
PydanticAI is a lightweight, Python-native agent framework built on top of Pydantic v2, the industry-standard library for data modeling and validation.
At its core, PydanticAI allows you to define agents as simple Python functions—with clearly typed inputs and outputs—while abstracting away the complexity of reasoning, tool orchestration, and language model interaction.
Each agent function is backed by a Pydantic model, ensuring type-safe, validated interactions between your application and the underlying LLM.
This makes it easy to define tools, chain multiple actions, and control the behavior of LLMs in a reliable, testable way.
Use Cases
PydanticAI shines in scenarios where structured, auditable workflows are a must. Some common use cases include:
- Validated tool I/O: Automatically enforce input/output schemas using Pydantic models
- Tool-chained reasoning: Let agents use multiple tools in sequence to complete multi-step tasks
- Auditable workflows: Keep logs of each agent step with structured data that’s easy to debug and analyze
Whether you’re building a customer support bot, data analysis pipeline, or internal tool, PydanticAI offers a composable way to orchestrate LLM behavior with the guardrails of Python typing.
Why It’s Ideal for Data-Centric Tasks
Data-heavy applications require predictability. PydanticAI makes this possible by:
- Enabling declarative schema integration from the start
- Producing predictable and testable outputs every time the agent runs
- Supporting local/private LLMs like those available through Ollama (among others), keeping data secure and offline
Requirements
To successfully complete this tutorial, you will need the following:
- A GitHub account: to store the code and trigger deployments to Koyeb.
- A Koyeb account is required to deploy the Python script and Ollama to Koyeb.
- Ollama: The LLM runtime environment that allows you to run models like MistralAI. We will deploy it with 1-Click to Koyeb.
- Postgres: A Postgres database is needed to store the processed data. We will deploy the database with Koyeb.
- Exchange Rate API: You’ll need access to a currency exchange API such as freecurrencyapi to retrieve up-to-date exchange rates for reporting. You can get an API key for free.
Architecture
This system follows a modular, tool-based architecture powered by a FastAPI backend and a PydanticAI agent for orchestrated, structured reasoning.
The flow begins when a user uploads a CSV file and ends with a generated output that combines historical sales data with live exchange rates:
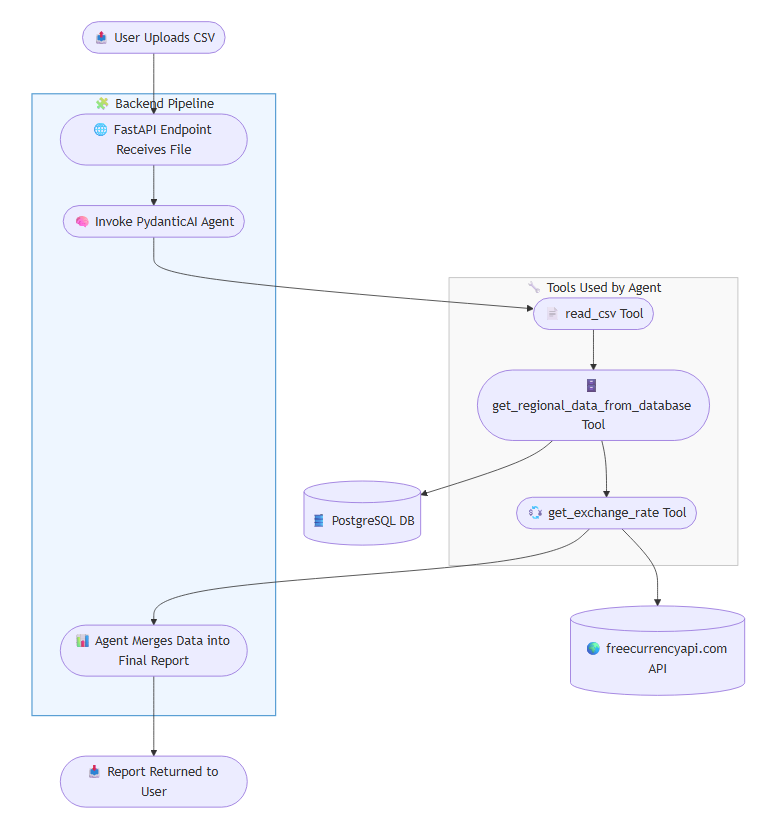
Key Components
- FastAPI Endpoint: Accepts user-uploaded CSV files and initiates the processing pipeline.
- PydanticAI Agent: Orchestrates the flow using structured tools with validated input/output schemas.
- Tools:
read_csv: Loads and validates CSV input using pandas.get_regional_data_from_database: Retrieves regional product data from a PostgreSQL database.get_exchange_rate: Calls a live exchange rate API to fetch current exchange rates.
- Final Output: The agent merges all data sources into a structured report and returns it to the user.
This architecture ensures clean separation of concerns, extensibility, and safe execution of LLM-powered tasks.
Implementing the AI Agent
In this section, we will go step-by-step into the implementation in Python of the custom tools and of the AI agent with PydanticAI.
Let's start with the necessary requirements, file requirements.txt:
pydantic
pydantic-ai
python-dotenv
psycopg[binary,pool]
ollama
fastapi
uvicorn
jinja2
python-multipart
pandas
aiofiles
tqdm
This project relies on several key Python libraries to function effectively.
pydanticandpydantic-aiprovide robust data validation and a structured framework for building type-safe LLM agents.python-dotenvhelps manage configuration via environment variables.psycopg[binary,pool]is used for efficient PostgreSQL database access with connection pooling.ollamaenables running local LLMs like Mistral for inference.- The frontend and backend is built using
fastapiand served withuvicorn, whilejinja2supports the HTML templates. - File uploads are handled with
python-multipartandaiofiles. - For data handling,
pandasis used to process CSV files, andtqdmadds progress bars for better user feedback during long operations.
Now, we will create two files, agent.py for all the AI agent logic and app.py for the FastAPI application that interacts with the agent.
Helper Functions
Start by creating the agent.py file and defining some helper functions:
import os
import time
import uuid
import requests
from dotenv import load_dotenv
import pandas as pd
import psycopg
from pydantic_ai import Agent, BinaryContent, RunContext
from pydantic_ai.models.openai import OpenAIModel
from pydantic_ai.providers.openai import OpenAIProvider
import ollama
from tqdm import tqdm

# Load the environment variables
load_dotenv()

# Model name
model_name = os.getenv("OLLAMA_MODEL")

# Initialize Ollama
def init_ollama():
    """Initialize and return the model via Ollama, with a real progress bar."""
    try:
        # Get the base URL
        base_url = os.getenv("OLLAMA_BASE_URL")
        # Initialize the Ollama client
        ollama_client = ollama.Client(host=base_url)
        # Pull the model
        print(f"Pulling {model_name} model (this may take a while if not already present)...")
        current_digest, bars = '', {}
        # Progress bar
        for progress in ollama_client.pull(model_name, stream=True):
            # Get the digest
            digest = progress.get('digest', '')
            if digest != current_digest and current_digest in bars:
                bars[current_digest].close()
            # If the digest is not present, continue
            if not digest:
                print(progress.get('status'))
                continue
            # If the digest is not in the bars and the total is present, create a new bar
            if digest not in bars and (total := progress.get('total')):
                bars[digest] = tqdm(total=total, desc=f'pulling {digest[7:19]}', unit='B', unit_scale=True)
            # If the completed is present, update the bar
            if completed := progress.get('completed'):
                bars[digest].update(completed - bars[digest].n)
            # Update the current digest
            current_digest = digest
        # Print the model is ready
        print(f"{model_name} model ready.")
        return True
    except Exception as e:
        print(f"Error initializing Olama model: {e}")
        return False
This code imports the essential libraries and the environment variables are loaded using load_dotenv(). The model to be used by the agent is retrieved from the .env file via the OLLAMA_MODEL key.
The init_ollama() function initializes and pulls a LLM model using the Ollama client, with real-time feedback via a progress bar.
It manages multiple progress bars, updating or closing them as needed. If successful, it confirms the model is ready; if any errors occur, it logs the exception and returns False.
Defining Custom Tools
PydanticAI agents rely on tools to extend their abilities beyond language reasoning.
Tools allow the agent to ingest data, query external systems, and interact with APIs in a type-safe and reliable way.
Each tool is defined as a function or class with a Pydantic input/output schema, ensuring structured interaction and easy validation.
In this section, we’ll define three essential tools for data workflows:
- Loading CSV files using Pandas
- Querying a PostgreSQL database with SQLAlchemy
- Fetching live exchange rates from an external API
These tools will be registered with the agent, enabling it to autonomously perform complex data tasks using natural language instructions.
1. read_csv Tool
# Tool to read CSV files
def read_csv(ctx: RunContext[str]):
    """
        Read a CSV file.

        Args:
            ctx (RunContext[str]): The context of the run.

        Returns:
            list[dict]: A list of dictionaries with the following keys:
                - product: str
                - sales: float
                - amount: float
    """
    print(f"Tool called: read_csv")
    # Get the binary data from the context
    csv_binary = ctx.deps.data
    # Write the binary data to a temporary random filename
    filepath = f'temp_{uuid.uuid4()}.csv'
    with open(filepath, 'wb') as f:
        f.write(csv_binary)
    # Read the CSV file
    df = pd.read_csv(filepath)
    # Delete the temporary file
    os.remove(filepath)
    return df.to_dict(orient='records')
The read_csv function is a tool designed to read and parse CSV files within a PydanticAI agent workflow.
It takes a RunContext containing binary CSV data, writes it to a temporary file with a unique filename, and uses pandas to read the contents into a DataFrame.
After parsing, it deletes the temporary file and returns the data as a list of dictionaries, where each dictionary represents a row with product, sales, and amount fields.
2. get_regional_data_from_database` Tool
# Tool to query the database
def get_regional_data_from_database(products: list[str]):
    """
        Query the database for the products regional data.

        Args:
            products (list[str]): The products to query the database for.

        Returns:
            list[dict]: The results of the query.
    """
    print(f"Tool called: get_regional_data_from_database")
    try:
        # Get the connection string from the environment variable
        connection_string = os.getenv('DATABASE_URL')
        # Connect to the database
        with psycopg.connect(connection_string) as conn:
            # Open a cursor to perform database operations
            with conn.cursor() as cur:
                # Select the products
                products_str = ','.join(f"'{product}'" for product in products) # Convert the list of products to a string of products
                cur.execute(f"SELECT region, product, sales, amount FROM regional_data WHERE product IN ({products_str})")
                # Get the results
                results = cur.fetchall()

                # Convert results to list of dictionaries
                results_dict = []
                for row in results:
                    results_dict.append({
                        "region": row[0],
                        "product": row[1],
                        "sales": row[2],
                        "amount": row[3]
                    })

                return results_dict
    except Exception as e:
        print(f"Error getting regional data from database: {e}")
        return []
The get_regional_data_from_database function is a tool that queries a PostgreSQL database for regional sales data based on a given list of product names. We will deploy the database to Koyeb in the next section.
It constructs a SQL query to select records from the regional_data table where the product matches any of the input values.
Using a secure connection string from environment variables, it connects to the database with psycopg, executes the query, fetches the results, and formats them as a list of dictionaries—each containing region, product, sales, and amount.
3. call_rest_api Tool
# Tool to get the exchange rate
def get_exchange_rate(from_currency: str, to_currency: str):
    """
        Get the exchange rate.

        Args:
            from_currency (str): The currency to get the exchange rate from.
            to_currency (str): The currency to get the exchange rate to.

        Returns:
            float: The exchange rate from the from_currency to the to_currency.
    """
    print(f"Tool called: get_exchange_rate")
    try:
        # Get the URL
        url = os.getenv("FREE_CURRENCY_API_URL") + "/v1/latest"
        # Get the API key
        api_key = os.getenv("FREE_CURRENCY_API_KEY")
        # Get the exchange rate
        response = requests.get(url, params={"base_currency": from_currency, "currencies": to_currency}, headers={"apikey": api_key})
        # Return the exchange rate
        return response.json()["data"][to_currency]
    except Exception as e:
        print(f"Error getting exchange rate: {e}")
        return None
The get_exchange_rate function is a tool that retrieves the latest currency exchange rate between two specified currencies using a third-party API (in this case Free Currency API).
It constructs a GET request with the base currency, target currency, and an API key (from environment variables), then sends it to the configured endpoint.
If successful, it extracts and returns the exchange rate value from the JSON response.
Agent Implementation
The create_agent function initializes and returns a PydanticAI agent configured to use a local LLM via Ollama (we will deploy Ollama to Koyeb in the next section).
1. create_agent function
# Create the agent
def create_agent(system_prompt: str):
    """Create the agent."""
    # Get the base URL
    base_url = os.getenv("OLLAMA_BASE_URL") + "/v1"
    # Create the model
    ollama_model = OpenAIModel(
        model_name=model_name, provider=OpenAIProvider(base_url=base_url)
    )
    # Create the tools
    tools = [read_csv, get_regional_data_from_database, get_exchange_rate]
    # Create the agent
    agent = Agent(ollama_model, tools=tools, system_prompt=system_prompt)
    return agent
It first constructs the API base URL from environment variables and sets up an OpenAIModel wrapper compatible with the Ollama backend.
Then, it registers a list of tools the agent can use—read_csv, get_regional_data_from_database, and get_exchange_rate—which enable structured data analysis.
Finally, the agent is instantiated with the specified system prompt, allowing it to reason through tasks by calling these tools as needed.
2. run_agent function
# Run the agent
async def run_agent(log_file: str, file_path: str):
    # System prompt
    system_prompt="""
            You are a helpful assistant that can read CSV files, query the database and get the exchange rate.
            You can use 'read_csv' tool to read the CSV file.
            You can use 'get_regional_data_from_database' tool to get the regional data from the database.
            You can use 'get_exchange_rate' tool to get the exchange rate.

            IMPORTANT: When reading a CSV file, you should:
            1. First read the CSV file using the read_csv tool
            2. Extract a list of product names from the CSV data
            3. Use those product names to query the database using get_regional_data_from_database tool
            4. Get the exchange rate from USD to EUR using get_exchange_rate tool
            5. Return the regional data in a table format with the exchange rate applied

            If the CSV doesn't contain product data, inform the user that they need to upload a CSV with product information.
    """

    # Create the messages
    messages = [
        """Read the CSV file with a tool and extract a list of products,
            get the regional data for those products from the database with a tool,
            finally get the exchange rate from USD to EUR with a tool,
            and finally return the regional data in a table format with the exchange rate applied.

            IMPORTANT: You MUST call all three tools in sequence:
            6. read_csv - to read the CSV file
            7. get_regional_data_from_database - to get regional data for the products
            8. get_exchange_rate - to get USD to EUR exchange rate

            If the CSV doesn't contain product names, inform the user they need to upload a CSV with product data."""
    ]

    # Define the dependencies to send to the agent
    deps = BinaryContent(data=file_path.read_bytes(), media_type='text/csv')

    # Create the agent
    agent = create_agent(system_prompt)

    # Begin an AgentRun, which is an async-iterable over the nodes of the agent's graph
    with open(log_file, "w") as log:
        log.write("-" * 100 + "\\n")
        log.write("Running agent\\n")
        log.write("-" * 100 + "\\n")
        log.flush()
        start_time = time.time()
        async with agent.iter(messages, deps=deps) as agent_run:
            async for node in agent_run:
                log.write(str(node) + "\\n\\n")
                log.flush()
        end_time = time.time()
        log.write("-" * 100 + "\\n")
        log.write(f"Agent run completed in {end_time - start_time} seconds\\n")
        log.write("-" * 100 + "\\n\\n")
        log.write(str(agent_run.result.output) + "\\n")
        log.flush()
The run_agent function asynchronously executes a PydanticAI agent to analyse a CSV file and generate a financial report.
It begins by defining a detailed system_prompt and messages that guide the agent through a structured workflow: read a CSV, extract product names, query the database for regional data, fetch the USD-to-EUR exchange rate, and return a formatted report.
The CSV file is passed to the agent as binary content via the deps argument.
The agent is created using create_agent, and its run is logged step-by-step to a file.
The function tracks the execution time and logs each reasoning step the agent takes, making the process transparent and auditable.
FastAPI Application
Next, create a app.py to define the frontend and backend with FastAPI.
import uuid
from fastapi import FastAPI, Request, File, UploadFile, Form, BackgroundTasks
from fastapi.templating import Jinja2Templates
from fastapi.responses import HTMLResponse, PlainTextResponse
from fastapi.staticfiles import StaticFiles
from pathlib import Path
import pandas as pd
from contextlib import asynccontextmanager

from agent import get_exchange_rate, init_ollama, run_agent

# Create uploads directory if it doesn't exist
UPLOAD_DIR = Path("uploads")
UPLOAD_DIR.mkdir(exist_ok=True)

# Lifespan
@asynccontextmanager
async def lifespan(app: FastAPI):
    # Startup
    print("Initializing Ollama...")
    init_ollama()
    print("Ollama initialized successfully!")
    yield
    # Shutdown
    print("Shutting down...")

# Create the FastAPI app
app = FastAPI(lifespan=lifespan)

# Mount templates directory
templates = Jinja2Templates(directory="templates")

# Home route
@app.get("/", response_class=HTMLResponse)
async def home(request: Request):
    return templates.TemplateResponse(
        "upload.html",
        {"request": request}
    )

# Upload route
@app.post("/upload", response_class=HTMLResponse)
async def upload_file(request: Request, file: UploadFile = File(...)):
    try:
        # Validate file extension
        if not file.filename.endswith('.csv'):
            return templates.TemplateResponse(
                "upload.html",
                {
                    "request": request,
                    "message": "Please upload a CSV file",
                    "message_type": "danger"
                }
            )

        # Save the file, creating a random filename
        random_filename = str(uuid.uuid4())
        file_path = UPLOAD_DIR / random_filename
        with open(file_path, "wb") as buffer:
            content = await file.read()
            buffer.write(content)

        # Show the uploaded file and pass filename
        return templates.TemplateResponse(
            "upload.html",
            {
                "request": request,
                "message": f"File uploaded successfully!",
                "message_type": "success",
                "filename": random_filename
            }
        )

    except Exception as e:
        # Show the error
        return templates.TemplateResponse(
            "upload.html",
            {
                "request": request,
                "message": f"An error occurred: {str(e)}",
                "message_type": "danger"
            }
        )

# Process file endpoint
@app.post("/process", response_class=HTMLResponse)
async def process_file(request: Request, background_tasks: BackgroundTasks, filename: str = Form(...)):
    file_path = UPLOAD_DIR / filename
    if not file_path.exists():
        return templates.TemplateResponse(
            "upload.html",
            {
                "request": request,
                "message": "File not found. Please upload again.",
                "message_type": "danger"
            }
        )
    # Start background task
    LOG_FILE = UPLOAD_DIR / f"{filename}.log"
    background_tasks.add_task(run_agent, LOG_FILE, file_path)
    return templates.TemplateResponse(
        "upload.html",
        {
            "request": request,
            "message": f"Started processing. Log will update below.",
            "message_type": "info",
            "filename": filename,
            "show_log": True
        }
    )

# Log route
@app.get("/log/{filename}")
async def get_log(filename: str):
    LOG_FILE = UPLOAD_DIR / f"{filename}.log"
    if LOG_FILE.exists():
        with open(LOG_FILE, "r") as f:
            log_content = f.read()
        return PlainTextResponse(log_content)
    return PlainTextResponse("No log yet.")
This FastAPI application provides a web interface for uploading and processing CSV files using an AI agent.
It sets up a simple site with HTML templates via Jinja2, allowing users to upload a CSV file through the home page (/).
Uploaded files are saved with a unique UUID-based filename to the uploads directory.
Once uploaded, users can trigger processing via the /process endpoint, which runs the AI agent (using run_agent) as a background task.
The agent reads the CSV, queries a database, retrieves exchange rates, and generates a report.
Log output from the agent is saved and can be viewed live at /log/{filename}.
During startup, the LLM is initialized via Ollama using a FastAPI lifespan context manager.
Templates
These templates are used by the FastAPI application to render HTML pages for the website. Here we are using Jinja2 for templating..
All template files should be placed inside a directory named templates, which should be located in the root of your project.
Let's start by creating the template that serves as a layout foundation for other pages to extend and fill in content. Create a base.html file in the templates directory:
<!DOCTYPE html>
<html lang="en">
<head>
    <meta charset="UTF-8">
    <meta name="viewport" content="width=device-width, initial-scale=1.0">
    <title>{% block title %}Pydantic AI Agent{% endblock %}</title>
    <link href="<https://cdn.jsdelivr.net/npm/bootstrap@5.3.0/dist/css/bootstrap.min.css>" rel="stylesheet">
</head>
<body>
    <nav class="navbar navbar-expand-lg navbar-dark bg-dark">
        <div class="container">
            <a class="navbar-brand" href="/">Pydantic AI Agent</a>
        </div>
    </nav>

    <div class="container mt-4">
        {% block content %}{% endblock %}
        <br>
        <br>
        <br>
    </div>

    <script src="<https://cdn.jsdelivr.net/npm/bootstrap@5.3.0/dist/js/bootstrap.bundle.min.js>"></script>
    <script src="<https://unpkg.com/htmx.org@1.9.10>"></script>
</body>
</html>
This is a base HTML template using Jinja2 templating syntax, it includes the Bootstrap 5 CSS framework for styling and responsiveness and the HTMX library for enabling dynamic HTML updates via AJAX without full page reloads.
Next, create a template that extends the base layout and provides the main content for a page to upload and process CSV files. Let's call it upload.html:
{% extends "base.html" %}

{% block content %}
<div class="row justify-content-center">
    <div class="col-md-8">
        <div class="card">
            <div class="card-header">
                <h2 class="text-center">Upload CSV File</h2>
            </div>
            <div class="card-body">
                {% if message %}
                <div class="alert alert-{{ message_type }}" role="alert">
                    {{ message }}
                </div>
                {% endif %}

                <form action="/upload" method="post" enctype="multipart/form-data" class="needs-validation" novalidate>
                    <div class="mb-3">
                        <label for="file" class="form-label">Choose CSV file</label>
                        <input type="file" class="form-control" id="file" name="file" accept=".csv" required>
                        <div class="invalid-feedback">
                            Please select a CSV file.
                        </div>
                    </div>
                    <div class="text-center">
                        <button type="submit" class="btn btn-primary">Upload</button>
                    </div>
                </form>

                {% if message_type == 'success' and filename %}
                <form action="/process" method="post" class="mt-3">
                    <input type="hidden" name="filename" value="{{ filename }}">
                    <div class="text-center">
                        <button type="submit" class="btn btn-success">Process File</button>
                    </div>
                </form>
                {% endif %}

                {% if show_log %}
                <div class="mt-4">
                    <h4>Processing Log</h4>
                    <pre id="log-area"
                         hx-get="/log/{{ filename }}"
                         hx-trigger="load, every 1s"
                         hx-swap="innerHTML"
                    ></pre>
                </div>
                {% endif %}
            </div>
        </div>
    </div>
</div>

<style>
#log-area {
    white-space: pre-wrap;
    word-break: break-word;
    overflow-x: auto;
    max-width: 100%;
}
</style>
{% endblock %}
The first form allows users to upload a CSV file with client-side validation to ensure a file is selected.
If a file is successfully uploaded (indicated by a success message and a filename), a second form appears to trigger processing of the uploaded file.
When processing starts, a live-updating log section appears below, which uses HTMX to fetch and refresh the processing log every second from the server asynchronously.
The log area is styled to wrap text properly and handle overflow horizontally for readability.
Deploy to Koyeb
Now your project is ready to deploy to Koyeb.
Download the standard Python .gitignore file from GitHub to exclude certain folders and files from being pushed to the repository:
curl -L <https://raw.githubusercontent.com/github/gitignore/main/Python.gitignore> -o .gitignore
Due to the use of psycopg to connect to Postgres, v3.12 is not recommended. So you can specific the Python version to use by creating a file called .python-version:
3.11.12
Now, create a new repository on GitHub and run the following commands in your terminal to commit and push your code to the repository:
echo "# PydanticAI Agent" >> README.md
git init
git add .
git commit -m "First Commit"
git branch -M main
git remote add origin [Your GitHub repository URL]
git push -u origin main
All of your local code should now be present in the remote repository. You can now deploy the application to Koyeb.
But before we do that, we need to first deploy the other application dependencies, like PostgresSQL and Ollama.
PostgresSQL
In the Koyeb control panel, while on the Overview tab, start the creation process by clicking Create Service.
On the Service creation page:
- Click Database
- Click Create Database Service
- Accept the default values and click Create
After a couple of minutes your database will be up and running. On the Overview section, check the connection details:
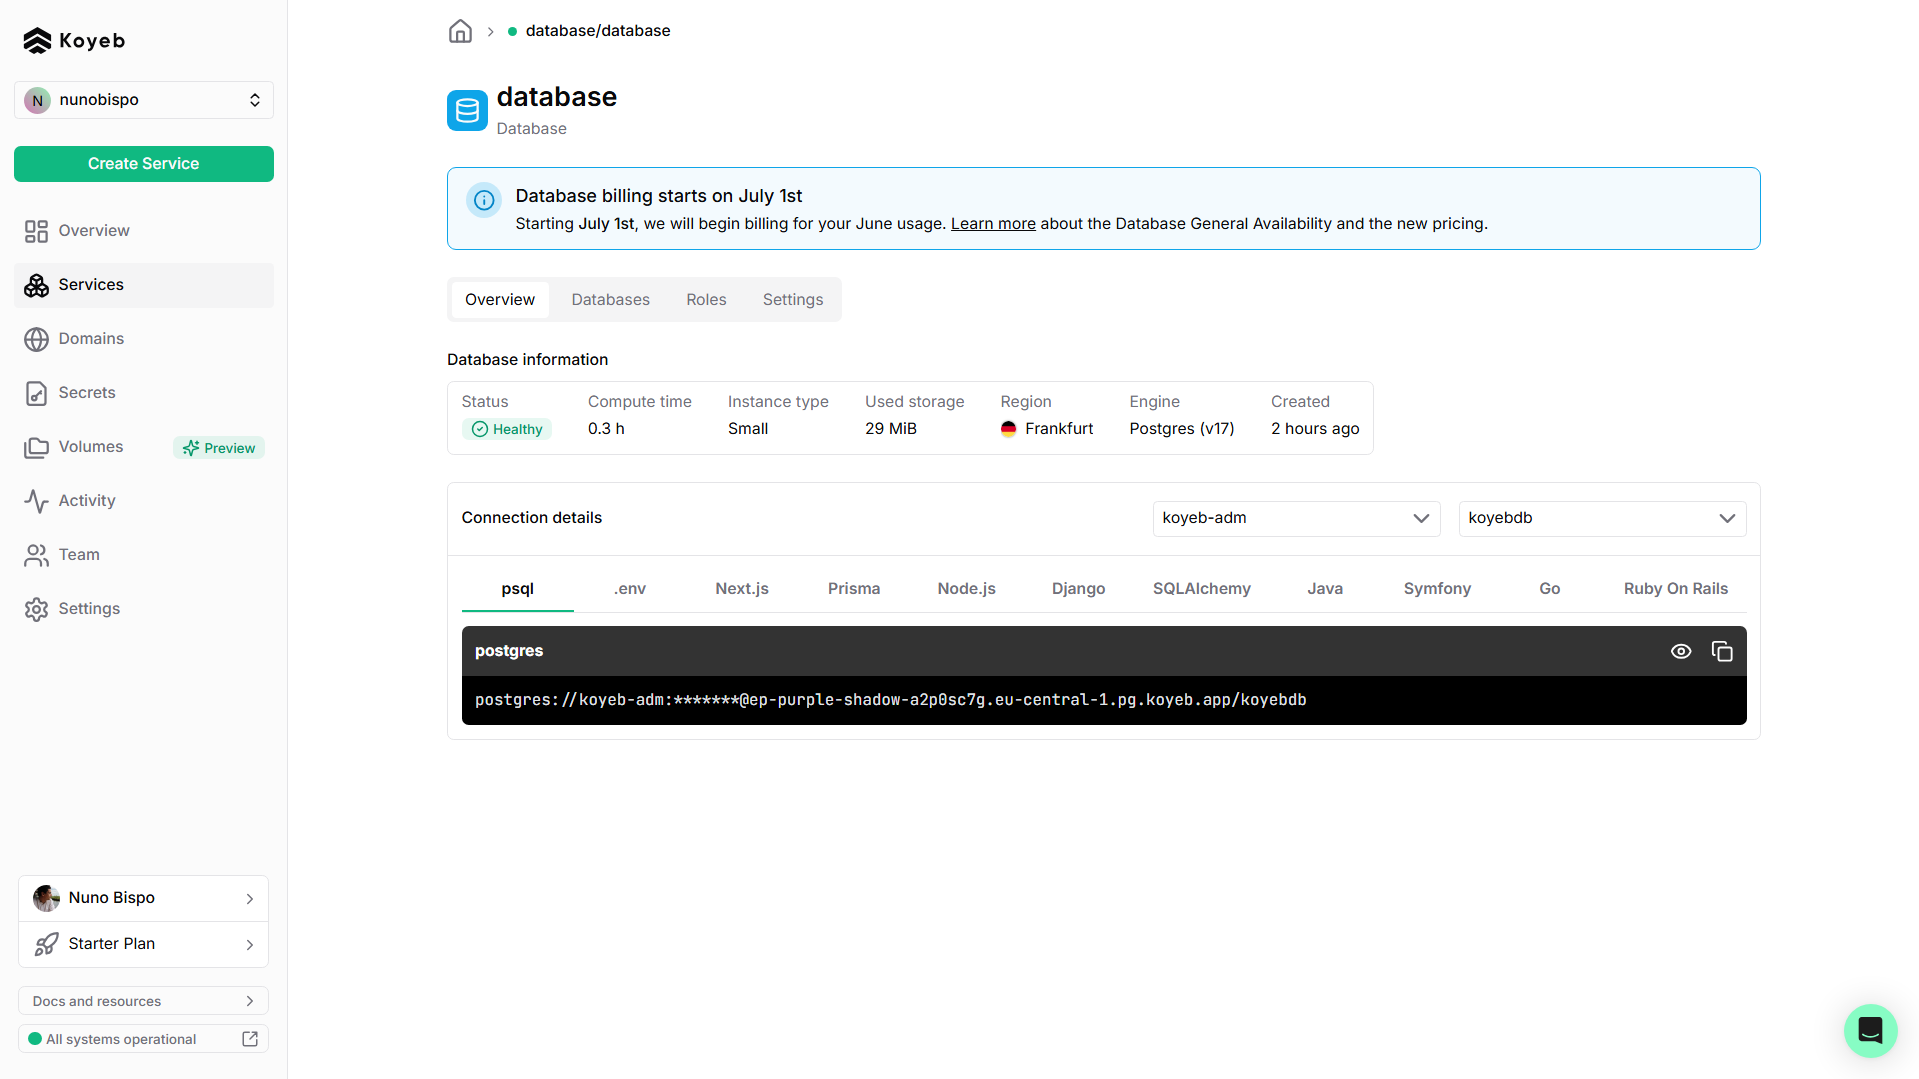
Click the copy icon to copy the connection string and store it in a safe place, you will need it later to add it to the environment variables.
Ollama
In the Koyeb control panel, while on the Overview tab, start the creation process by clicking Create Service.
On the Service creation page (under Deploy one-click apps):
- Click Ollama
- Choose your preferred GPU, for instance RTX-4000-SFF-ADA
- Configure the 'Scaling' to be Min 1 and Max 1 (meaning reserving one single instance)
- Click Deploy
After a couple of minutes Ollama will be up and running. On the Overview section, check the URL:
Click the copy icon to copy the Public URL and store it in a safe place, you will need it later to add it to the environment variables.
FastAPI Application
After you've successfully created a PostgreSQL database and deployed Ollama on Koyeb, you can prepare the deployment of the FastAPI application that you pushed to a GitHub repository at the beginning of this section.
In the Koyeb control panel, while on the Overview tab, start the creation process by clicking Create Service.
On the Service creation page:
- Click Web service
- Click GitHub as the deployment method
- Select your repository. If necessary, click
Edit GitHub app permissionsto configure which of your repositories can be accessed by Koyeb. - Select a Nano CPU Standard instance and your preferred region
- On the Builder section, override the 'Run command' with:
uvicorn app:app --host 0.0.0.0 - On the Environment variables section, fill in:
OLLAMA_BASE_URLwith the public URL of the previously deployed Ollama instance;OLLAMA_MODELwithmistral-small:24b;DATABASE_URLwith URL of the previously deployed Postgres instance;FREE_CURRENCY_API_URLwith 'https://api.freecurrencyapi.com' andFREE_CURRENCY_API_KEYwith your API key. - Click Deploy
After a couple of minutes your instance should be deployed. You can access it by navigating to the Public URL.
Note: The first load of the application might take a couple of minutes to start. That is because it will be pulling the Mistral model inside Ollama. You can check the logs of the instance on Koyeb for more details.
Running an Example
Let's now see an example of the AI agent in action.
Upload a CSV file and click Process file: sales.csv.
The AI Agent will process the CSV, invoke the corresponding tools and present a result.
This is an execution log:
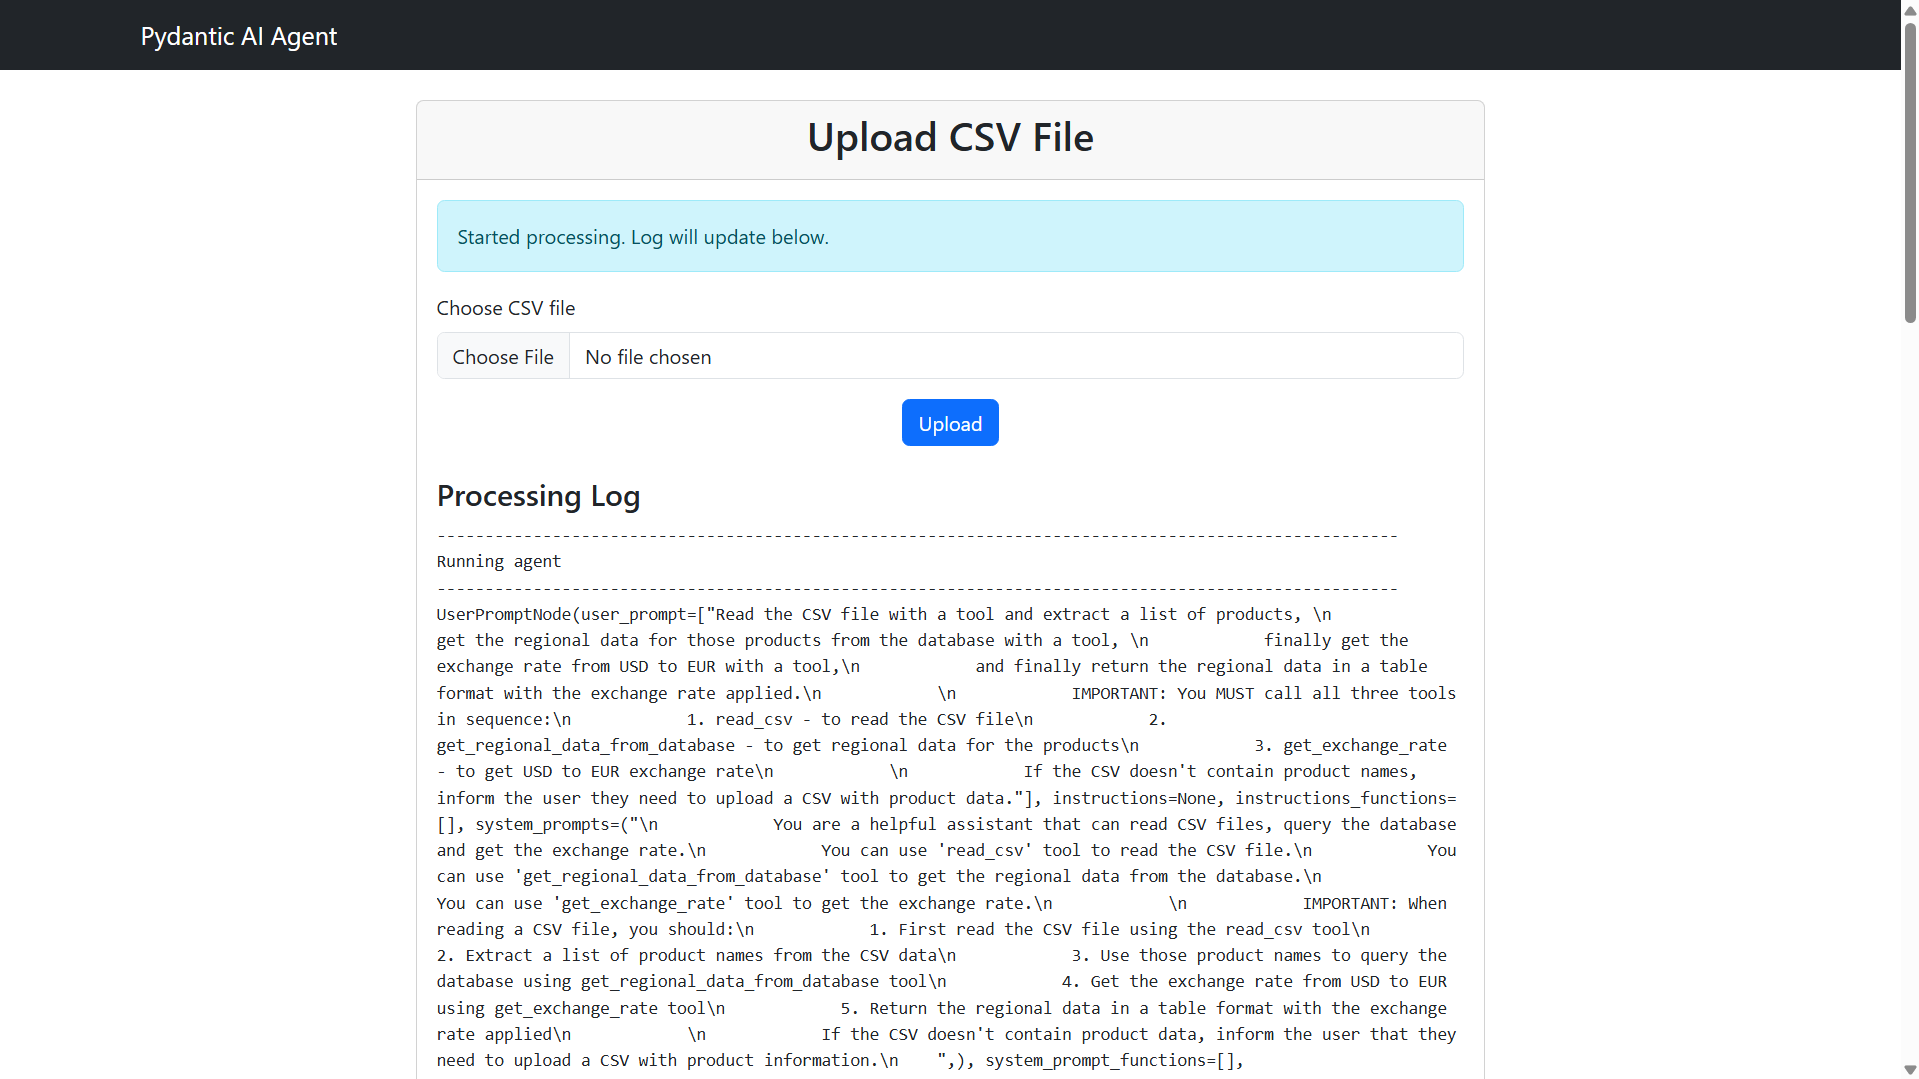
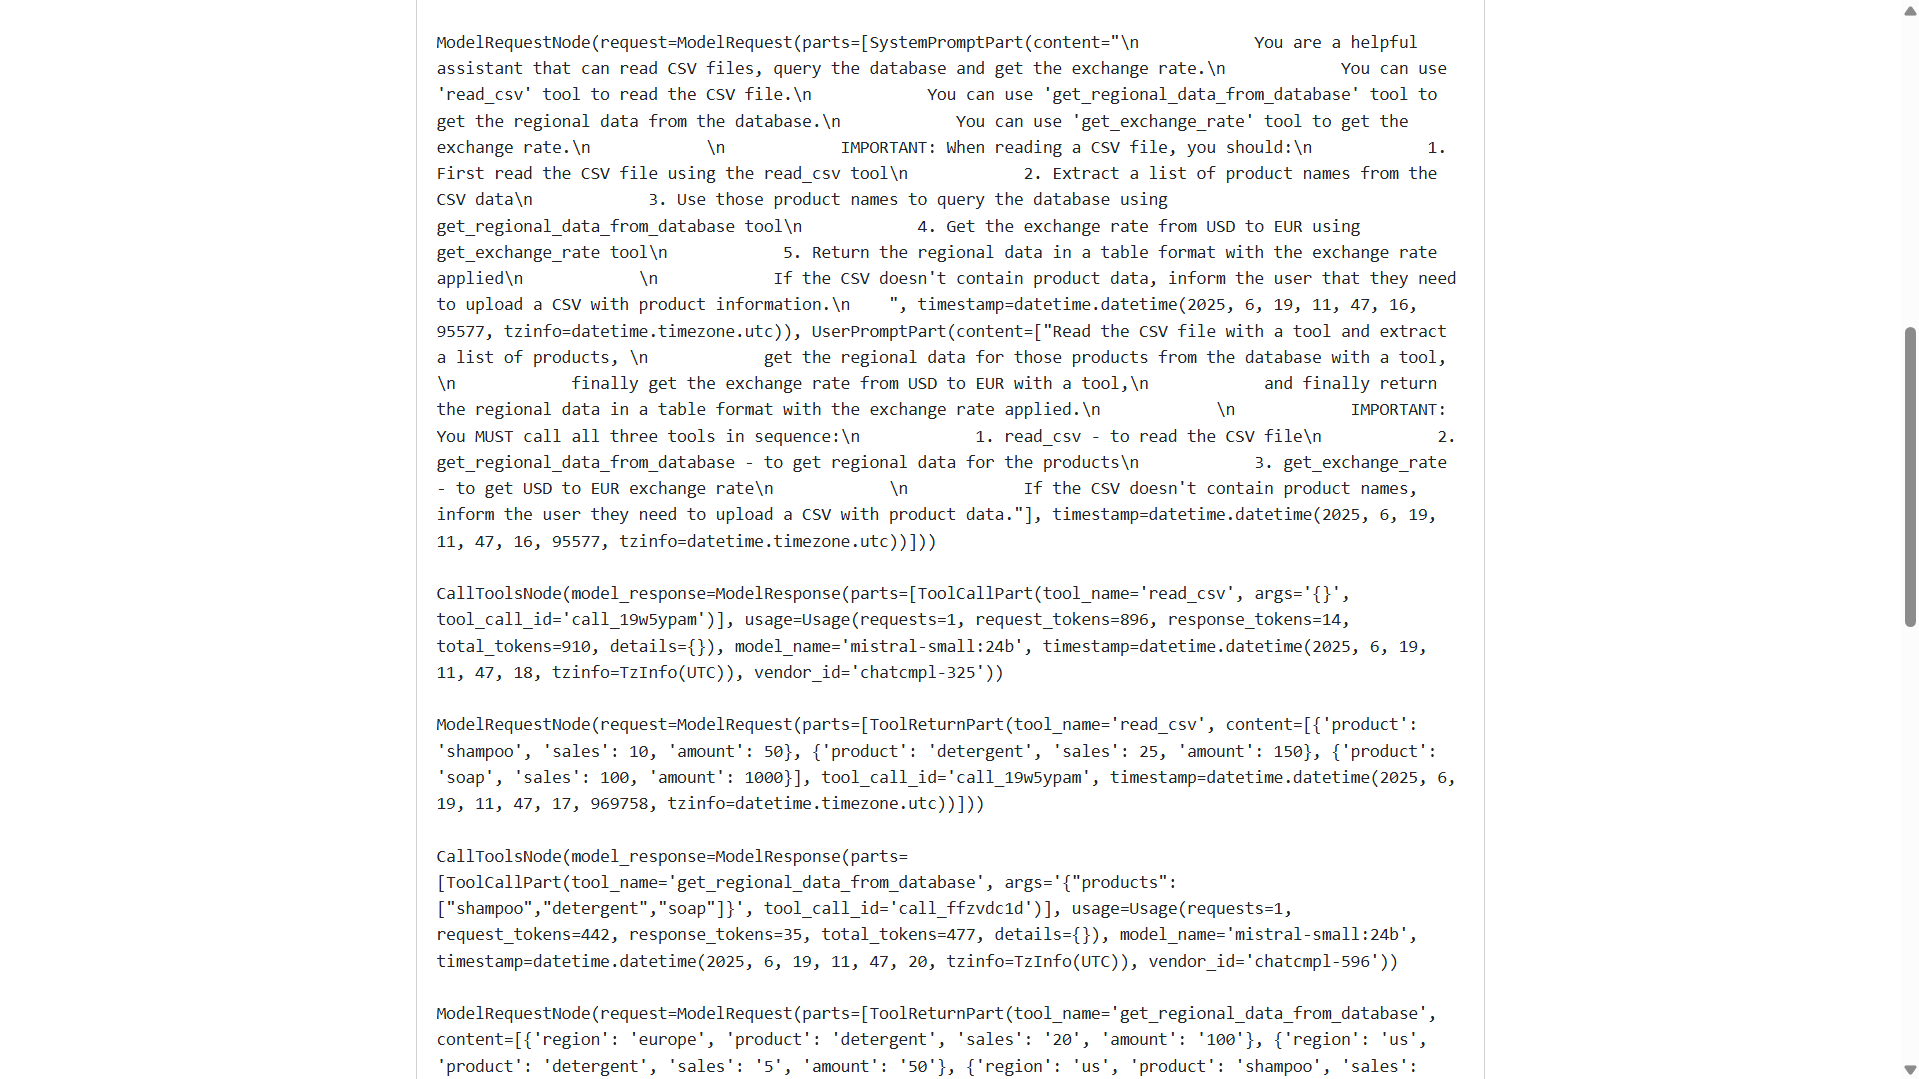
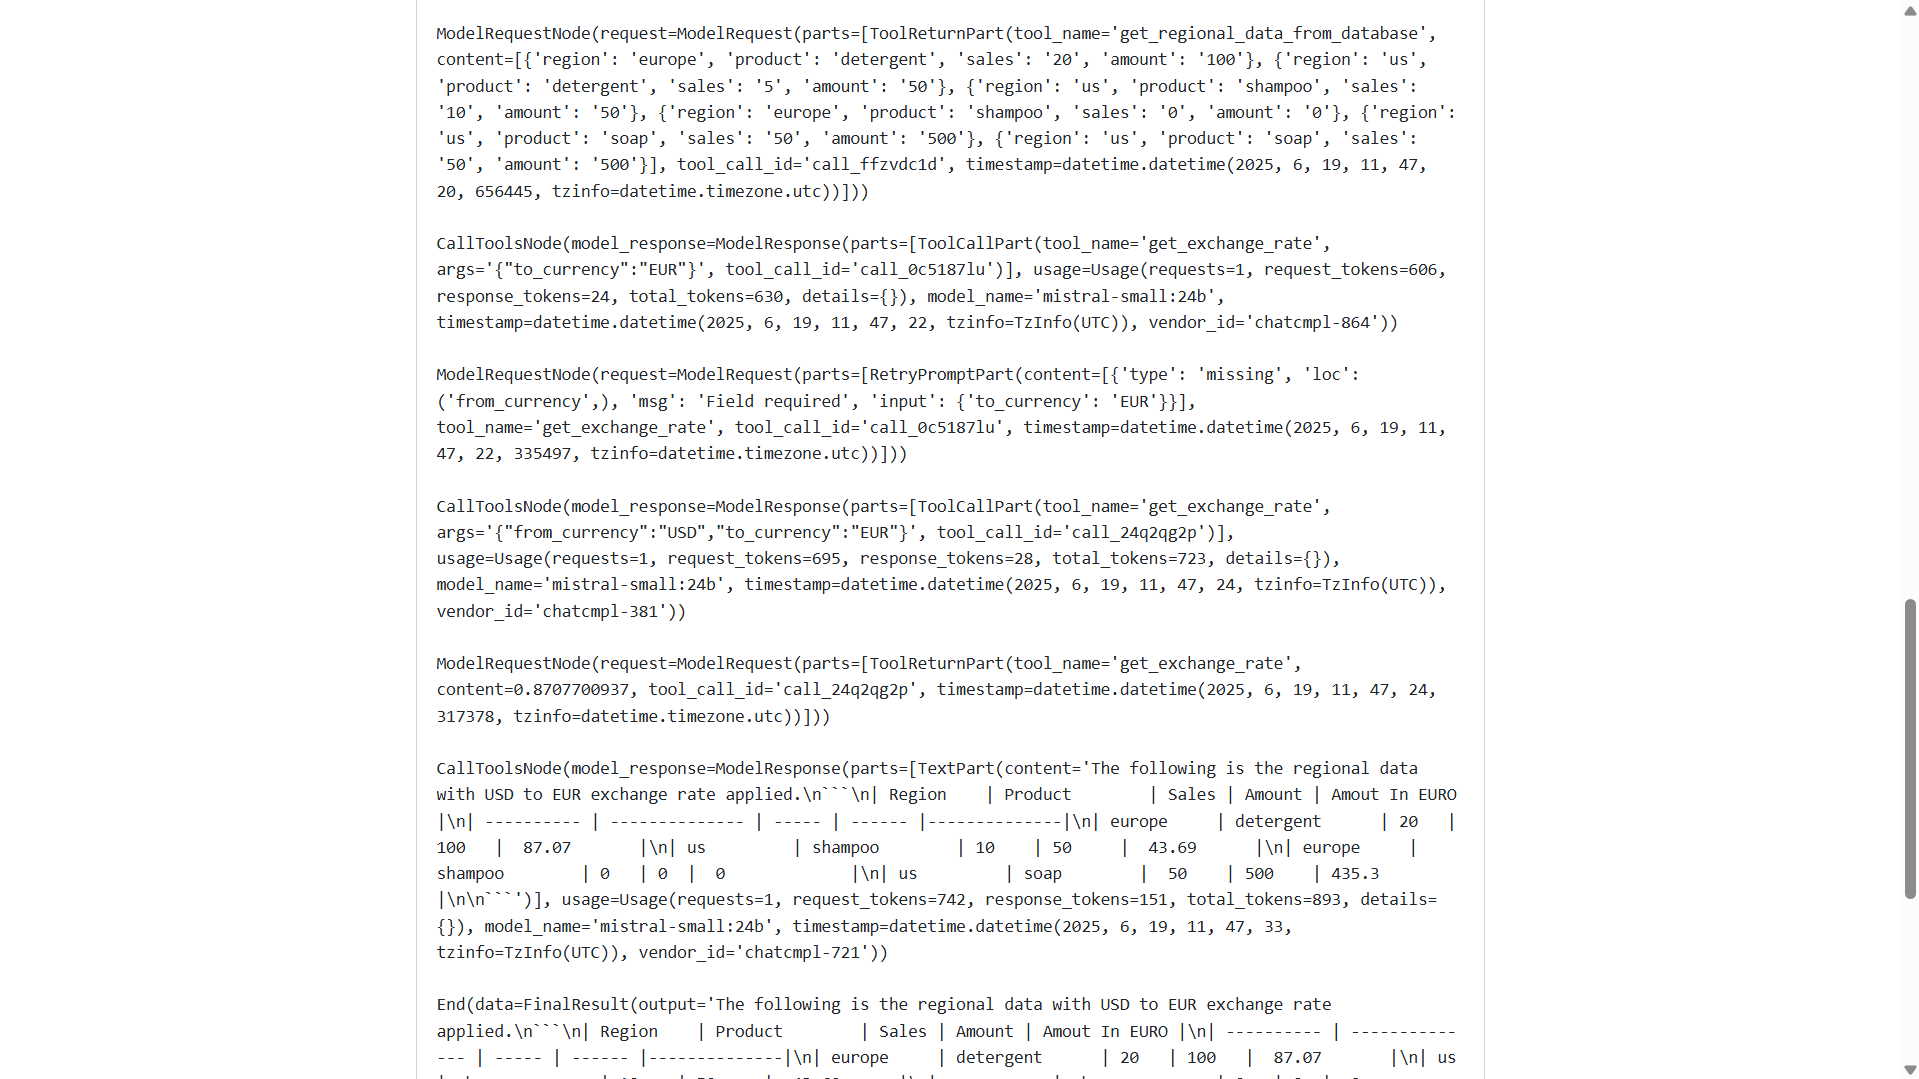
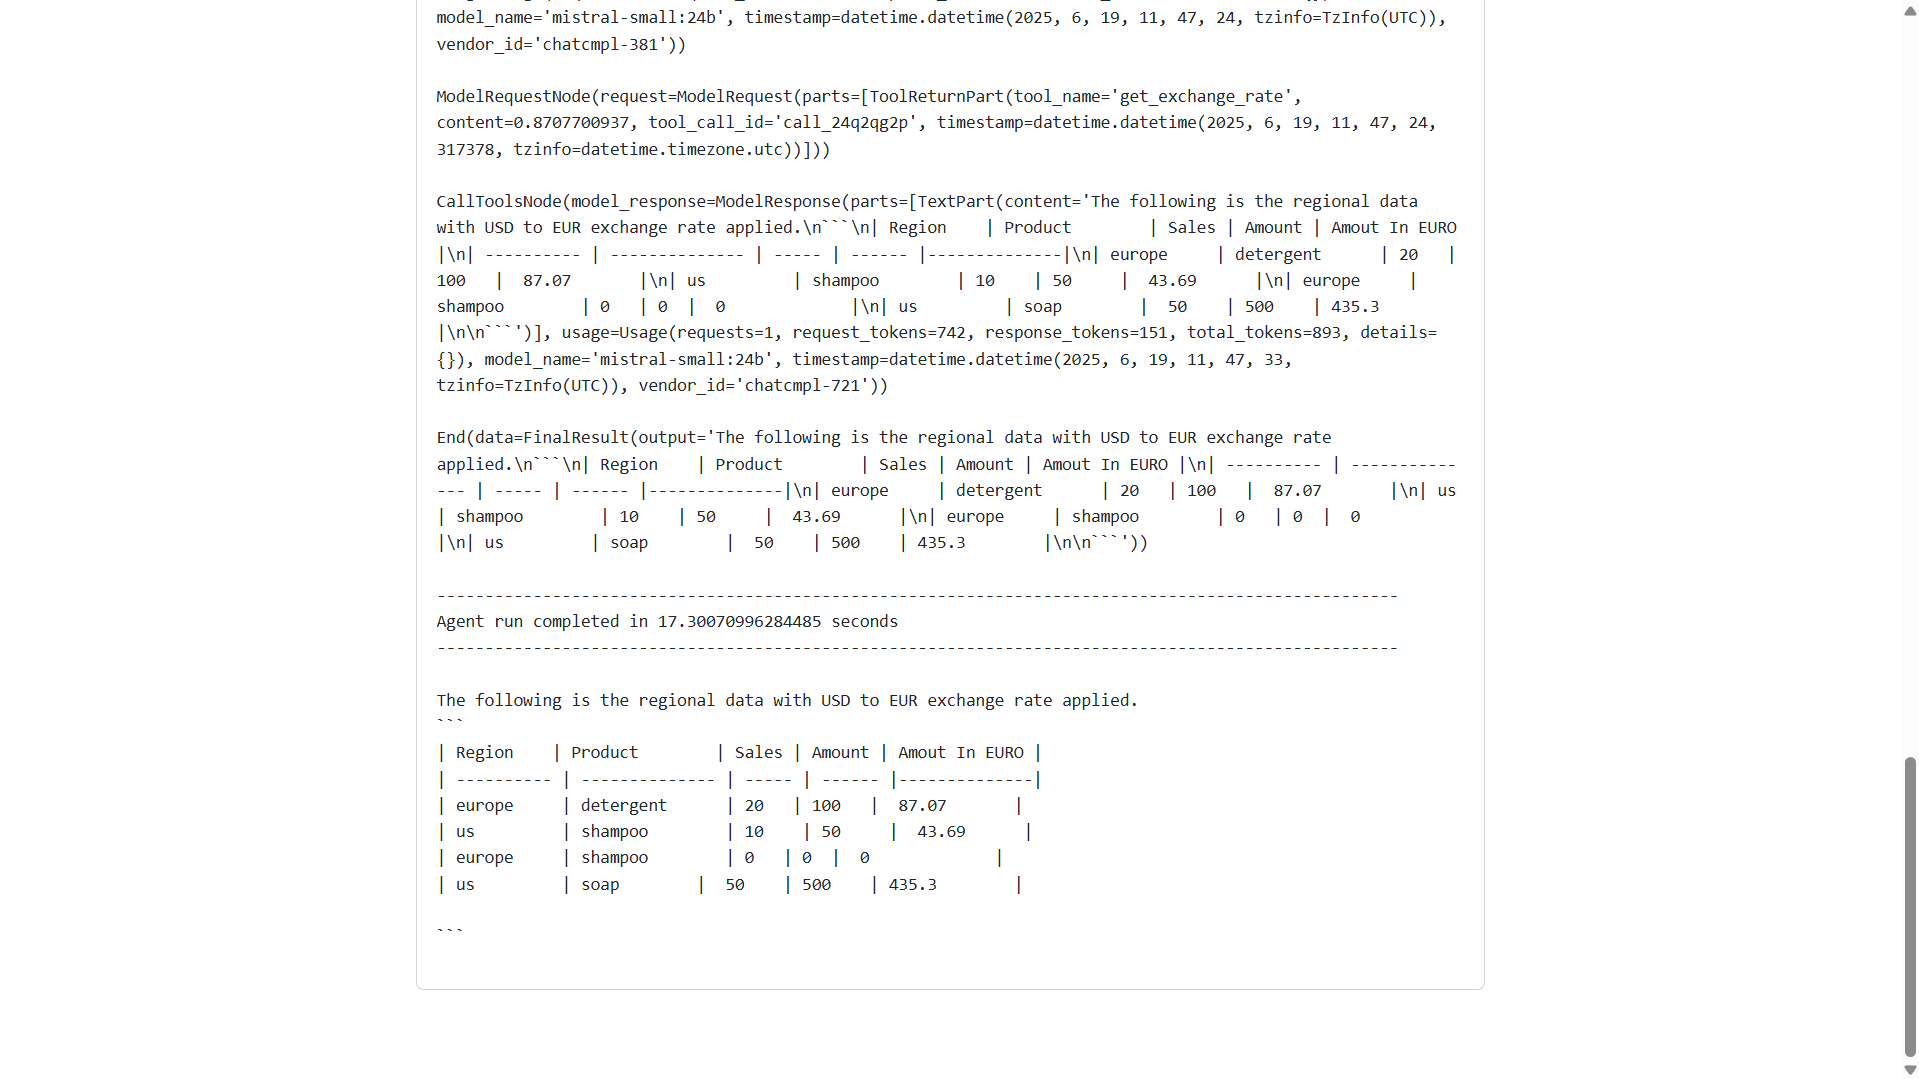
As you can see, the AI agent executes the appropriate tools, passing the correct values to each of them and using the output of each tool as the input of the next tool.
Note: To fully test the AI agent as in this example, you should add some records to the database. You can do so with, for example pgAdmin. The table should be called regional_data and contain the columns 'region, product, sales, amount'.
Conclusion
In this guide, we showcased how to build intelligent data workflows using PydanticAI. By clearly defining data schemas and integrating useful tools like CSV readers, database queries, and exchange rate fetchers, you can build intelligent agents that efficiently handle complex workflows.
This approach not only streamlines processes but also makes your automation more reliable and maintainable.
Looking ahead, there are many ways to expand on the application built in this tutorial:
- Add currency formatting tools to improve output presentation
- Integrate notifications through email or Slack to keep stakeholders informed in real time
Beyond this use case, you can build schema-first agents tailored to other domains where automating routine tasks can save time and enhance productivity: marketing, HR, or customer support.
You can find all the code from this tutorial in the example PydanticAI repository.
Explore Koyeb docs and tutorials to learn more about deploying AI applications.
Get started with more one-click apps on Koyeb, like Ollama to build your own AI-powered applications.