Using Gradio to Build MCP Servers to Interact with PostgreSQL Databases
As more and more well-known LLM providers integrate support for MCP clients (Claude Desktop, Cursor, Tiny Agents, etc.), it's clear that MCP servers are becoming a standard interface for interacting with complex data.
In the spirit of this shift to integrate MCP, the Gradio library now includes a powerful new feature: native MCP server compatibility. Meaning, you can now turn any Gradio interface into an MCP server (currently compatible only with the SSE protocol at the time of writing).
In this tutorial, you will learn how it works and how you can deploy it effortlessly using Koyeb.
Requirements
To successfully follow and complete this tutorial, you need:
- Python >= 3.9 installed on your local development environment.
- Gradio >= 4.0.0 installed on your local development environment.
- The
gradio[mcp]plugin package. - The
psycopg2-binary >= 2.9.0package. - A Koyeb account to deploy the optimized Flux model.
- The Koyeb CLI installed to interact with Koyeb from the command line.
You can find the full repo at https://github.com/koyeb/example-gradio-mcp-servers-postgres.
Steps
To successfully follow along with this tutorial, you will need to follow these steps:
- Create and deploy a PostgreSQL database
- Build the Gradio interface
- Deploy on Koyeb
- Test the MCP server
What is MCP?
LLMs have become increasingly accurate and versatile, but they still face two major limitations:
- They can't reason over data they haven't seen.
- They can't take direct action.
This is where the Model Context Protocol (MCP) comes in. Released by Anthropic, MCP aims to become the universal standard for enabling LLMs to communicate with external data sources.
Think of it like the web: you have a client and a server communicating via HTTP. With MCP, you have an MCP client making requests to an MCP server to overcome those two limitations above with three key components:
-
Tools – Actions that your MCP server exposes to enhance the model’s capabilities:
- Calculator
- Email sender
- Embedding generator
-
Resources – Contextual data that the model can reason over:
- Real-time weather
- Your personal data
-
Prompts – Predefined templates to guide the model in specific tasks:
- Q&A
- Guidelines
- Formatting
Your MCP client expects a single entry point that allows it to discover what your server is exposing.
Here is a typical configuration in Claude Desktop might look like this:
{
  "mcpServers": {
    "gradio": {
      "url": "http://<YOUR_SERVER>/gradio_api/mcp/sse"
    }
  }
}
The MCP library you use generates a standardized “documentation” about the tools and resources that you expose. The model retrieves it when connecting to the endpoint you defined,/sse with Gradio. That’s how the client interacts with your server. More about the transport layer.
Now, here’s where Gradio shines! They’ve recently released a feature that abstracts all the complexity behind a simple interface: You can turn any Gradio app into an MCP server with a single line of code:
demo.launch(mcp_server=True)
In this tutorial, we’ll use this feature to build a simple PostgreSQL connector, that allow you to interact in natural language with your favorite DB, we'll add some tools to specify it for data analysis.
Create and Deploy a PostgreSQL Database
In this tutorial, we will use a sample from the well-known H&M dataset on Kaggle. It's a great example of a real-world transactional database, the kind you’d often want an MCP connector to quickly explore and analyze. That said, since the approach we’re using is flexible, so you’ll be able to connect to any PostgreSQL database you want to interact with via natural language.
The dataset includes three CSV files:
- customers.csv
- articles.csv
- transactions.csv
You can use the following schema to load the data into your PostgreSQL instance:
DROP TABLE IF EXISTS transactions;

DROP TABLE IF EXISTS articles;

DROP TABLE IF EXISTS customers;

-- Create the customers table
CREATE TABLE customers (
	customer_id TEXT PRIMARY KEY,
	FN FLOAT,
	active BOOLEAN,
	club_member_status TEXT,
	fashion_news_frequency TEXT,
	age INTEGER,
	postal_code TEXT
);

-- Create the articles table
CREATE TABLE articles (
	article_id TEXT PRIMARY KEY,
	product_code TEXT,
	prod_name TEXT,
	product_type_no INTEGER,
	product_type_name TEXT,
	product_group_name TEXT,
	graphical_appearance_no INTEGER,
	graphical_appearance_name TEXT,
	colour_group_code TEXT,
	colour_group_name TEXT,
	perceived_colour_value_id INTEGER,
	perceived_colour_value_name TEXT,
	perceived_colour_master_id INTEGER,
	perceived_colour_master_name TEXT,
	department_no INTEGER,
	department_name TEXT,
	index_code TEXT,
	index_name TEXT,
	index_group_no INTEGER,
	index_group_name TEXT,
	section_no INTEGER,
	section_name TEXT,
	garment_group_no INTEGER,
	garment_group_name TEXT,
	detail_desc TEXT
);

-- Create the transactions table
CREATE TABLE transactions (
	transaction_date DATE,
	customer_id TEXT REFERENCES customers(customer_id),
	article_id TEXT REFERENCES articles(article_id),
	price NUMERIC(10, 6),
	sales_channel_id INTEGER
);

-- Indexes to speed up queries
CREATE INDEX idx_transactions_customer_id ON transactions(customer_id);
CREATE INDEX idx_transactions_article_id ON transactions(article_id);
CREATE INDEX idx_transactions_date ON transactions(transaction_date);

COMMENT ON TABLE customers IS 'Stores customer information such as unique ID, demographics (age, postal code), and marketing preferences (club membership status, fashion news subscription, and a float feature FN).';

COMMENT ON TABLE articles IS 'Holds metadata for clothing items and fashion articles, including product codes, names, type and group information, color and appearance attributes, and other classification details.';

COMMENT ON TABLE transactions IS 'Records customer transactions, linking a customer and an article with the date of purchase, price paid, and sales channel used.';
This SQL snippet sets up three core tables - customers, articles, and transactions - to mirror the structure of the H&M dataset.
Each table maps directly to one of the provided CSVs, preserving key relationships like customer purchases and article metadata (product_type_no, product_group_name …).
Finally, the snippet creates indexes on the tables to speed up queries (important if you are going to load the entire dataset) and attaches a comment to describe each of them.
The schema is intentionally simple and flat to keep queries fast and easy to write.
To run the migration, you'll just have to connect to your Postgres instance using your favorite client, check out how to do it with psql in the section below.
Here is what your database schema will look like:

Deploy the Database on Koyeb
We have our database migrations ready, now we want to deploy the database itself. For this, we'll use the Koyeb CLI to do it in just one command.
With Koyeb we can create a PostgreSQL database like so:
koyeb databases create koyeb-gradio-mcp --app koyeb-gradio-mcp \
                                        --db-name hAndMdb \
                                        --db-owner admin \
                                        --instance-type small \
                                        --pg-version 17
Our database is ready to accept connection. You can test that its working using the following command:
>> koyeb database get <YOUR_DB_ID> # this will output your database connection string
>> psql <YOUR_DB_CONNECTION_STRING>
Then, in the prompt run:
hAndMdb=# SELECT datname FROM pg_database WHERE datistemplate = false;
datname
----------
 postgres
 hAndMdb -- our database
(2 rows)
Voila ! Those commands allow you to spin up a fully functional PostgreSQL instance on Koyeb and confirm that it's ready to accept connections.
The next step is to initialize the database structure using our migration files and then load in the data from the H&M dataset.
Migrations
Next, migrate both the schema and the data. For the schema, we’re using the default public schema.
You can simply use psql with the -f option to apply your SQL migration files, like so:
psql <YOUR DATABASE_CONNECTION_STRING> -f database/00_init.sql
psql <YOUR DATABASE_CONNECTION_STRING> -f database/01_comment_tables.sql
In the repository of the article, you can look at the database/run_migration.py script. It uses psycopg2 to connect to the DB and run all migrations in a given folder. It also creates a table migrations that keep tracks of previous migrations. It's handy, so feel free to use it.
Finally, to populate the database with the H&M dataset (or any dataset you'd like), you can use your preferred method.
For this example, I've provided a script: database/populate_db.py:
# Load environment variables from .env file
load_dotenv()

# Fetch environment variables
DB_NAME = os.getenv("DB_NAME")
DB_USER = os.getenv("POSTGRES_USER")
DB_PASSWORD = os.getenv("POSTGRES_PASSWORD")
DB_HOST = os.getenv("DB_HOST")
DB_PORT = os.getenv("DB_PORT", 5432)

#
# SEE REPO FOR IMPLEMENTATION DETAILS
#

if __name__ == "__main__":
	try:
		customers_df = load_customers('./customers_df_filtered.csv')
		articles_df = load_articles('./articles.csv')
		transactions_df = load_transactions('./transaction_sample.csv')

		connection = connect_to_db()

		for df, table in [
			(customers_df, "customers"),
			(articles_df, "articles"),
			(transactions_df, "transactions")
		]:

			expected_columns = get_table_columns(connection, table)
			assert check_columns_in_df(df, expected_columns), f"DataFrame columns do not match for table {table}"
			print(f"Starting to insert into {table} ({len(df)} rows)...")
			insert_df_to_db(df, connection, table)
		print("DONE")
	except Exception as e:
		print(f"Migration failed: {e}")
To keep this article concise, I didn’t include the full script here, but you can find it in the repo under database/populate_db.py.
The script handles a few key steps: it loads environment variables, connects to your PostgreSQL database, reads the CSVs into Pandas DataFrames, and applies light preprocessing (like renaming columns, filling missing values, and formatting dates).
Before inserting, it checks that the columns match the table definitions, then batches the data into efficient inserts with some fallback handling for edge cases.
It’s a practical, flexible way to populate your tables safely, feel free to reuse or adapt it.
To use it, you'll just need to provide the DB credentials in a .env like so:
DB_HOST=<YOUR_URL>
POSTGRES_USER=<YOUR_USER>
POSTGRES_PASSWORD=<YOUR_PSWD>
DB_NAME=<YOUR_DBNAME>
Also, make sure that your dataset files are in the same directory as the populate_db.py script if you want it to work out of the box. Like so:
>> tree database
database
├── articles.csv # dataset file
├── customers.csv # dataset file
├── transactions.csv # dataset file
├── populate_db.py # data loader script
├── sample_transaction.ipynb # script to sample the dataset
Note: The H&M dataset is quite large (around 3GB), so loading it into the database may take some time.
If you want to explore or test on a smaller subset, check out the database/sample_transaction.ipynb script — it lets you sample the three CSV files based on a specified fraction and automatically cleans the customers and articles files to match the sampled transactions.
While the populate script runs, you’ll receive progress updates every 5 seconds to track the insertion process.
Once done, you can verify that everything worked with a simple query:
SELECT count(*) FROM transactions;
Depending on your sample size, you should get something like:
  count
---------
 4768249
(1 row)`
Build the Gradio Interface
Gradio is best known for providing a simple interface tool to test and monitor your ML models.
It offers many features and components you can use to build various applications, but the typical workflow looks like this:
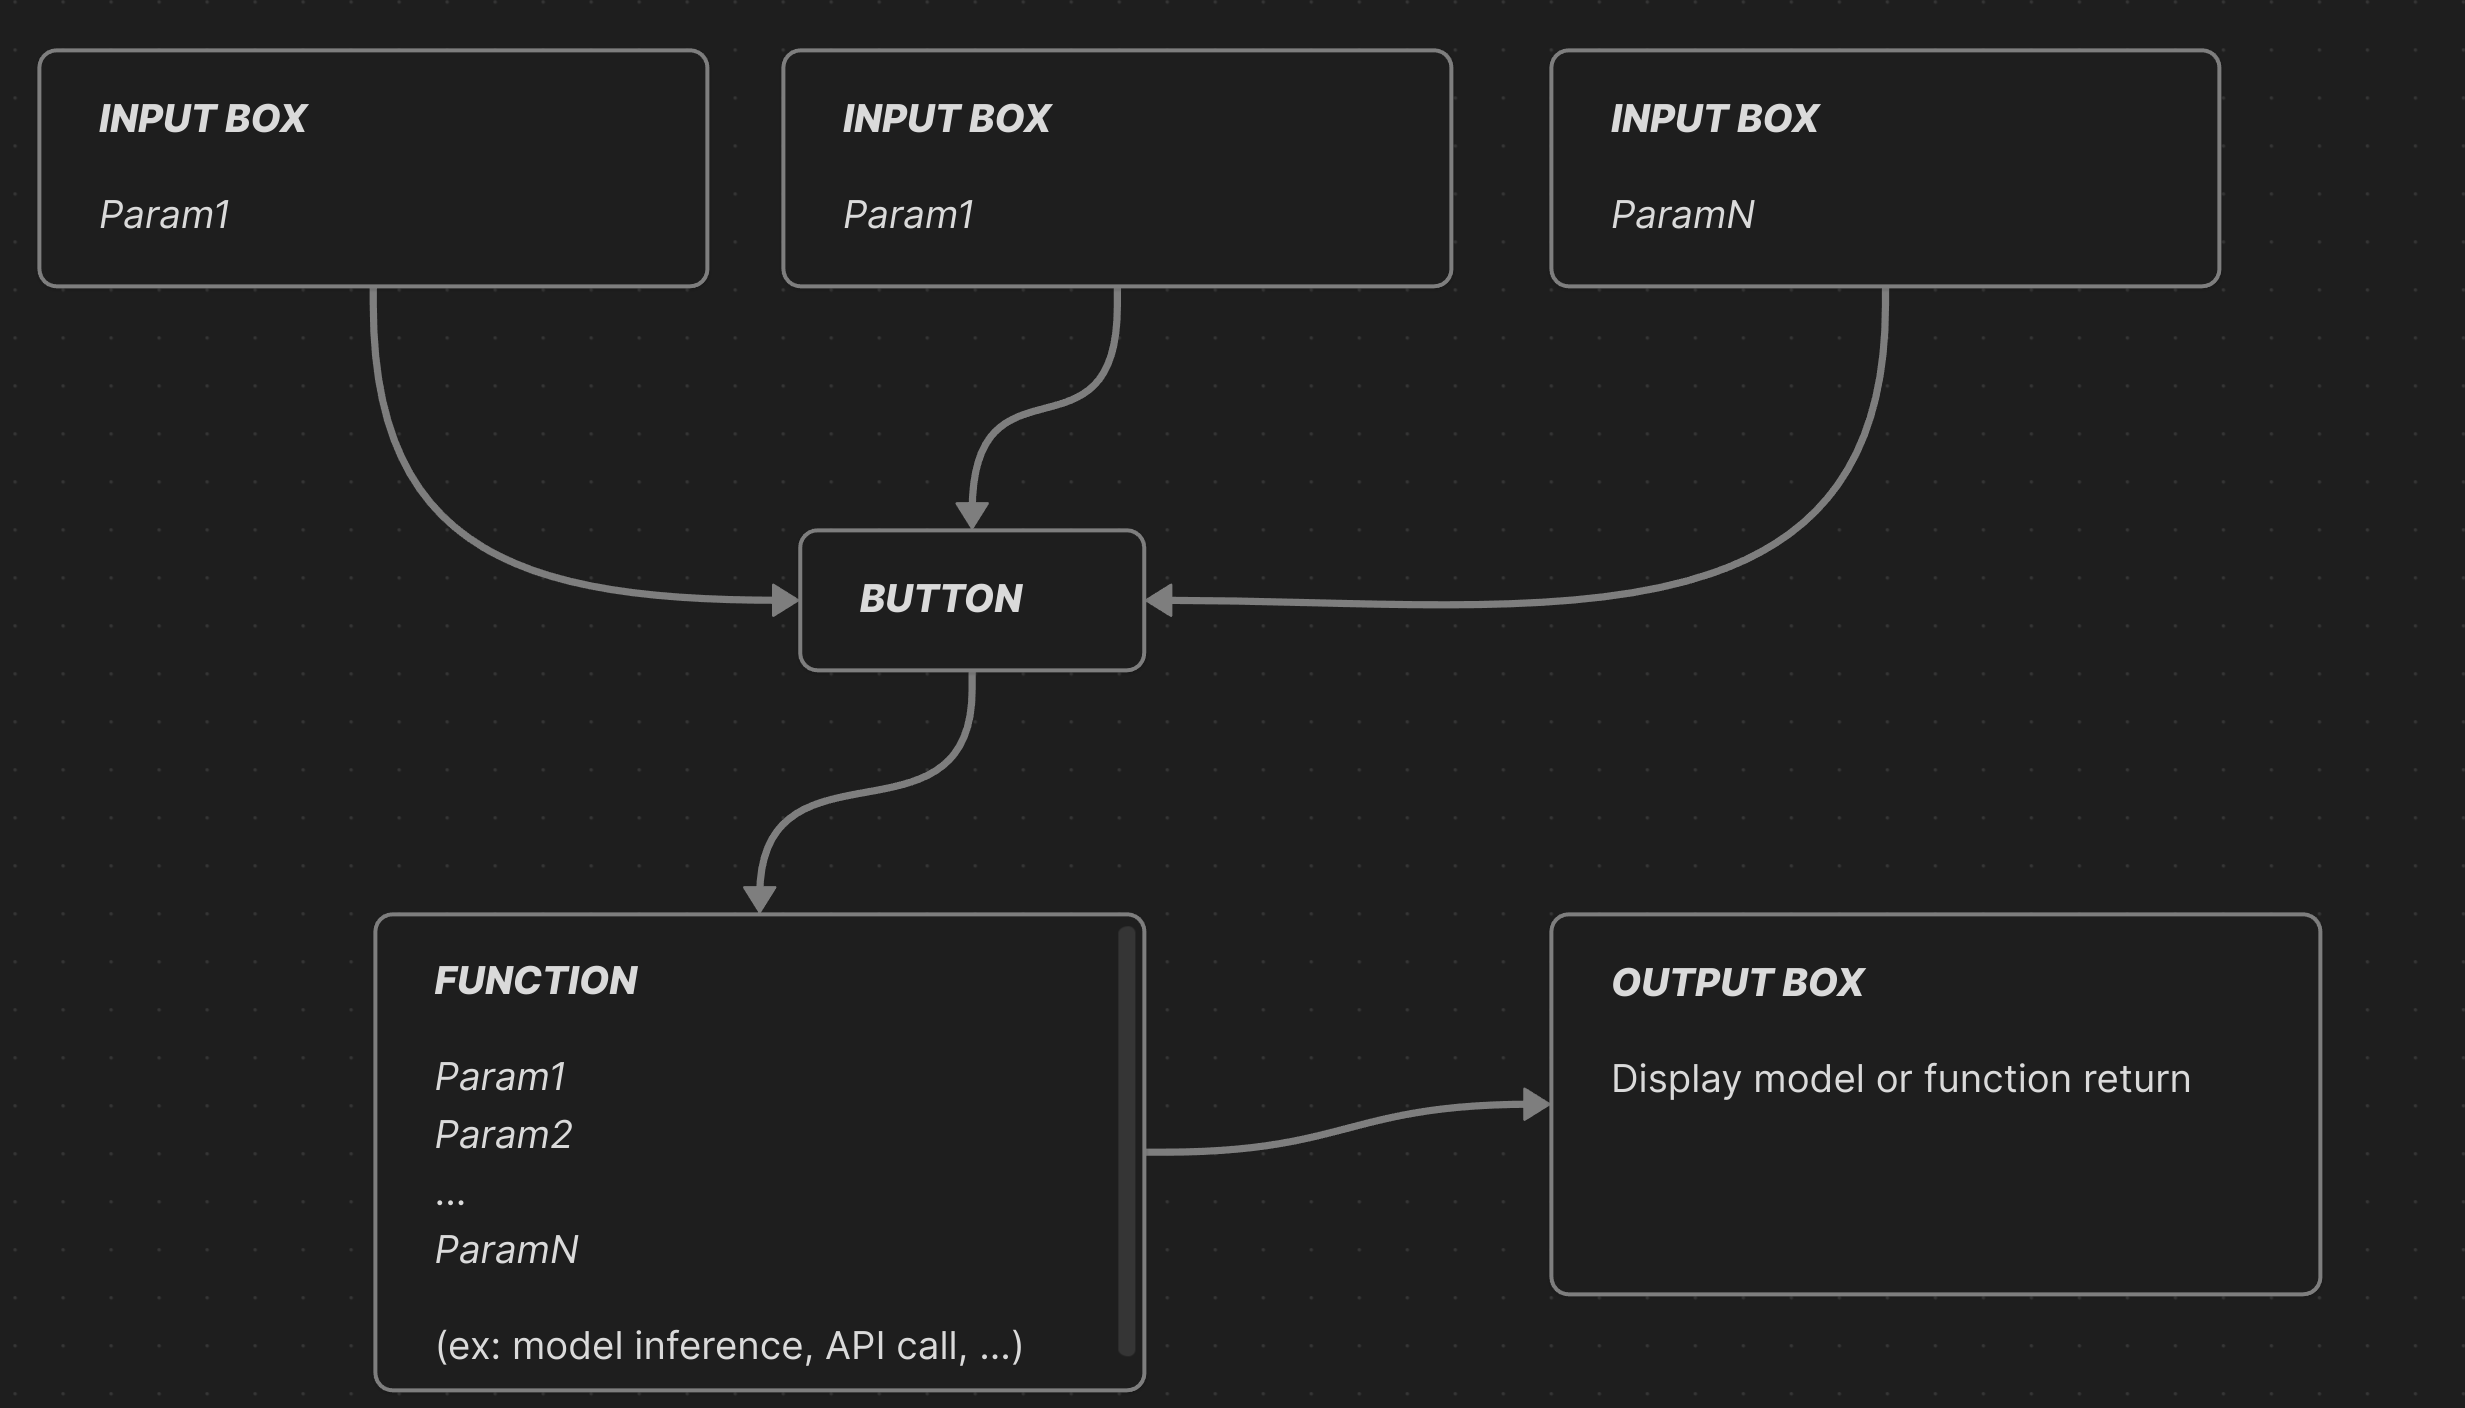
With a few details aside, this is the exact same workflow we need to follow to comply with the MCP specifications, and that's exactly what Gradio has done.
Each input box becomes an MCP-compliant entry point, each function becomes a tool (I don't think they're currently distinguishing between resources, tools, and prompts), and the output box content is returned directly to the MCP client!
This way, you can focus entirely on your application logic and tool development.
First, let's build our PostgreSQL connecter. In /database_connector.py:
from typing import Dict, Any, Optional
import psycopg2
import os


class DatabaseInterface:
	def __init__(self, db_config: Optional[Dict[str, Any]] = None):
		if db_config:
			self.db_config = db_config
		else:
			# Fallback to environment variables
			self.db_config = {
				'host': os.getenv('DB_HOST'),
				'port': int(os.getenv('DB_PORT', 5432)),
				'database': os.getenv('DB_NAME'),
				'user': os.getenv('DB_USER'),
				'password': os.getenv('DB_PASSWORD')
			}
		# Validate configuration
		required_fields = ['host', 'database', 'user', 'password']
		missing_fields = [field for field in required_fields if not self.db_config.get(field)]
		if missing_fields:
			raise ValueError(f"Missing required database configuration: {missing_fields}")

	def get_db_connection(self):
		"""Create database connection with error handling"""
		try:
			return psycopg2.connect(**self.db_config)
		except psycopg2.Error as e:
			raise ConnectionError(f"Failed to connect to database: {str(e)}")
The DatabaseInterface class will be our main way to connect to Postgres and abstract away connection logic and error handling.
- If a config is passed, it uses that; otherwise, it falls back to environment variables.
- It validates that all required fields are present and raises a
ValueErrorif any are missing. get_db_connection()attempts to connect and raises a clear error if it fails.
All subsequent database operations exposed by your server will go through this interface.
Proper error handling is key here, it allows the model to understand what went wrong and adapt its next call accordingly.
In /app.py:
from database_connector import DatabaseInterface
import gradio as gr

def setup_database_connection(host: str, port: str, database: str, user: str, password: str):
	"""Setup database connection with user-provided configuration"""
	global db_interface, db_connection_status
	if not all([host.strip(), port.strip(), database.strip(), user.strip(), password.strip()]):
		db_connection_status = "❌ All fields are required"
		return db_connection_status, False

	try:
		db_config = {
			'host': host.strip(),
			'port': int(port.strip()),
			'database': database.strip(),
			'user': user.strip(),
			'password': password.strip()
		}
		# Test connection
		test_interface = DatabaseInterface(db_config)
		test_connection = test_interface.get_db_connection()
		test_connection.close()
		# If successful, set global interface
		db_interface = test_interface
		db_connection_status = f"✅ Connected to {database} at {host}:{port}"
		return db_connection_status, True
	except ValueError:
		db_connection_status = "❌ Port must be a valid number"
		return db_connection_status, False

	except Exception as e:
		db_connection_status = f"❌ Connection failed: {str(e)}"
		return db_connection_status, False

def handle_connection(host: str, port: int, database, user, password):
	"""
	this function allow you to connect to the Database using the provided credentials:
	the paramters are the following:
	Args:
	host (str): the given address.
	port (int): the connection port
	database (str): the name of the database
	user (str): the user
	password (str): the password
	"""
	status, success = setup_database_connection(host, port, database, user, password)
	return status
The app.py file that contains the Gradio interface:
- Functions:
setup_database_connection()andhandle_connection() - Inputs:
host_input,port_input,database_input,user_input,password_input - Button:
connect_button
The handle_connection function takes database credentials as input and calls setup_database_connection, which initializes the db_interface singleton.
This interface is what your MCP client will use to connect to the database using those credentials.
The handle_connection function helps the client understand what this tool is doing.
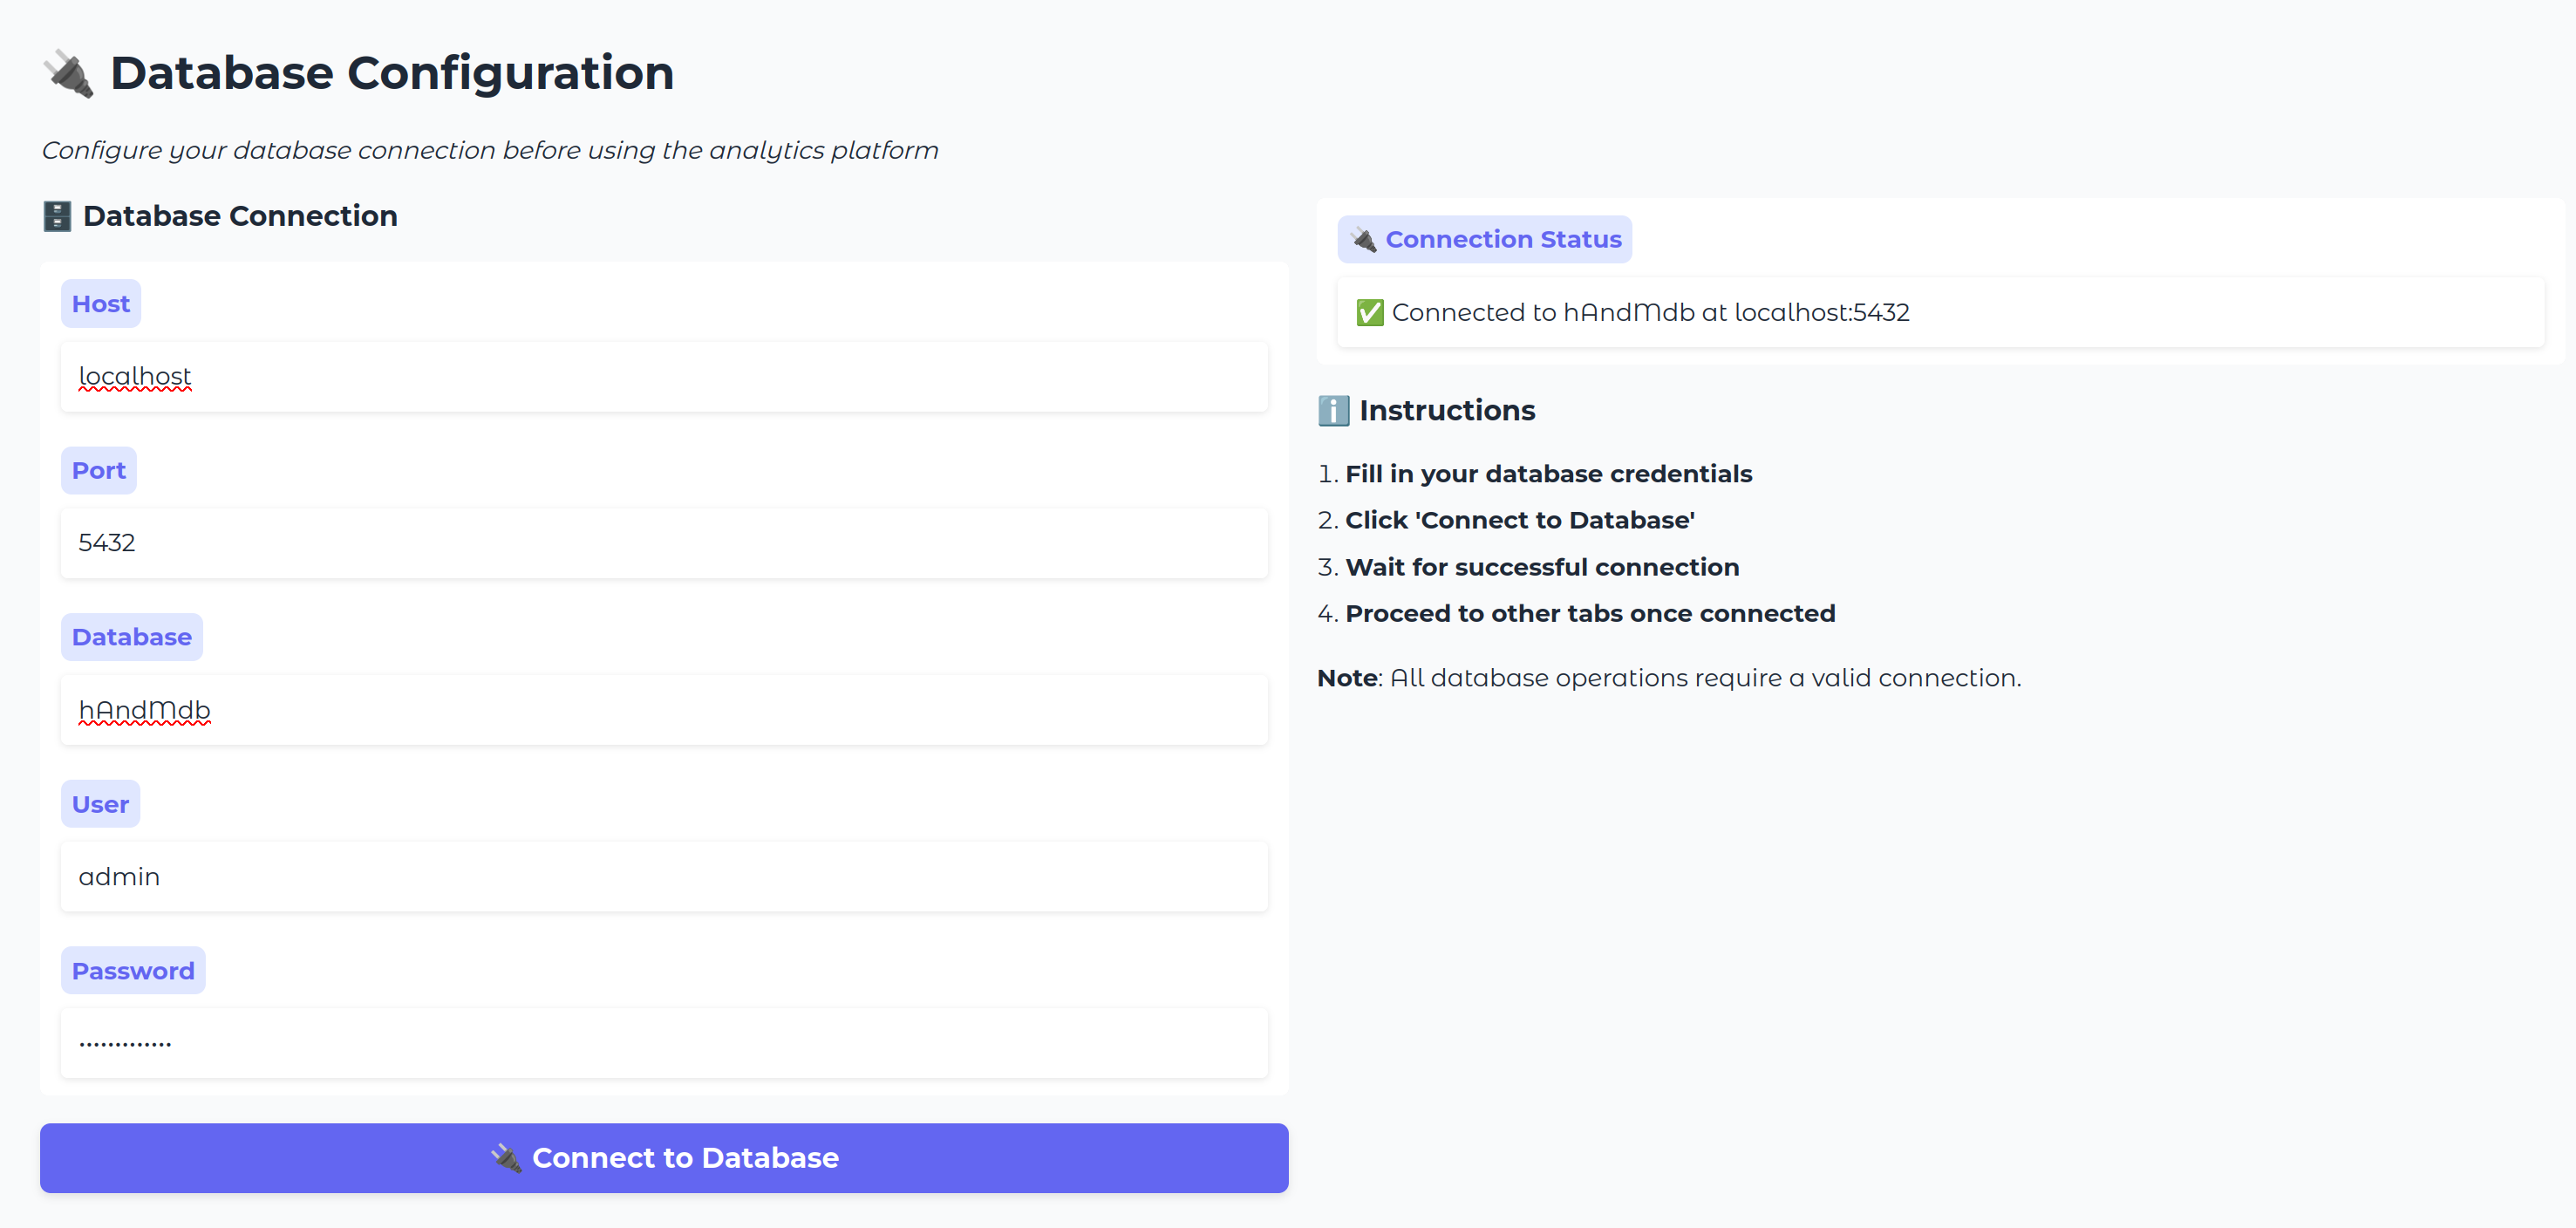
# Creating TAB 1: Database Configuration

with gr.Blocks(title="Database Configuration") as tab1:
	gr.Markdown("# 🔌 Database Configuration")
	gr.Markdown("*Configure your database connection before using the analytics platform*")

	with gr.Row():
		with gr.Column(scale=1):
			gr.Markdown("### 🗄️ Database Connection")
			host_input = gr.Textbox(label="Host", placeholder="database.example.com", value="")
			port_input = gr.Textbox(label="Port", placeholder="5432", value="")
			database_input = gr.Textbox(label="Database", placeholder="my_database", value="")
			user_input = gr.Textbox(label="User", placeholder="db_user", value="")
			password_input = gr.Textbox(label="Password", type="password", placeholder="••••••••", value="")
			connect_btn = gr.Button("🔌 Connect to Database", variant="primary")

		with gr.Column(scale=1):

			connection_status = gr.Textbox(label="🔌 Connection Status", value=db_connection_status, interactive=False)
			gr.Markdown("### ℹ️ Instructions")
			gr.Markdown("""
				1. **Fill in your database credentials**
				2. **Click 'Connect to Database'**
				3. **Wait for successful connection**
				4. **Proceed to other tabs once connected**
				**Note**: All database operations require a valid connection.
				""")

	connect_btn.click(
		handle_connection,
		inputs=[host_input, port_input, database_input, user_input, password_input],
		outputs=connection_status)
By linking your function handle_connection to the inputs (your database credentials) and finally to the connect_btn trigger, Gradio automatically parses it as an MCP-compatible tool.
This is thanks to how Gradio structures its apps, every function tied to a UI component through .click() or similar methods becomes an exposed API endpoint behind the scenes.
Gradio handles the input/output bindings and serializes them into a standard format (typically JSON) which makes them easily callable via HTTP or, in the case of MCP, by the model itself. Inputs like Textbox map directly to parameters, and Gradio routes the values to your Python function when the button is triggered.
In this case, everything is wired together using the connect_btn.click event:
connect_btn.click(
	handle_connection,
	inputs=[host_input, port_input, database_input, user_input, password_input],
	outputs=connection_status
)
You now have an MCP server capable of connecting to a PostgreSQL database.
Test the server locally
To make sure everything is running as expected, you can run your server locally:
# Create the TabbedInterface
interface = gr.TabbedInterface(
	[tab0, tab1, tab2, tab3, tab4],
	tab_names=["Welcome","🔌 Database Setup", "🗄️ Database Operations", "📊 Statistical Analysis", "📊 MCP client guidelines"],
	title="Postgres Database Analytics MCP Server",
	theme=gr.themes.Soft()
)

# Launch the app
if __name__ == "__main__":
	print("🚀 Starting Database Analytics MCP Server...")
	print(f"🌐 Dashboard: http://localhost:7860")
	interface.launch(server_name="0.0.0.0", server_port=7860, mcp_server=True)
Note: You can adapt the code, as for now we only have the tab1 for the database connection. In the terminal, run:
python app.py
If you navigate to localhost:7860, you can directly test our server through the Gradio interface:
Now, by clicking the Use via API or MCP button at the bottom center of the page, you can directly monitor your server, see which functions are exposed, and check if they are properly described.
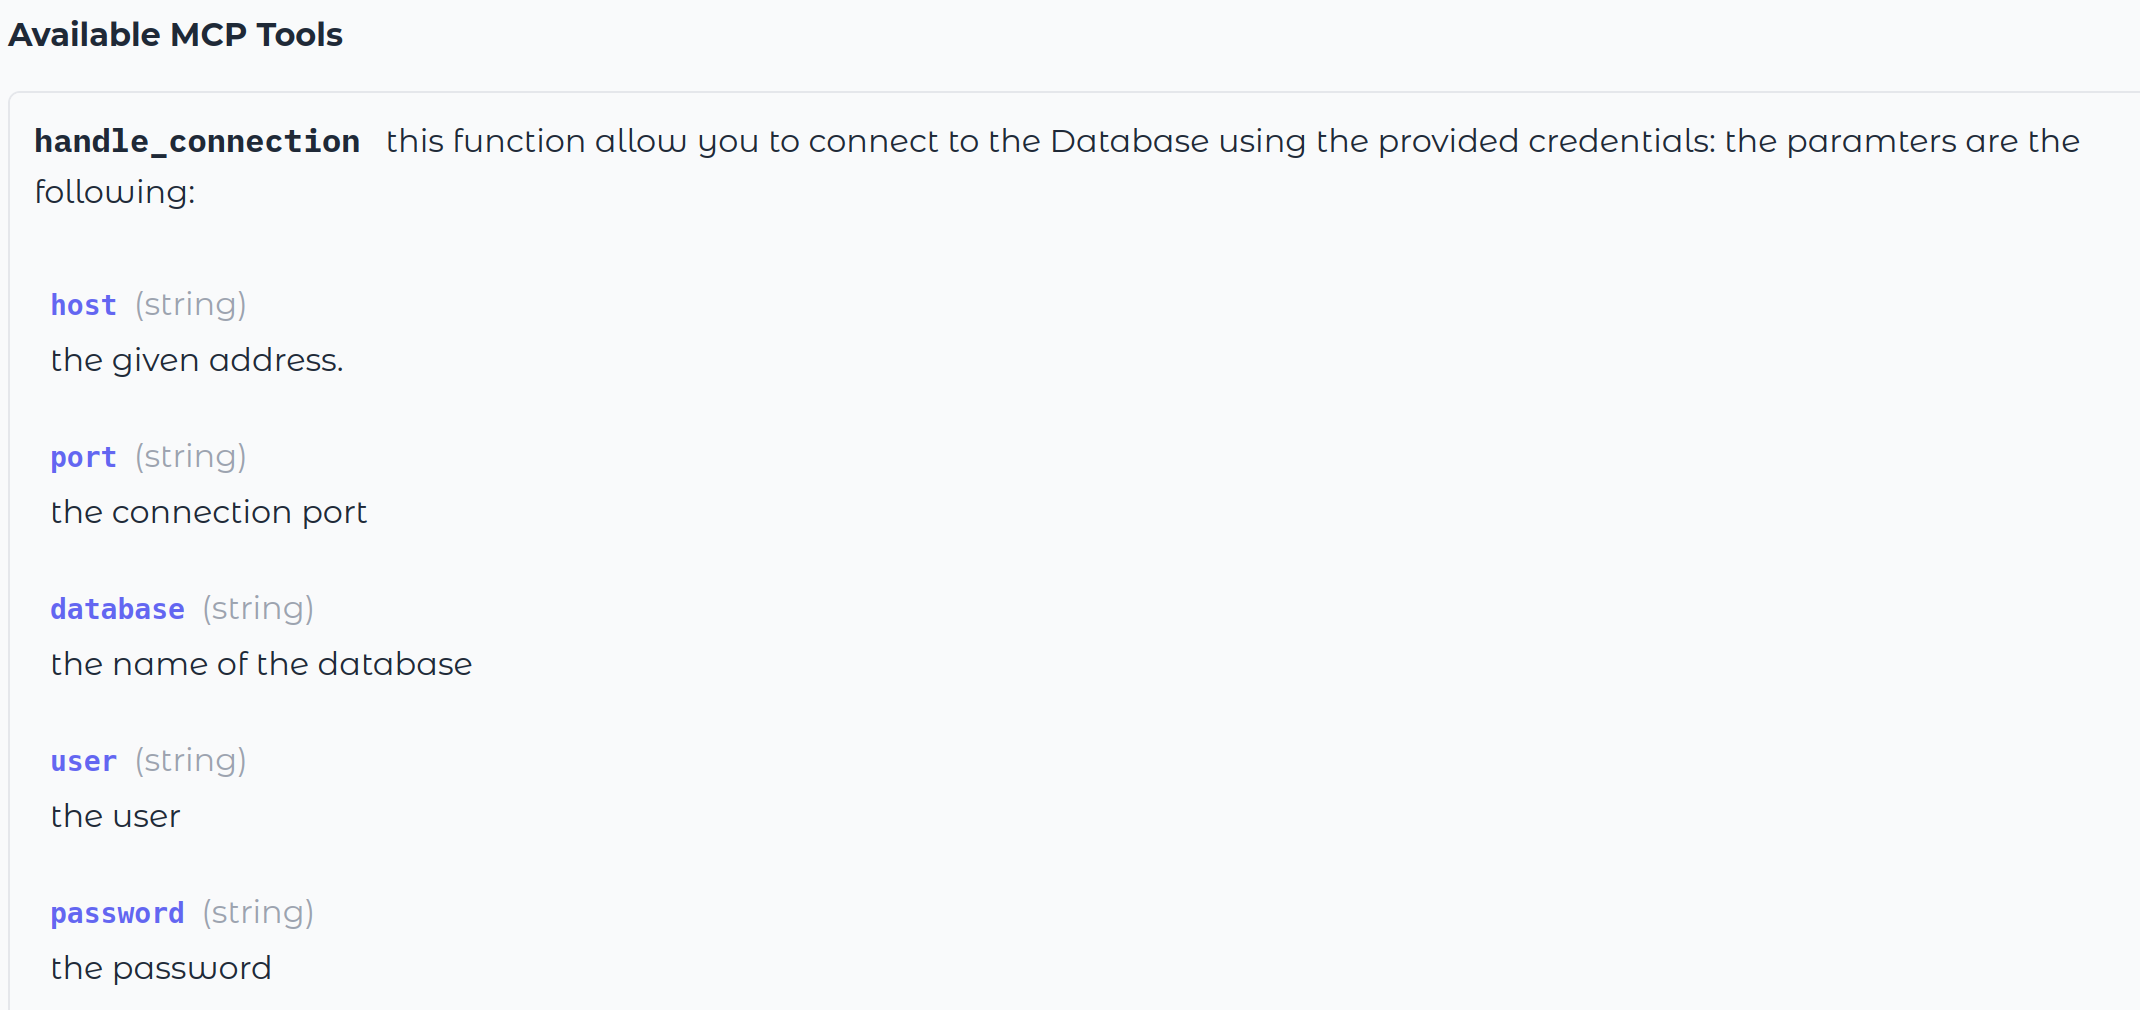
Gradio automatically parses the doc-strings and parameter types of functions to pass to your model when it makes the first connection.
Following this pattern, let’s give the client the ability to understand our database autonomously. The idea is to expose a set of introspection or metadata queries to help the client discover the database structure, so it can decide the best queries to write based on our prompts.
This is also an easy way to restrict the client and limit its scope of action.
For that, here are five queries:
list_database_infos.sql— Lists databases (name and description)list_schema.sql— Lists the available schemas in the databaselist_tables_in_schema.sql— Lists the tables and their properties for a given schemalist_columns_in_table.sql— Lists columns and their properties for a given tablelist_extensions.sql— Lists available extensions
Here are two examples, but you can find them all under the sql/ folder in the repository.
-- sql/list_schemas.sql
-- List all non-system schemas in the database
-- Returns a JSON array of schema objects

WITH schemas AS (
	SELECT
		schema_name,
		obj_description(pg_namespace.oid) as description
	FROM information_schema.schemata
	JOIN pg_namespace ON pg_namespace.nspname = schema_name
	WHERE
		schema_name NOT IN ('pg_catalog', 'information_schema', 'pg_toast')
		AND schema_name NOT LIKE 'pg_%'
	ORDER BY schema_name
)
SELECT jsonb_build_object(
	'schemas',
	jsonb_agg(
		jsonb_build_object(
		'name', schema_name,
		'description', description
		)
	)
) AS schema_list
FROM schemas;
-- server/resources/sql/list_tables_in_schema.sql
-- Returns all user-defined tables in a given schema with their descriptions as JSON
-- Uses a parameter :schema_name

WITH tables AS (
	SELECT
		table_name,
		obj_description(('"' || table_schema || '"."' || table_name || '"')::regclass) AS description
	FROM information_schema.tables
	WHERE table_schema = %(schema_name)s
		AND table_type = 'BASE TABLE'
	ORDER BY table_name
)
SELECT jsonb_build_object(
	'tables',
	jsonb_agg(
		jsonb_build_object(
			'name', table_name,
			'description', description
		)
	)
) AS table_list
FROM tables;
These two SQL queries return structured information from a PostgreSQL database in JSON format:
list_schemas.sqllists all non-system schemas, along with their descriptions.list_tables_in_schema.sqllists all user-defined tables in a given schema, also with their descriptions.
Both return a nicely formatted JSON object that will be easily understandable by the MCP client.
As you can see, this provides a clean way to control what the client can see, you can easily include or exclude specific schemas or tables directly in the query, ensuring sensitive structures are never exposed.
From there, we repeat the previous workflow in database_connector.py:
class DatabaseInterface():
	# see code above
	... the __init__
	##
	def list_database_info(self):
		sql_path = Path(LIST_DATABASE_INFOS)
		with sql_path.open("r", encoding="utf-8") as f:
			query = f.read()
		conn = self.get_db_connection()
		try:
			with conn.cursor() as cur:
				cur.execute(query)
				result = cur.fetchone()[0] # JSON object
				return result
		finally:
			conn.close()


	def list_schemas(self):
		sql_path = Path(LIST_SCHEMA)
		with sql_path.open("r", encoding="utf-8") as f:
			query = f.read()
		conn = self.get_db_connection()
		try:
			with conn.cursor() as cur:
				cur.execute(query)
				result = cur.fetchone()[0] # JSON object
				return result
		finally:
			conn.close()

	def list_tables_in_schema(self, schema_name: str):
		sql_path = Path(TABLE_IN_SCHEMA)
		with sql_path.open("r", encoding="utf-8") as f:
			query = f.read()
		conn = self.get_db_connection()
		try:
			with conn.cursor() as cur:
				cur.execute(query, {'schema_name': schema_name})
				result = cur.fetchone()[0] # JSON object
				return result
		finally:
			conn.close()
In the DatabaseInterface, we provide one method per query that simply runs the query using psycopg2 and returns the result.
In the app.py file, you can now add a new tab to expose these tools:
def get_db_infos():
	"""### `get_db_infos()`
	-> database name and description
	"""
	connected, status = check_db_connection()
	if not connected:
		return status
	return db_interface.list_database_info()

def get_schemas():
	"""### `get_schemas()`
	-> list availables schemas in the database
	"""
	connected, status = check_db_connection()
	if not connected:
		return status
	return db_interface.list_schemas()

def get_list_of_tables_in_schema(schema:str):
	"""### `get_list_of_tables_in_schema(schema_name: str)`
	Args:
	schema (str): the schema you want to discover tables for.
	"""
	connected, status = check_db_connection()
	if not connected:
		return status
	return db_interface.list_tables_in_schema(schema)
In app.py, add Gradio components:
# TAB 2: Database Operations
with gr.Blocks(title="Database Operations") as tab2:
	gr.Markdown("# 🗄️ Database Operations")
	gr.Markdown("*Explore database schema, tables, and run queries*")
	with gr.Row():
		with gr.Column(scale=1):
			gr.Markdown("### 🗄️ Database Schema")
			discover_btn = gr.Button("📋 Get Schemas", variant="primary")
			database_info_btn = gr.Button("ℹ️ Get Database Info", variant="secondary")
			get_extension_btn = gr.Button("ℹ️ Get Database Extensions", variant="secondary")
		with gr.Column(scale=2):
			schema_info = gr.Textbox(label="📋 Schema Information", lines=5)
			db_info = gr.Textbox(label="ℹ️ Database Information", lines=5)
			db_extensions = gr.Textbox(label="ℹ️ Database Extensions", lines=5)
	with gr.Row():
		with gr.Column(scale=1):
			gr.Markdown("### 📊 Table Explorer")
			table_in_schema_input = gr.Textbox(label="Schema Name", placeholder="public")
			table_in_schema_btn = gr.Button("Get Tables")

		with gr.Column(scale=2):
			table_in_schema = gr.Textbox(label="📊 Tables in Schema", lines=5)
Make sure to link everything in the click event:
# Event handlers for Tab 1
discover_btn.click(get_schemas, outputs=schema_info)
database_info_btn.click(get_db_infos, outputs=db_info)
get_extension_btn.click(get_availables_extensions, outputs=db_extensions)
table_in_schema_btn.click(get_list_of_tables_in_schema, inputs=table_in_schema_input, outputs=table_in_schema)
column_btn.click(get_list_of_column_in_table, inputs=[schema_input, table_input], outputs=column_output)
That's it, your client can fully discover you database properties.
Finally, we want to enable the ability to run read-only queries (at minimum). In database_connector.py:
class DatabaseInterface():
	# see code above
	... the __init__
	##
	def read_only_query(self, query):
		try:
			conn = self.get_db_connection()
			try:
				with conn.cursor() as cur:
					cur.execute("SET TRANSACTION READ ONLY")
					cur.execute(query)
					result = cur.fetchall() # JSON object
					return result
			except Exception as e:
				conn.rollback()
				return f"❌ Error creating table: {str(e)}"
			finally:
				conn.close()
		except Exception as e:
			return f"❌ Connection error: {str(e)}"
In app.py, we can add a new tab to run queries:
def run_read_only_query(query: str):
	"""### `run_read_only_query(query: str)`
	Args:
	query (str): read-only query that will be executed
	You will get the raw result following this pattern
	[(row_1_col_a, ..., row_1_col_b), (row_2_col_a, ..., row_2_col_b), ...]
	Or the sql error message if the query you wrote is not valid
	"""
	connected, status = check_db_connection()
	if not connected:
		return status
	return db_interface.read_only_query(query)
with gr.Row():
	with gr.Column(scale=1):
		gr.Markdown("### 🔍 SQL Query")
		query_input = gr.Textbox(label="SQL Query", lines=3, placeholder="SELECT * FROM customers LIMIT 10")
		query_btn = gr.Button("Execute Query", variant="primary")

with gr.Column(scale=2):
	query_output = gr.Textbox(label="🔍 Query Results", lines=8)
query_btn.click(run_read_only_query, inputs=query_input, outputs=query_output)
And that’s it! You now have a functional MCP server that can interact with any PostgreSQL database for simple analysis or query writing.
You can verify that everything is working correctly by launching your interface.
Deploy on Koyeb
Finally, we want to deploy our server. For this, we'll use the Koyeb CLI, which allows us to deploy an app directly from the project directory.
koyeb deploy . gradio-mcp-server/mcp-server -d \ # -d for debug
  --instance-type small \
  --region was \
  --type web \
  --min-scale 0 \
  --max-scale 5 \
  --autoscaling-concurrent-requests 5 \
  --archive-buildpack-run-command "python app.py"
This command deploys the MCP server to Koyeb with scale to zero and autoscaling based on concurrent requests enabled. It runs on a small instance type in the Washington, D.C. region. After a few seconds, your MCP server should be up and running.
Next, retrieve the public URL of your deployment. Run the following command in your terminal:
>> koyeb app get mcp-example-server
ID      	NAME              	STATUS 	DOMAINS                                     	CREATED AT
22284dd0	mcp-example-server	HEALTHY	["gradio-mcp-server-ed-e5f1a08a.koyeb.app"]	05 Jul 25 10:43 UTC
Next, copy the domain that ends with .koyeb.app. You can now connect to https://<REPLACE_ME>.koyeb.app and check that you can properly access the Gradio interface.
Test the MCP Server
Once the server is deployed on Koyeb, we can try it out using Claude Desktop. the result you'll get might vary a lot depending on the client you use.
Claude Desktop seem to be most easy to use with the best results.
The configuration file is located in ~/Library/Application\ Support/Claude/claude_desktop_config.json. Open the file and add the following config:
{
  "mcpServers": {
    "gradio": {
      "command": "npx",
      "args": [
        "mcp-remote",
        "https://<REPLACE_ME>.koyeb.app/gradio_api/mcp/sse",
        "--transport",
        "sse-only"
      ]
    }
  }
}
Note: You'll need Node.js for this config
Then reload Claude Desktop.
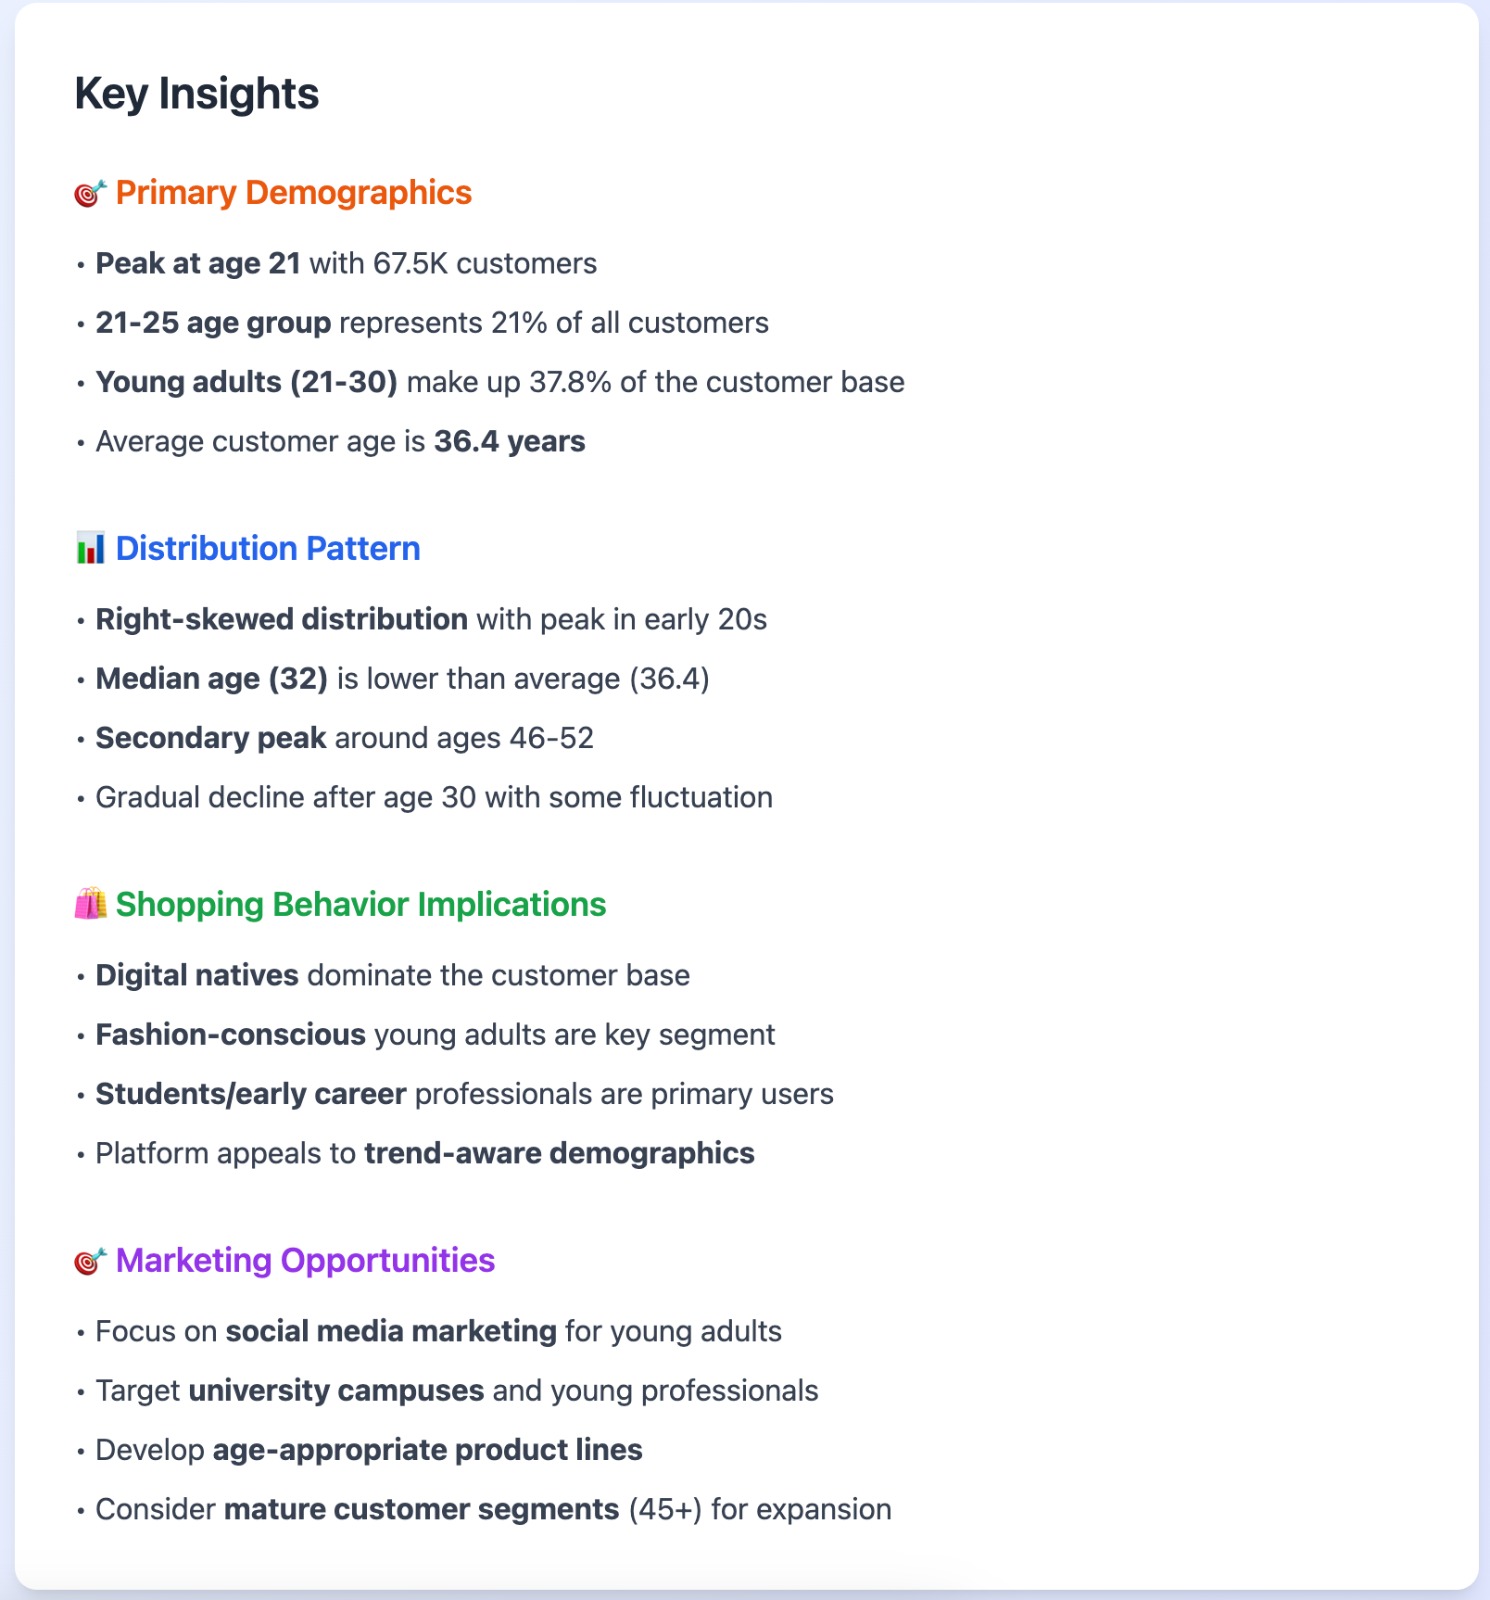
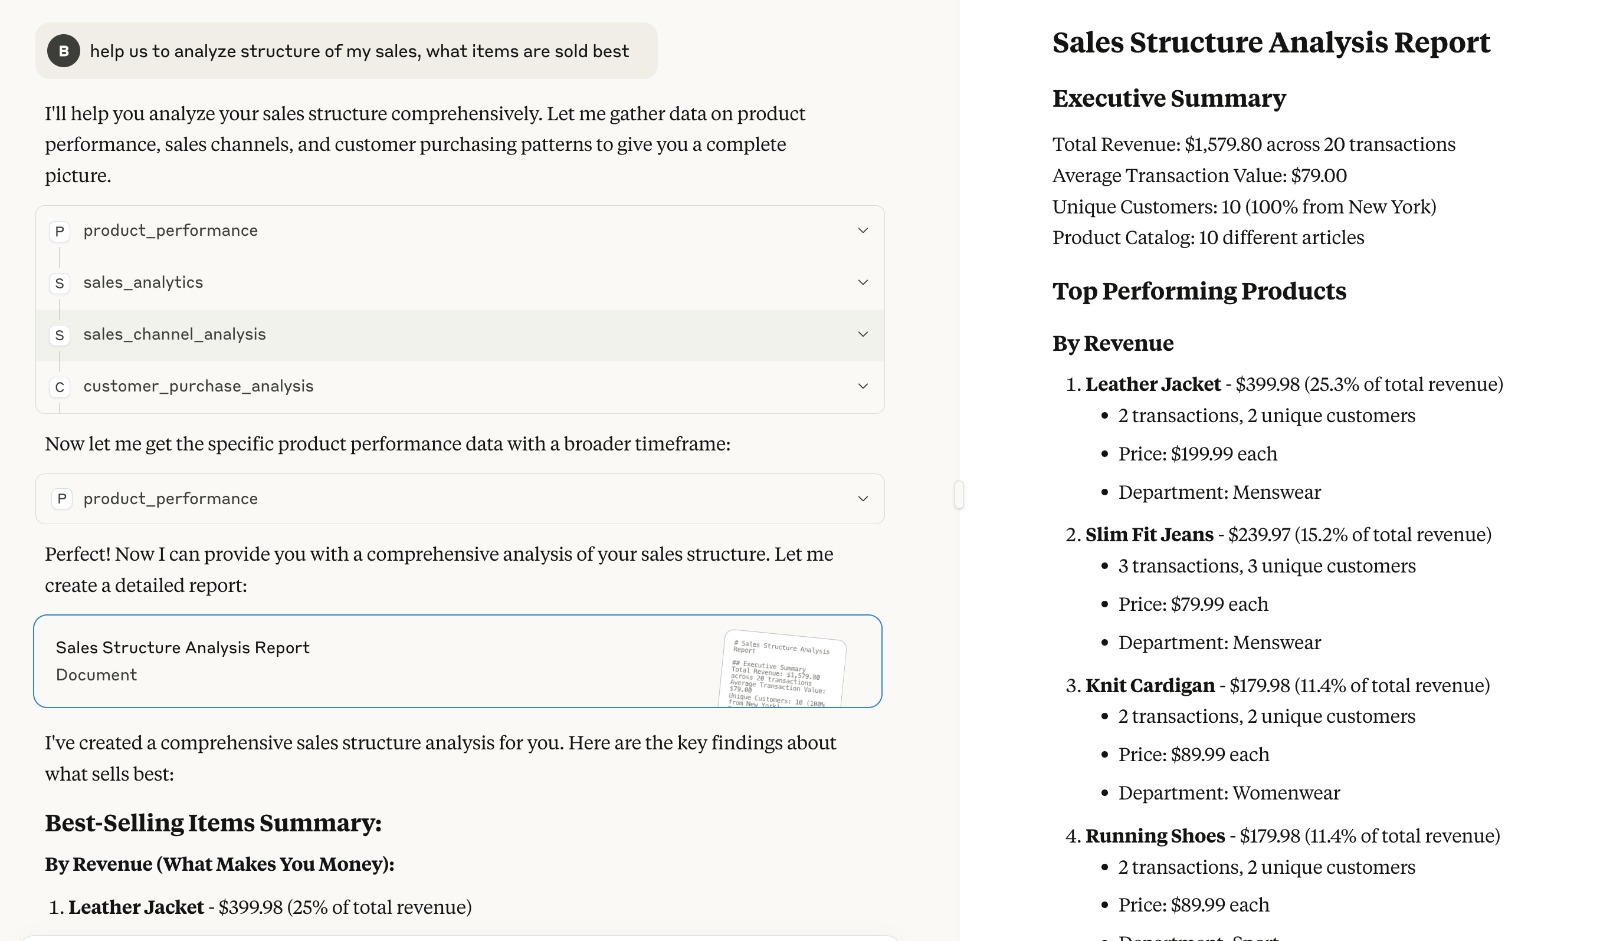
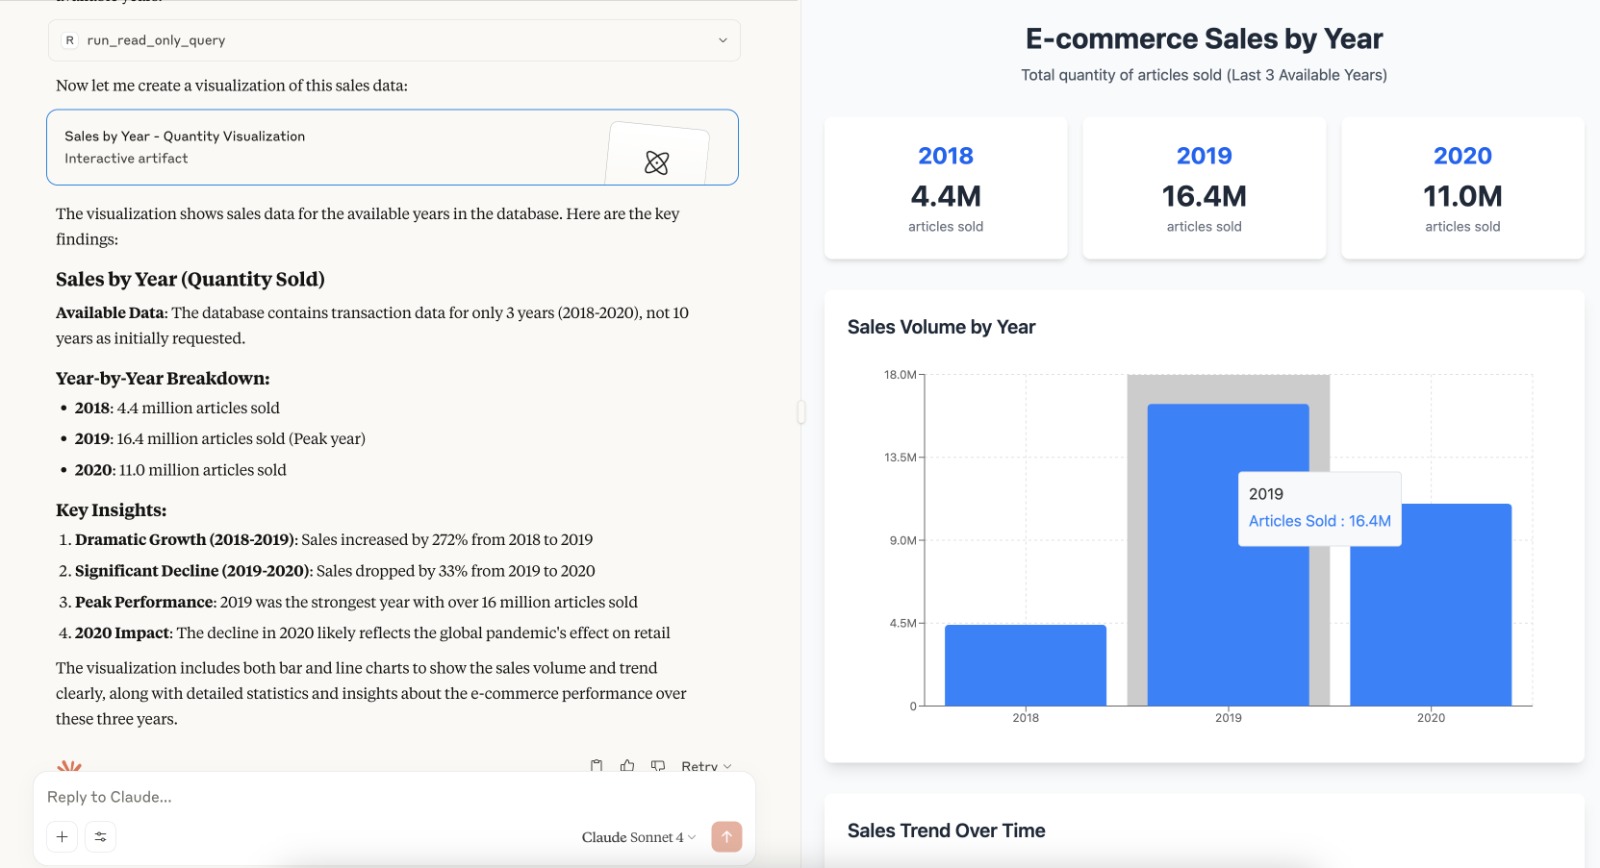
You can then ask Claude all the basic task you'll want to do with this kind of database: here is a few prompts:
- Hey claude, connect to my DB using these credentials: DB_HOST USER PASSWORD DB_NAME
- hey claude ! Discover the DB and give me key insights
- give me the distribution of customers age
- give me insight about the relation between age and product categories
- Analyse the sales volume
Here is a few screenshots of cool results:

Conclusion
Gradio’s new MCP server capability opens an exciting path for integrating natural language interfaces with structured data like PostgreSQL, with minimal setup and code (almost no code at this point). Thanks to Koyeb's cloud, deploying and running the server is seamless, making it easy to go from a local prototype to a production-ready endpoint.
Keep in mind that there are still limitations, such as the support for SSE protocol only and also the doc is still light. But we can hope the Gradio team will extend it very soon and it will become a viable way to build production MCP server.
It’s a great foundation for building intelligent, context-aware assistants that can reason, act, and adapt based on real-world data.
Further Steps could be
- Integrate authentication and differentiate content and available tools regarding profile
- Build a more flexible connector to interact seamlessly with multiple data sources (e.g., MySQL, REST APIs, CSVs)
- Integrate multiple models to expand capabilities — such as adding text-to-image generation, embedding generation, or audio processing.
If you want to explore the code in the repository, you can find it here
References: