Deploy a Rest API using Koa, Prisma, and Aiven on Koyeb
Introduction
In this tutorial, we will showcase how to build a Notes REST API using Koajs, Prisma, and Aiven on Koyeb. By running your application on Koyeb, you natively benefit from continuous deployment using git, autoscaling, autohealing, TLS encryption, a global edge network CDN, and more.
Koa is a minimalist, expressive and robust web framework for web applications and APIs. We will use Koa to build our application REST API.
Aiven is a fully-managed, multi-cloud data platform allowing you to deploy a wide range way of open-source data services and databases such as MySQL, PostgreSQL, InfluxDB, Redis, and more. We will use Aiven to provision a MySQL database and use it to store our Notes information.
Last, we will make use of Prisma, an ORM offering powerful primitive that will help us interact with the MySQL database from our application intuitively and safely.
At the end of this guide, you will have a working Notes application deployed on Koyeb using git-driven deployment.
Requirements
To successfully follow and complete this guide, you need:
- A local development environment with Node.js installed
- A Koyeb account to deploy and run the application
- An Aiven account to run the MySQL database
- A GitHub account to version and deploy your application code on Koyeb
Steps
To deploy the Rest API using Koa, Prisma, and Aiven on Koyeb, you need to follow these three steps:
- Deploy a MySQL database on Aiven
- Create the Notes REST API using Koa and Prisma
- Deploy the Notes application to Koyeb
Deploy a MySQL database on Aiven
Aiven is a fully-managed, multi-cloud data platform allowing you to deploy a wide range of open-source databases including MySQL, PostgreSQL, InfluxDB, Redis, and many more. In this guide, we will deploy a MySQL database on Aiven and use it as the data backend for our application.
Aiven provides a 1-month free trial with $300 credits to try out the platform.
On the Aiven control panel, click the Create a new service button on the top right corner. You land on the Create Service page where you need to select the service type to deploy. Select the MySQL service.
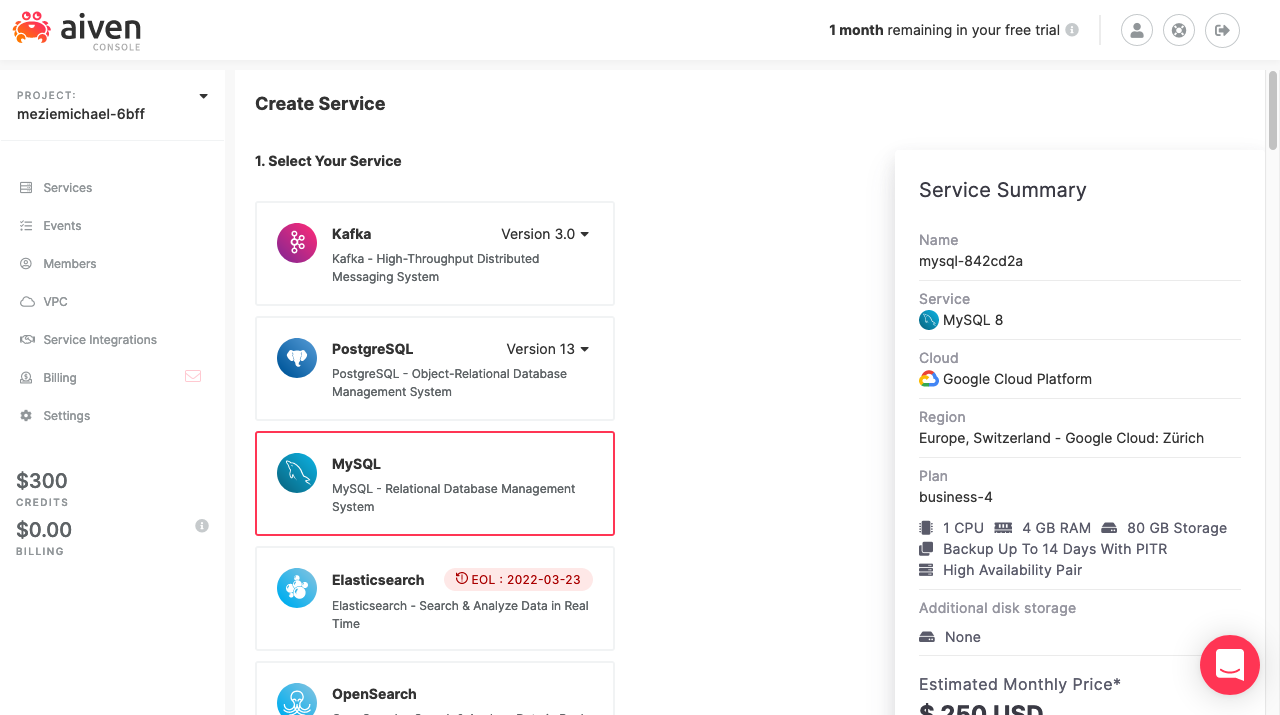
Then, select Google Cloud as the cloud service provider to run the MySQL database.
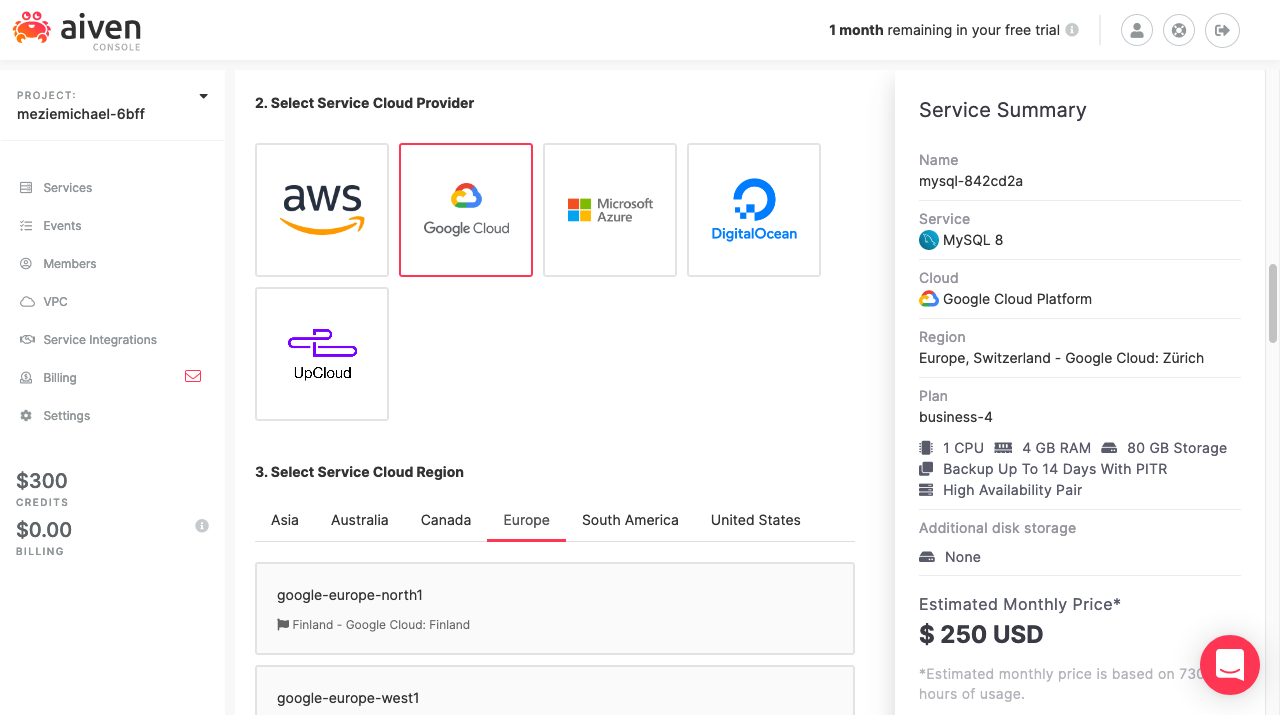
Select the Hobbyist plan which is perfect for small test environments and is ideal to follow this guide.
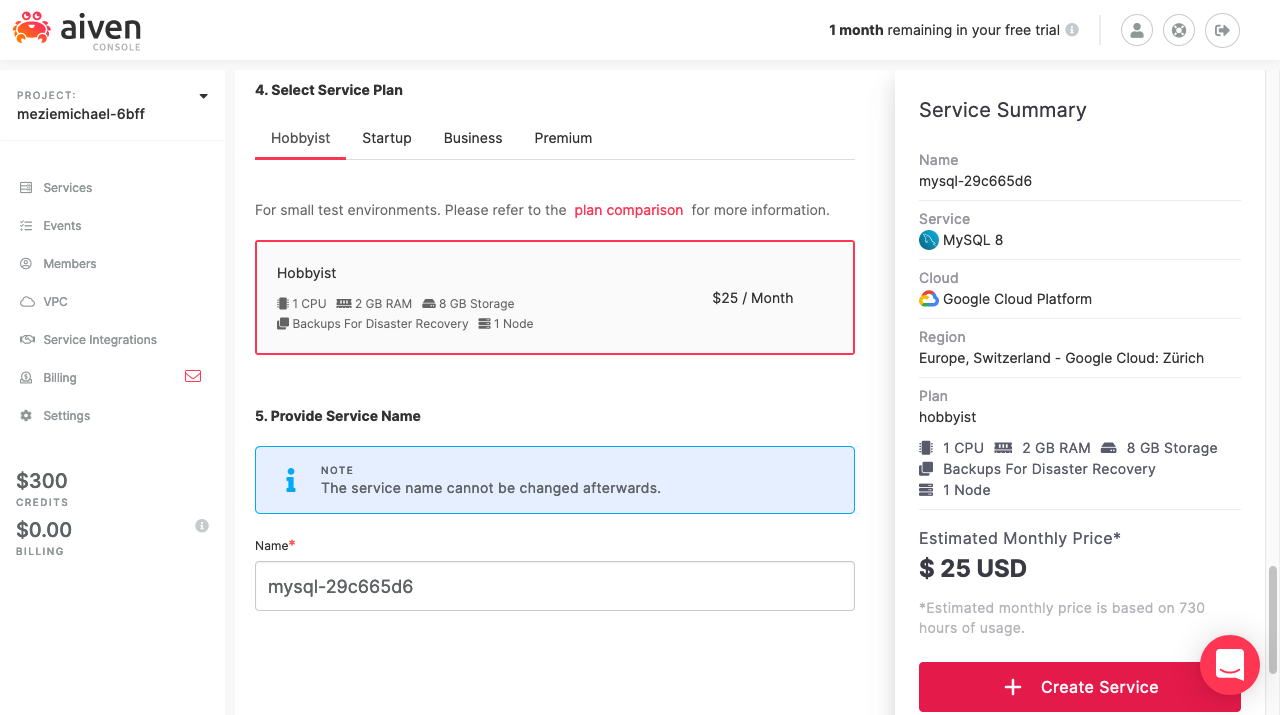
Last, click the Create Service button to provision the MySQL database. You land on the Aiven Services page where you can see the newly created service.
Click the MySQL service to go to the service details page and retrieve the MySQL database credentials.
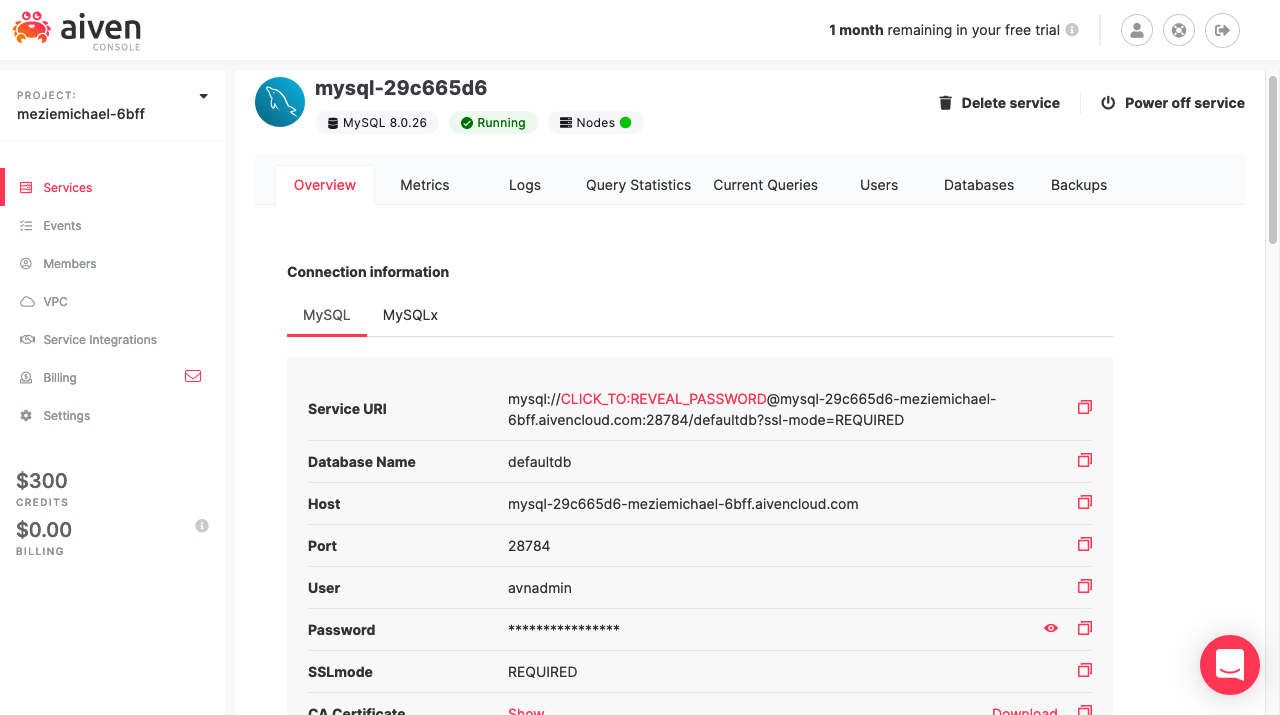
Take note of the Service URI in a secure place, that’s what we will use to connect to our database in our application. Embedded in the URI are the MySQL user, password, host, and port as well as a default database name, so don't share it publicly!
Tip: If you’re more of a command line person, you can make use of the Aiven CLI as well.
Connect to the database
Before we go further, let's ensure we can properly connect to the MySQL database we just deployed to ensure everything is working as expected. In the terminal, run the following command to connect to the database:
mysql --user AIVEN_DB_USER --password=AIVEN_DB_PASSWORD --host AIVEN_DB_HOST --port AIVEN_DB_PORT defaultdb
Don't forget to replace AIVEN_DB_USER, AIVEN_DB_PASSWORD, AIVEN_DB_HOST, and AIVEN_DB_PORT with your own information.
Once the command is executed, if everything goes well, you should see the following output:
Welcome to the MySQL monitor.  Commands end with ; or \g.
Your MySQL connection id is 139834
Server version: 8.0.26 Source distribution

Copyright (c) 2000, 2021, Oracle and/or its affiliates.

Oracle is a registered trademark of Oracle Corporation and/or its
affiliates. Other names may be trademarks of their respective
owners.

Type 'help;' or '\h' for help. Type '\c' to clear the current input statement.

mysql>
Create the Notes REST API using Koa and Prisma
Create the Koa application
First, we will create a new Koa application and install the necessary packages required by our application. To start, create a new directory for our application code and change to the newly created directory using the command below:
mkdir koa-prisma-notes-api
cd koa-prisma-notes-api
Next, initialize a new Node project using the command below:
npm init -y
This command creates a package.json file inside the koa-prisma-notes-api directory containing basic information such as the project name, version, and author.
We can then install the dependencies required by our API using the npm command:
npm install koa @koa/router koa-body
This command installs Koa, koa-router a router for Koa which we will use to define the API endpoints, and koa-body a body-parser middleware to parse the request body as JSON.
With those dependencies installed, create a new src containing an index.js file:
mkdir src && cd src
touch index.js
Open and add the following code to the index.js file using your preferred editor:
// src/index.js

const Koa = require('koa')
const Router = require('@koa/router')
const KoaBody = require('koa-body')

const app = new Koa()
const router = new Router()

app.use(KoaBody())
app.use(router.routes()).use(router.allowedMethods())

app.listen(8080, () => {
  console.log('Server running at: http://localhost:8080')
})
In the code above, we:
-
import the dependencies required by our application
,
-
create a new instance of Koa to which everything will be tied to,
-
add the Koa router and Koa body middlewares to the Koa application,
-
launch the Koa server on port
8080.
You can then start the server by running in your terminal:
node src/index.js
This works fine but for a better development experience, we would like the server to restart automatically whenever we make changes. For that, we will make use of Nodemon which will automatically restart the application when file changes are detected in the directory.
To install nodemon in your terminal, run the following command:
npm install nodemon --save-dev
Then we can start the server by running:
nodemon src/index.js
Next, add the following scripts to your package.json to ease the launch of the application for development and production as below:
// package.json

"scripts": {
  "dev": "nodemon src/index.js",
  "start": "node src/index.js"
},
Install Prisma
Prisma is a next-generation ORM for Node.js and TypeScript. It supports multiple databases such as PostgreSQL, MySQL, SQL Server, SQLite, and MongoDB. We will use Prisma to manage our schemas and query the database from our application.
Start by adding Prisma to your project using the following command:
npm install prisma --save-dev
Then initialize a fresh Prisma project by running:
npx prisma init --datasource-provider mysql
This will create a new prisma directory that contains a schema.prisma file and a .env and file in the project root.
The schema.prisma file contains things like the Prisma client generator, the database connection, and the Prisma schema which will be used to define the database schema.
✔ Your Prisma schema was created at prisma/schema.prisma
  You can now open it in your favorite editor.

Next steps:
1. Set the DATABASE_URL in the .env file to point to your existing database. If your database has no tables yet, read https://pris.ly/d/getting-started
2. Set the provider of the datasource block in schema.prisma to match your database: postgresql, mysql, sqlite, sqlserver or mongodb (Preview).
3. Run prisma db pull to turn your database schema into a Prisma schema.
4. Run prisma generate to generate the Prisma Client. You can then start querying your database.

More information in our documentation:
https://pris.ly/d/getting-started
The .env file contains the environment variables that will be put into the system environments. Prisma will then read and use these variables.
Edit the .env file by replacing the DATABASE_URL value with your Aiven database connection string.
// .env

DATABASE_URL="mysql://johndoe:randompassword@localhost:3306/mydb" # [!code --]
DATABASE_URL="mysql://AIVEN_DB_USER:AIVEN_DB_PASSWORD@AIVEN_DB_HOST:AIVEN_PORT/AIVEN_DB_DATABASE_NAME?ssl-mode=REQUIRED" # [!code ++]
The Prisma schema file contains the configuration of the Prisma setup:
// prisma/schema.prisma

generator client {
  provider = "prisma-client-js"
}

datasource db {
  provider = "mysql"
  url      = env("DATABASE_URL")
}
Create a Prisma schema for the notes API
Our application will just have one model called Note. To create the data model definition in the prisma/schema.prisma file add the following:
// prisma/schema.prisma

generator client {
  provider = "prisma-client-js"
}

datasource db {
  provider = "mysql"
  url      = env("DATABASE_URL")
}

model Note { // [!code ++]
  id        Int      @id @default(autoincrement()) // [!code ++]
  title     String   @db.VarChar(255) // [!code ++]
  content   String?  @db.Text // [!code ++]
  createdAt DateTime @default(now()) // [!code ++]
  updatedAt DateTime @updatedAt // [!code ++]
} // [!code ++]
Each field definition is composed of the following parts:
- The field name
- The field type
- Type modifiers (optional)
- Attributes, including native database type attributes (optional)
Our Note model has a couple of fields:
id: of typeIntmarked as the primary key using the@idmodifier and set to a default value which will be auto-incrementedtitle: of typeStringand using the native database typevarcharwith a length of 255.content: of typeStringbut marked as optional by using?and of native database typetextcreatedAt: of typeDateTimewith a default value set to the current time when a note is createdupdatedAt: of typeDateTimewith a default value set to the time when the note is updated
Create your first Prisma migration
With the note model defined, we can now perform a Prisma migration to synchronize our database schema with our Prisma schema. To do so, run the following command in your terminal:
$ npx prisma migrate dev

Environment variables loaded from .env
Prisma schema loaded from prisma/schema.prisma
Datasource "db": MySQL database "defaultdb" at "mysql-xyz.aivencloud.com:28784"

✔ Enter a name for the new migration: …
Applying migration `20211229094929_`

The following migration(s) have been created and applied from new schema changes:

migrations/
  └─ 20211229094929_/
    └─ migration.sql

Your database is now in sync with your schema.

✔ Generated Prisma Client (3.7.0 | library) to ./node_modules/@prisma/client in 822ms
Once the migration is completed, your prisma directory structure should now look as below:
prisma
├── migrations
│   ├── 20211229094929_
│   │   └── migration.sql
│   └── migration_lock.toml
└── schema.prisma
While it’s totally fine to use migrate dev to run migrations in a development environment, in production, or in your CI/CD pipeline, we need to make sure we apply any pending migrations and create the database if it does not exist using prisma migrate deploy before running the application.
To make doing that straightforward, let’s add a build script in the package.json file:
// package.json

"scripts": {
	"build": "prisma generate && prisma migrate deploy",
},
Create seeds data
We are now ready to seed our database with some mock data using Prisma. Into the prisma directory, create a new seed.js file containing the following code:
// prisma/seed.js

const { PrismaClient } = require('@prisma/client')
const prisma = new PrismaClient()

async function main() {
  await prisma.note.createMany({
    data: [
      {
        title: 'Deploy a Go Gin Application on Koyeb',
        content:
          'This tutorial explains how to deploy a Go Gin application on the Koyeb serverless platform using git-driven deployment.',
      },
      {
        title: 'Deploy a Laravel Application with Continuous Deployment on Koyeb',
        content:
          'This guide shows how to deploy a Laravel application on the Koyeb Serverless Platform using git-driven deployment. Git-driven deployment allows you to push your code without having to take care of the build, deployment, and run process. Koyeb handles all this for you.',
      },
      {
        title: 'Continuous Deployment of a NestJS Application on Koyeb',
        content:
          'This guide explains how to continuously deploy a NestJS application on the Koyeb serverless platform.',
      },
    ],
  })
}

main()
  .catch((e) => {
    console.error(e)
    process.exit(1)
  })
  .finally(async () => {
    await prisma.$disconnect()
  })
The script uses the Prisma client to insert data into the database. You may notice that we are using the createMany() function to insert multiple data at once.
Next, add a prisma section in our package.json file to be able to run the script using the Prisma CLI:
// package.json

"prisma": {
  "seed": "node prisma/seed.js"
}
Then to seed the database, execute:
$ npx prisma db seed
Environment variables loaded from .env
Running seed command `node prisma/seed.js` ...

🌱  The seed command has been executed.
Building the Notes Koa API
With all the setup out of the way, let’s start building the API’s functionality. As mentioned earlier, the note API is going to contain basic CRUD operations. As seen briefly in the seed section above, we will be making use of the Prisma client to interact with our database and perform the necessary CRUD operation.
Add the code below inside the index.js file containing our Koa application:
// src/index.js
const { PrismaClient } = require('@prisma/client') // [!code ++]
const Koa = require('koa')
const Router = require('@koa/router')
const KoaBody = require('koa-body')

const app = new Koa()
const router = new Router()

router.get('/notes', async (ctx) => { // [!code ++]
  const notes = await prisma.note.findMany() // [!code ++]

  ctx.response.status = 200 // [!code ++]
  ctx.body = { // [!code ++]
    message: 'Notes retrieved', // [!code ++]
    data: notes, // [!code ++]
  } // [!code ++]
}) // [!code ++]

router.get('/notes/:id', async (ctx) => { // [!code ++]
  const note = await prisma.note.findUnique({ // [!code ++]
    where: { id: Number(ctx.params.id) }, // [!code ++]
  }) // [!code ++]

  if (note) { // [!code ++]
    ctx.response.status = 200 // [!code ++]
    ctx.body = { // [!code ++]
      message: 'Note retrieved', // [!code ++]
      data: note, // [!code ++]
    } // [!code ++]
  } else { // [!code ++]
    ctx.response.status = 404 // [!code ++]
    ctx.body = { // [!code ++]
      message: 'Note not found', // [!code ++]
    } // [!code ++]
  } // [!code ++]
}) // [!code ++]

router.post('/notes', async (ctx) => { // [!code ++]
  const note = await prisma.note.create({ // [!code ++]
    data: { // [!code ++]
      title: ctx.request.body.title, // [!code ++]
      content: ctx.request.body.content, // [!code ++]
    }, // [!code ++]
  }) // [!code ++]

  ctx.response.status = 201 // [!code ++]
  ctx.body = { // [!code ++]
    message: 'Note created', // [!code ++]
    data: note, // [!code ++]
  } // [!code ++]
}) // [!code ++]

router.put('/notes/:id', async (ctx) => { // [!code ++]
  const note = await prisma.note.update({ // [!code ++]
    where: { id: Number(ctx.params.id) }, // [!code ++]
    data: { // [!code ++]
      title: ctx.request.body.title, // [!code ++]
      content: ctx.request.body.content, // [!code ++]
    }, // [!code ++]
  }) // [!code ++]

  ctx.response.status = 200 // [!code ++]
  ctx.body = { // [!code ++]
    message: 'Note updated', // [!code ++]
    data: note, // [!code ++]
  } // [!code ++]
}) // [!code ++]

router.delete('/notes/:id', async (ctx) => { // [!code ++]
  await prisma.note.delete({ where: { id: Number(ctx.params.id) } }) // [!code ++]

  ctx.response.status = 204 // [!code ++]
  ctx.body = { // [!code ++]
    message: 'Note delete', // [!code ++]
  } // [!code ++]
}) // [!code ++]

app.use(KoaBody())
app.use(router.routes()).use(router.allowedMethods())

app.listen(8080, () => {
  console.log('Server running at: http://localhost:8080')
})
The code above adds the following routes to our Note application:
GET /notes: retrieves all notes and uses the Prisma clientfindMany()function to retrieve the notes.GET /notes/:id: retrieves a single note from its ID and uses the PrismafindUnique()function to retrieve the note. If the note is found the API responds with an HTTP code200and404otherwise.POST /notes: creates a new note. It uses the Prismacreate()function to create the note and returns a201HTTP code when the note is created.PUT /notes/:id: updates an existing note from its ID. It uses the Prismaupdate()function to update the note and returns a200HTTP code when the note is updated.DELETE /notes/:id: deletes a note from its ID. This endpoint uses the Prismadelete()function to delete the note and returns a204HTTP code when the note is deleted.
Run the Notes API application
It's time to test out the API to ensure everything is working as expected.
First, launch the server by running:
npm run dev
The server will start and be accessible at http://localhost:8080.
Then, let's play with the API using curl to test the different endpoints:
# Retrieve all notes
$ curl -s http://localhost:8080/notes | jq .

# Output
{
  "message": "Notes retrieved",
  "data": [
    {
      "id": 1,
      "title": "Deploy a Go Gin Application on Koyeb",
      "content": "This tutorial explains how to deploy a Go Gin application on the Koyeb serverless platform using git-driven deployment.",
      "status": "draft",
      "createdAt": "2021-12-29T10:10:57.293Z",
      "updatedAt": "2021-12-29T10:10:57.294Z"
    },
    {
      "id": 2,
      "title": "Deploy a Laravel Application with Continuous Deployment on Koyeb",
      "content": "This guide shows how to deploy a Laravel application on the Koyeb Serverless Platform using git-driven deployment. Git-driven deployment allows you to push your code without having to take care of the build, deployment, and run process. Koyeb handles all this for you.",
      "status": "draft",
      "createdAt": "2021-12-29T10:10:57.294Z",
      "updatedAt": "2021-12-29T10:10:57.294Z"
    },
    {
      "id": 3,
      "title": "Continuous Deployment of a NestJS Application on Koyeb",
      "content": "This guide explains how to continuously deploy a NestJS application on the Koyeb serverless platform.",
      "status": "draft",
      "createdAt": "2021-12-29T10:10:57.294Z",
      "updatedAt": "2021-12-29T10:10:57.294Z"
    }
  ]
}

# Retrieve a single note
$ curl -s http://localhost:8080/notes/1 | jq .

# Output
{
  "message": "Note retrieved",
  "data": {
    "id": 1,
    "title": "Deploy a Go Gin Application on Koyeb",
    "content": "This tutorial explains how to deploy a Go Gin application on the Koyeb serverless platform using git-driven deployment.",
    "status": "draft",
    "createdAt": "2021-12-29T10:10:57.293Z",
    "updatedAt": "2021-12-29T10:10:57.294Z"
  }
}

# Create a new note
$ curl -d '{"title": "Sample note title", "content": "Sample note content"}' -H 'Content-Type: application/json' -X POST http://localhost:8080/notes | jq .

# Output

{
  "message": "Note created",
  "data": {
    "id": 5,
    "title": "Sample note title",
    "content": "Sample note content",
    "status": "draft",
    "createdAt": "2021-12-29T10:47:16.903Z",
    "updatedAt": "2021-12-29T10:47:16.904Z"
  }
}

# Update a note
$ curl -d '{"title": "Sample note title [UPDATED]", "content": "Sample note content"}' -H 'Content-Type: application/json' -X PUT http://localhost:8080/notes/5 | jq .

# Output
{
  "message": "Note updated",
  "data": {
    "id": 5,
    "title": "Sample note title [UPDATED]",
    "content": "Sample note content",
    "status": "draft",
    "createdAt": "2021-12-29T10:47:16.903Z",
    "updatedAt": "2021-12-29T10:50:44.279Z"
  }
}

# Delete a note
curl -X DELETE http://localhost:8080/notes/5
Update the Prisma schema (optional)
Our application is now feature complete. But before we wrap up, let’s make a small refactor by adding status to notes. That way, we can have notes that are in draft and those published.
Let’s start by updating the Prisma schema. Since we want to have predetermined status (draft and published), we are going to create an enum and add a new field called status set to the type of the Status enum with a default value of draft to the Note model.
// prisma/schema.prisma

generator client {
  provider = "prisma-client-js"
}

datasource db {
  provider = "mysql"
  url      = env("DATABASE_URL")
}

enum Status { // [!code ++]
  draft // [!code ++]
  published // [!code ++]
} // [!code ++]

model Note {
  id        Int      @id @default(autoincrement())
  title     String   @db.VarChar(255)
  content   String?  @db.Text
  status    Status   @default(draft) // [!code ++]
  createdAt DateTime @default(now())
  updatedAt DateTime @updatedAt
}
Next, we need to create a new migration to synchronize our database schema with the Prisma schema by running:
$ npx prisma migrate dev
Environment variables loaded from .env
Prisma schema loaded from prisma/schema.prisma
Datasource "db": MySQL database "defaultdb" at "mysql-xyz.aivencloud.com:28784"

✔ Enter a name for the new migration: … add status
Applying migration `20211229125948_add_status`

The following migration(s) have been created and applied from new schema changes:

migrations/
  └─ 20211229125948_add_status/
    └─ migration.sql

Your database is now in sync with your schema.

✔ Generated Prisma Client (3.7.0 | library) to ./node_modules/@prisma/client in 2.05s
When prompted for a name for the new migration, we’ll enter “add status”.
Once the migration is completed, the migrations directory should look like below:
prisma/migrations
├── 20211229125830_
│   └── migration.sql
├── 20211229125948_add_status
│   └── migration.sql
└── migration_lock.toml
Last, update the application to use the freshly created status field by editing the Koa application index.js file:
// src/index.js
const { PrismaClient } = require('@prisma/client')
const Koa = require('koa')
const Router = require('@koa/router')
const KoaBody = require('koa-body')

const app = new Koa()
const router = new Router()

router.get('/notes', async (ctx) => {
  const notes = await prisma.note.findMany() // [!code --]
  const notes = await prisma.note.findMany({ // [!code ++]
    where: { status: ctx.query.status }, // [!code ++]
  }) // [!code ++]

  ctx.response.status = 200
  ctx.body = {
    message: 'Notes retrieved',
    data: notes,
  }
})

router.get('/notes/:id', async (ctx) => {
  const note = await prisma.note.findUnique({
    where: { id: Number(ctx.params.id) },
  })

  if (note) {
    ctx.response.status = 200
    ctx.body = {
      message: 'Note retrieved',
      data: note,
    }
  } else {
    ctx.response.status = 404
    ctx.body = {
      message: 'Note not found',
    }
  }
})

router.post('/notes', async (ctx) => {
  const note = await prisma.note.create({
    data: {
      title: ctx.request.body.title,
      content: ctx.request.body.content,
      status: ctx.request.body.status, // [!code ++]
    },
  })

  ctx.response.status = 201
  ctx.body = {
    message: 'Note created',
    data: note,
  }
})

router.put('/notes/:id', async (ctx) => {
  const note = await prisma.note.update({
    where: { id: Number(ctx.params.id) },
    data: {
      title: ctx.request.body.title,
      content: ctx.request.body.content,
      status: ctx.request.body.status, // [!code ++]
    },
  })

  ctx.response.status = 200
  ctx.body = {
    message: 'Note updated',
    data: note,
  }
})

router.delete('/notes/:id', async (ctx) => {
  await prisma.note.delete({ where: { id: Number(ctx.params.id) } })

  ctx.response.status = 204
  ctx.body = {
    message: 'Note delete',
  }
})

app.use(KoaBody())
app
  .use(router.routes())
  .use(router.allowedMethods())

app.listen(8080, () => {
  console.log('Server running at: http://localhost:8080')
})
We can now filter the notes based on their status when we call the /notes endpoint and can also update the status of a note.
For instance to list all notes with the draft status run:
# Retrieve all draft notes
$ curl -s http://localhost:8080/notes?status=draft | jq .

# Output
{
  "message": "Notes retrieved",
  "data": [
    {
      "id": 1,
      "title": "Deploy a Go Gin Application on Koyeb",
      "content": "This tutorial explains how to deploy a Go Gin application on the Koyeb serverless platform using git-driven deployment.",
      "status": "draft",
      "createdAt": "2021-12-29T12:58:37.639Z",
      "updatedAt": "2021-12-29T12:58:37.640Z"
    },
    {
      "id": 2,
      "title": "Deploy a Laravel Application with Continuous Deployment on Koyeb",
      "content": "This guide shows how to deploy a Laravel application on the Koyeb Serverless Platform using git-driven deployment. Git-driven deployment allows you to push your code without having to take care of the build, deployment, and run process. Koyeb handles all this for you.",
      "status": "draft",
      "createdAt": "2021-12-29T12:58:37.639Z",
      "updatedAt": "2021-12-29T12:58:37.640Z"
    },
    {
      "id": 3,
      "title": "Continuous Deployment of a NestJS Application on Koyeb",
      "content": "This guide explains how to continuously deploy a NestJS application on the Koyeb serverless platform.",
      "status": "draft",
      "createdAt": "2021-12-29T12:58:37.639Z",
      "updatedAt": "2021-12-29T12:58:37.640Z"
    }
  ]
}
Deploy the Notes application on Koyeb
We are now ready to deploy our note API on Koyeb.
Koyeb is a developer-friendly serverless platform to deploy apps globally. It supports deploying applications using pre-built Docker containers or native code using git. For the purpose of this tutorial, we will deploy our application using git-driven deployment.
Head over to GitHub to create a new repository and push the application code running:
git init
git add --all
git commit -m "Initial commit"
git branch -M main
git remote add origin https://github.com/YOUR_GITHUB_USERNAME/koa-prisma-notes-api.git
git push -u origin main
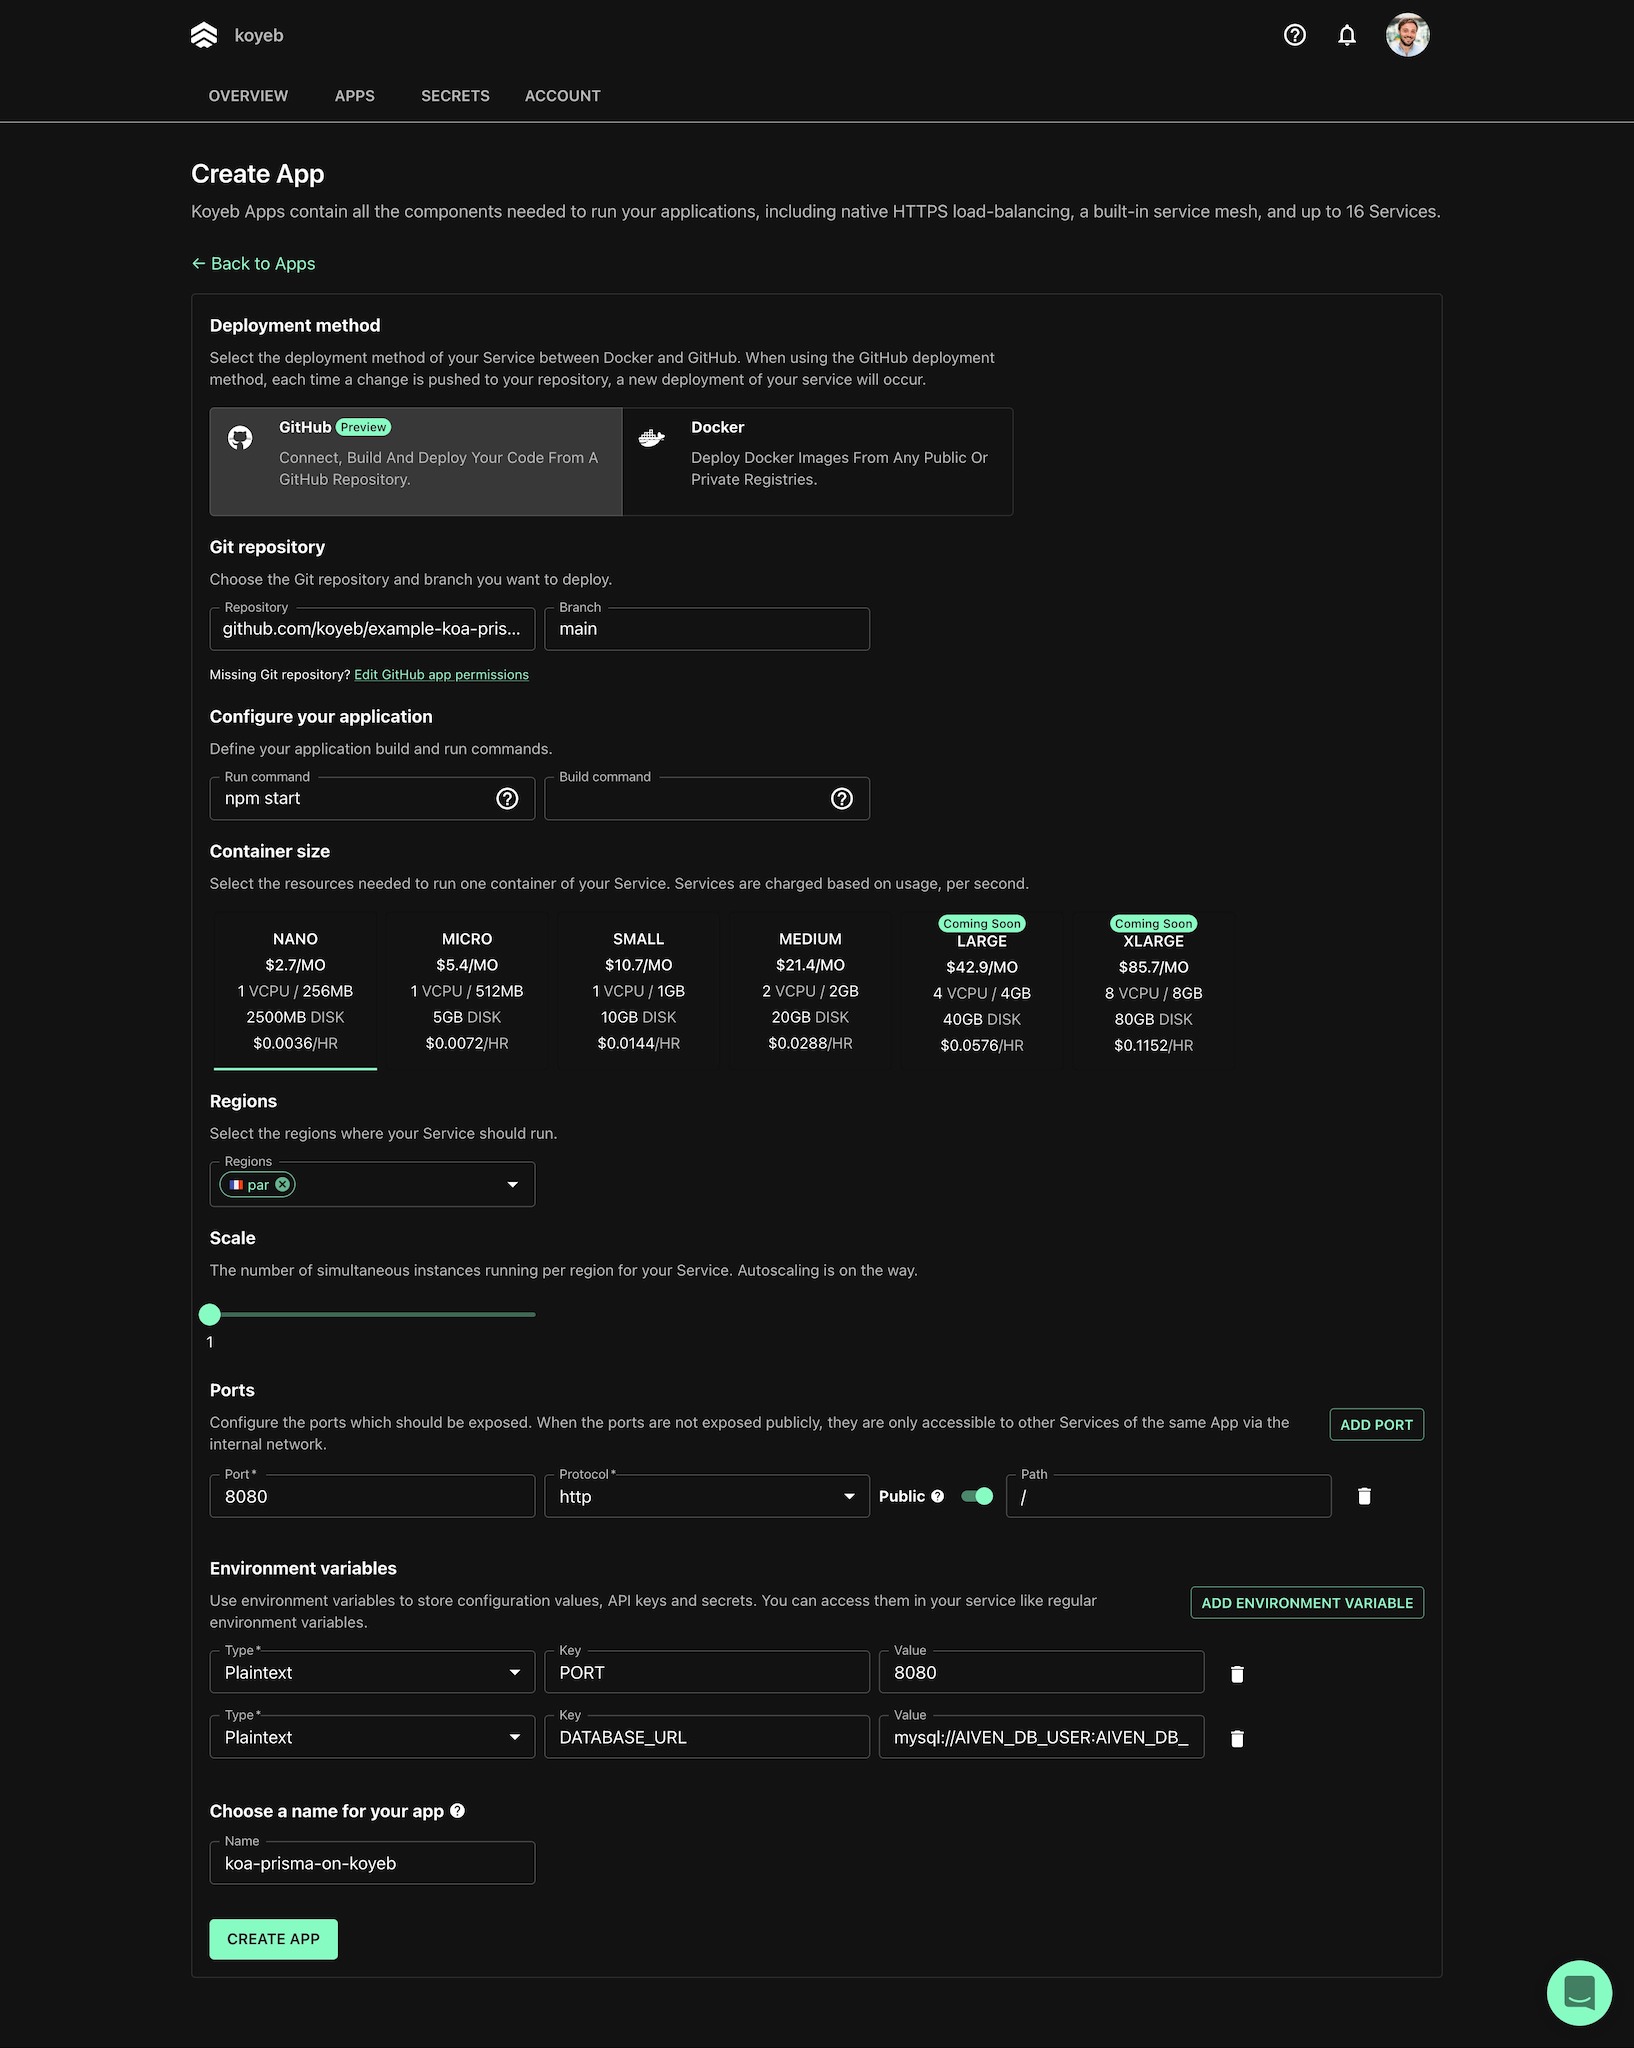
On the Overview tab of the Koyeb control panel, click Create Web Service to begin:
- Select GitHub as the deployment method.
- In the repositories list, select the repository containing your Koa application.
- In the Environment variables and files section, click Add variable to create a
DATABASE_URLvariable set to your Aiven connection string in the form of:mysql://AIVEN_DB_USER:AIVEN_DB_PASSWORD@AIVEN_DB_HOST:AIVEN_PORT/AIVEN_DB_DATABASE_NAME?ssl-mode=REQUIRED. - Choose a name for your App and Service, for example
koa-prisma-notes-api-on-koyeb, and click Deploy.
There is no need to set the build and run commands, by default Koyeb detects if a build and start scripts are present in your package.json file and execute them automatically.
The build script will be run during the build stage and the startscript to launch the application once the build succeeded.
You land on the deployment page where you can follow the progress of your application's deployment. Once the build and deployment are completed, you can access your application by clicking the App URL ending with koyeb.app in the Koyeb control panel.
Conclusion
That's it! In this tutorial, we looked at how to build a REST API with Koa, Prisma, and Aiven. We created a MySQL database using Aiven, created a new Koa application, and used Prisma to interact with our MySQL database from our application. Along the line, we covered how to run migration and seed our database with data using Prisma.
Finally, we deployed the application on Koyeb using git-driven deployment: all the changes you push to your repository will automatically trigger a new build and deployment on the Koyeb Serverless Platform. With the Koyeb continuous deployment feature, your changes will go live as soon as the deployment passes all necessary health checks. In case of a failure during deployment, the platform maintains the latest working deployment in production to ensure your application is always up and running.
You can access the complete application code on GitHub.