Build a Hybrid AI App With WebLLM & Qwen 3 Next on Koyeb
This tutorial walks through building a hybrid AI demo app that runs small models locally in the browser with WebLLM, and falls back to a large remote model Qwen 3 Next 80B A3B Instruct served on Koyeb with vLLM.
The final app is built with Next.js 13 App Router and styled with Tailwind CSS.
Introduction
While LLMs continue to grow in size and reasoning cabaility, there is also a rise in demand for smaller, more specialized language models that run on-device and in-browser. WebLLM is a high-performance in-browser LLM inference engine that is suitable for many lightlightweight use cases. But when the prompts and required responses increase in complexity, it's important to be able to rely on the right LLM for the job.
In this simple demo, we showcase how a lightweight model can be used from the client to answer programming questions. Once the complexity of the question exceeds the capability of our local model, we make a call to Qwen 3 Next 80B A3B Instruct served with vLLM on Koyeb.
In this case, we showcase SmolLM2 135M Instruct as our local model and Qwen 3 Next 80B A3B Instruct as our large model, but there are multiple models to choose from for both the local and server models. Check out the Koyeb One-Click deploy library for other LLMs to use in this demo.
Requirements
To successfully complete this tutorial, You need the following:
- Node.js 18+
- A Koyeb account
- Basic familiarity with React / Next.js
Steps
Here are the key steps to completing the tutorial:
- Initialize the Next.js project
- Deploy Qwen 3 Next 80B A3B Instruct on Koyeb
- Add Environment Variables
- Set up the local model using WebLLM
- Run the app locally
- (Optional) Deploy the app on Koyeb
Initialize the Next.js Project
Start by creating a new Next.js app:
npx create-next-app@latest hybrid-ai-demo
When prompted, opt to use the App Router format and use Tailwind for the project.
At this time, you may want to open your project in the IDE of your choice, like VS Code:
cd hybrid-ai-demo
code .
Add the following Node.js dependencies to the project:
npm install @mlc-ai/web-llm
Deploy Qwen 3 Next 80B A3B Instruct on Koyeb
We’ll deploy Qwen/Qwen3-Next-80B-A3B-Instruct on Koyeb using vLLM for model serving.
Use the following button to deploy Qwen3 Next:

Alternatively, you can test out the project with a more lightweight model that requires fewer GPUs, like Qwen 3 14B. Check out all available models here
Your service will expose a vLLM-compatible API endpoint like:
https://<YOUR-KOYEB-URL>.koyeb.app/v1/chat/completions
Save this URL for later.
Add environment variables
The Next.js application accesses your unique Koyeb URL through an environment variable. Optionally, you can provide an API key that you use to secure your endpoint. If you choose to use this API key, then provide it as a secret value in the Koyeb control panel.
Create .env.local at the root of your project, and provide the endpoint to your LLM, model name, and optionally, an API key:
VLLM_URL=https://<your-koyeb-url>.koyeb.app/v1/chat/completions
MODEL=Qwen/Qwen-3-Next-80B-A3B-Instruct
VLLM_API_KEY= # optional if you added auth
Adding the model name as a variable allows you to more easily try various models and compare their performance.
Set up the local model using WebLLM
Create the file lib/localEngine.ts, and add the following code to handle local inference:
import * as webllm from "@mlc-ai/web-llm";

let engine: webllm.MLCEngine | null = null;

const initProgressCallback = (progress: any) => {
  console.log("Model loading progress:", progress);
};

export async function getLocalEngine() {
  if (!engine) {
    // Create engine and load a small prebuilt model
    engine = await webllm.CreateMLCEngine(
      "SmolLM2-135M-Instruct-q0f32-MLC",
      { initProgressCallback }
    );

    // reload() is optional if CreateMLCEngine already loads the bundle
    await engine.reload("SmolLM2-135M-Instruct-q0f32-MLC");
  }
  return engine;
}
Here we use web-llm to load SmolLM2-135M, which is a lightweight model suitable for in-browser inference.
Remote API Route
Create app/api/remote/route.ts to proxy requests to vLLM on Koyeb:
// app/api/remote/route.ts
import fetch from "node-fetch";

type VLLMResponse = {
  choices?: {
    message?: {
      content?: string;
    };
  }[];
};


export async function POST(req: Request) {
  const { prompt } = await req.json();
  const MODEL = process.env.model

  const payload = {
    model: MODEL,
    messages: [
      { role: "system", content: "You are a helpful programming tutor." },
      { role: "user", content: prompt },
    ],
    max_tokens: 5000,
    temperature: 0.2,
  };

  const VLLM_URL = process.env.VLLM_URL || "https://<YOUR-KOYEB-URL>/v1/chat/completions";
  const VLLM_KEY = process.env.VLLM_API_KEY || "";

  const upstream = await fetch(VLLM_URL, {
    method: "POST",
    headers: {
      "Content-Type": "application/json",
      ...(VLLM_KEY ? { Authorization: `Bearer ${VLLM_KEY}` } : {}),
    },
    body: JSON.stringify(payload),
  });

  if (!upstream.ok) {
    const txt = await upstream.text();
    return new Response(JSON.stringify({ error: "vLLM error", details: txt }), {
      status: 502,
      headers: { "Content-Type": "application/json" },
    });
  }

  // ✅ Buffer entire response as text
  const json: VLLMResponse = (await upstream.json()) as VLLMResponse;
  const message = json.choices?.[0]?.message?.content || "No response available."
  return new Response(message, {
    headers: { "Content-Type": "text/plain" },
  });
}
This makes it easy for the frontend to call /api/remote instead of hitting your Koyeb Service directly.
Create the frontend page
To create the frontend view for the client, replace the contents of app/page.tsx with the following:
'use client';
import React, { useState, useRef } from 'react';
import { getLocalEngine } from '@/lib/localEngine';
export default function Home() {
const [prompt, setPrompt] = useState('');
const [reply, setReply] = useState("");
const [loading, setLoading] = useState(false);
const [mode, setMode] = useState<'auto' | 'local' | 'remote'>('auto');
const controllerRef = useRef<AbortController | null>(null);
const replyRef = useRef<HTMLDivElement | null>(null);
async function runLocalBuffered(prompt: string): Promise<string> {
const engine = await getLocalEngine();
let buffer = "";
const stream = await engine.chat.completions.create({
messages: [{ role: "user", content: prompt }],
stream: true,
});
for await (const chunk of stream) {
buffer += chunk.choices[0]?.delta.content || "";
}
return buffer;
}
async function runRemoteBuffered(prompt: string): Promise<string> {
const res = await fetch("/api/remote", {
method: "POST",
body: JSON.stringify({ prompt }),
headers: { "Content-Type": "application/json" },
});
if (!res.ok) throw new Error(`Remote error: ${res.status}`);
const reader = res.body!.getReader();
const decoder = new TextDecoder();
let buffer = "";
let done = false;
while (!done) {
const { value, done: streamDone } = await reader.read();
done = streamDone;
if (value) buffer += decoder.decode(value);
}
return buffer;
}
function estimateTokens(text: string): number {
// Rough heuristic: ~4 characters ≈ 1 token
return Math.ceil(text.length / 4);
}
async function tryLocalWithTimeout(prompt: string, timeoutMs = 4000): Promise<string> {
return Promise.race([
runLocalBuffered(prompt),
new Promise((_, reject) =>
setTimeout(() => reject(new Error("local timeout")), timeoutMs)
),
]);
}
async function handleSubmit(e?: React.FormEvent) {
if (e) e.preventDefault();
setLoading(true);
setReply("");
const tokenEstimate = estimateTokens(prompt);
const shouldTryLocal =
mode === "local" || (mode === "auto" && tokenEstimate < 120);
let finalText = "";
if (shouldTryLocal) {
try {
// Try local first, but don't stream to UI yet
finalText = await tryLocalWithTimeout(prompt, 4000);
} catch (err) {
console.warn("Local failed/timed out, falling back to remote:", err);
finalText = await runRemoteBuffered(prompt);
}
} else {
finalText = await runRemoteBuffered(prompt);
}
// Only update the UI once we have decided the source
setReply(finalText);
setLoading(false);
}
return (
<main className="min-h-screen flex flex-col items-center justify-center bg-gradient-to-br from-slate-100 to-slate-200 px-4">
<div className="w-full max-w-2xl bg-white rounded-2xl shadow-lg p-8">
<h1 className="text-3xl font-bold text-center text-slate-800 mb-6">
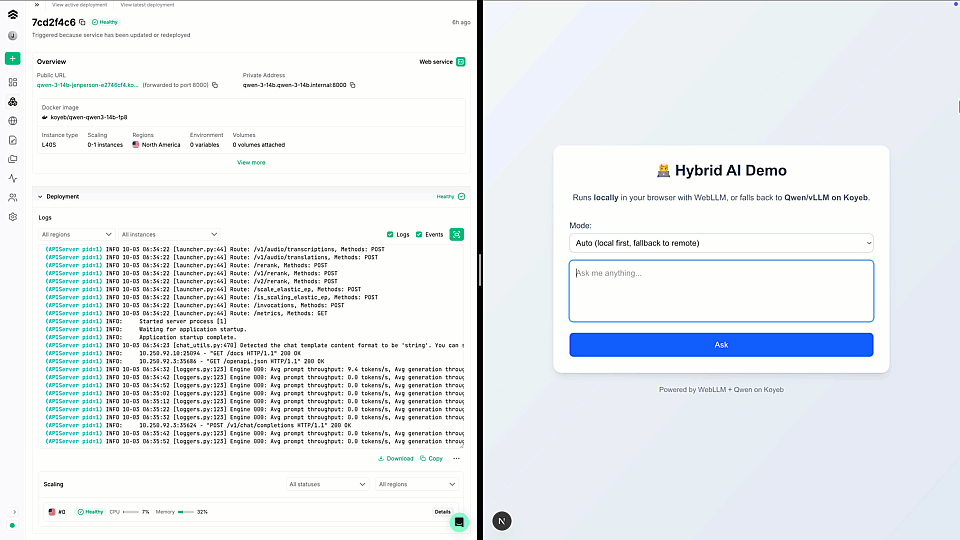
🧑💻 Hybrid AI Demo
</h1>
<p className="text-center text-slate-600 mb-8">
Runs <span className="font-semibold">locally</span> in your browser
with WebLLM, or falls back to{" "}
<span className="font-semibold">Qwen/vLLM on Koyeb</span>.
</p>
<div className="mb-4">
<label className="block mb-1 font-medium text-slate-700">
Mode:
</label>
<select
value={mode}
onChange={(e) => setMode(e.target.value as "auto" | "local" | "remote")}
className="w-full border border-slate-300 rounded-lg p-2 focus:ring-2 focus:ring-blue-400 focus:outline-none"
>
<option value="local">Local</option>
<option value="remote">Remote</option>
<option value="auto">Auto (local first, fallback to remote)</option>
</select>
</div>
<form onSubmit={handleSubmit} className="space-y-4">
<textarea
value={prompt}
onChange={(e) => setPrompt(e.target.value)}
placeholder="Ask me anything..."
className="w-full border border-slate-300 rounded-lg p-3 focus:ring-2 focus:ring-blue-400 focus:outline-none resize-none"
rows={4}
/>
<button
type="submit"
disabled={loading}
className="w-full bg-blue-600 text-white font-medium py-3 rounded-lg shadow hover:bg-blue-700 transition-colors disabled:opacity-50"
>
{loading ? "Thinking…" : "Ask"}
</button>
</form>
{reply && (
<div className="mt-6 border-t pt-4">
<h2 className="font-semibold text-slate-700 mb-2">Reply:</h2>
<div
ref={replyRef}
className="bg-slate-50 border border-slate-200 rounded-lg p-4 whitespace-pre-wrap
max-h-96 overflow-y-auto"
>
{reply}
</div>
</div>
)}
</div>
<footer className="mt-6 text-sm text-slate-500">
Powered by WebLLM + Qwen on Koyeb
</footer>
</main>
);
}
This provides a dropdown for selecting local / remote / auto, a textarea for input, and a styled output box.
Run the app locally
To run the app locally, start the dev server using this command:
npm run dev
Visit http://localhost:3000 to view your app running locally.
Try asking short questions (which run locally) vs longer ones (which fall back to Qwen on Koyeb).
(Optional) Dockerize and deploy
You can optionally deploy your web all on Koyeb.
Add a Dockerfile to your project with the following code:
# Use official Node.js image
FROM node:20-alpine

WORKDIR /app

COPY package*.json ./
RUN npm install --production

COPY . .

RUN npm run build

EXPOSE 3000

CMD ["npm", "start"]
There are a few options for deploying your container to Koyeb. Here are two options to choose from:
- Build the container locally and deploy using the Koyeb CLI.
- Commit your code to GitHub and use the Koyeb control panel to deploy.
Option 1: Build container locally
You can build and run your Docker image locally:
docker build -t hybrid-ai-demo .
docker run -p 3000:3000 hybrid-ai-demo
And then deploy the container to Koyeb using the Koyeb CLI:
koyeb service deploy hybrid-ai-demo \
  --docker . \
  --env VLLM_URL=https://<your-koyeb-url>.koyeb.app/v1/chat/completions
Option 2: Commit to GitHub and deploy
First, push your project to GitHub.
On Koyeb, create a new Service → choose GitHub repository.
Select your repo, branch (main), and set build command:
npm install && npm run build
Set run command:
npm start
Expose port 3000.
Koyeb then automatically rebuilds the app when you push changes to GitHub.
🎉 You’re Done!
You now have a hybrid AI app that runs lightweight local models in the browser with WebLLM and falls back to large Qwen models on Koyeb for heavier queries.
Try the app out by giving a straightforward prompt "How do I create a for loop in Java"? and a a longer prompt "Create a React frontend for a chatbot" to see how the app routes from local to server sources.
This setup gives you the best of both worlds:
- Low latency and privacy for small queries.
- High power and accuracy for bigger tasks.
In addition to providing straightforward infrastructure for models as demonstrated in this tutorial, you can also use Koyeb Services for other AI tasks like utilizing LangChain to build agents through LangServe and Unsloth for model training and fine-tuning. Check out these and other solutions on the Koyeb One-Click Deploy page.