Use Remix and Tailwind to build a Hacker News clone
Introduction
Remix is a full-stack web framework that provides built-in features for creating a strong user experience that is fast and smooth. It is a React framework that provides APIs and conventions for server rendering, data loading, routing, and more. Tailwind is a popular CSS framework that streamlines building UI.
In this guide, we are going to dive into Remix by building a simple Hacker News clone that fetches and displays data available from the Hacker News API. Then, we will use Tailwind CSS to style our application. Once we finish building our application, we will deploy it on Koyeb using the platform's git-driven deployment.
Our application will benefit from native continuous-deployment because each time we push changes to our GitHub repository, a new build of our application will be automatically triggered and deployed on Koyeb.
Requirements
To successfully follow and complete this guide, you need:
- A local development environment with Node.js 14 or greater and npm 7 or greater installed
- A GitHub account to version and deploy your application code on Koyeb
- A Koyeb account to deploy and run the application
Steps
To deploy the Hacker News application using Remix and Tailwind, you need to follow these steps:
- Create a new Remix application
- Add Tailwind CSS to the application
- Define the Remix application routes
- Build the components of our application
- Deploy the Remix app to Koyeb
Create a new Remix application
Let’s get started by creating a new Remix project. Open your terminal and run the following command:
npx create-remix@latest remix-hacker-news
npx allows us to execute npm packages binaries (create-remix in our case) without having to first install it.
When prompted, choose:
- Just the basics
- Remix App Server
- JavaScript
- Enter
ywhen prompted to runnpm installto install the npm dependencies.
Once that’s done, you can move into the project directory and start the app:
cd remix-hacker-news
npm run dev
The app should be running on localhost:3000. We are going to leave it running as we continue to build the app.
Add Tailwind CSS to the application
For styling the app, we will be using Tailwind CSS. Install and set up Tailwind at the root of our project's directory by running:
npm install -D tailwindcss postcss autoprefixer concurrently
In addition to Tailwind and its peer dependencies, we are also installing:
postcss: for transforming styles with JS plugins.autoprefixer: for automatically applying vendor prefixes to CSS.concurrently: for running multiple commands concurrently.
Next, run the init command to create tailwind.config.js:
npx tailwindcss init -p
Using -p (short for --postcss) flag instruct Tailwind CSS to initialize a postcss.config.js file in addition to the tailwind.config.js file.
Next, we need to make use of Tailwind directives in our CSS file. Directives are custom Tailwind-specific at-rules that offer special functionalities for Tailwind CSS projects.
Create a styles folder in the root of the project and inside it create an app.css file and add the snippet below in it:
/* styles/app.css */

@tailwind base;
@tailwind components;
@tailwind utilities;
Since Tailwind scans our HTML, JavaScript components, and any other template files for class names, then generates all of the corresponding CSS for those styles, we need to configure our template paths so that Tailwind can generate all the CSS we need. We can do that by updating the content section of tailwind.config.js:
// tailwind.config.js

module.exports = {
  content: ['./app/**/*.{js,ts,jsx,tsx}'],
  theme: {
    extend: {},
  },
  plugins: [],
}
We need to add a new command to our application to successfully compile the CSS. Update the scripts section in your package.json file to build both the development and production CSS with the following commands:
// package.json

"scripts": {
	"build": "npm run build:css && remix build",
    "build:css": "tailwindcss -m -i ./styles/app.css -o app/styles/app.css",
    "dev": "concurrently \"npm run dev:css\" \"remix dev\"",
    "dev:css": "tailwindcss -w -i ./styles/app.css -o app/styles/app.css",
    "postinstall": "remix setup node",
    "start": "remix-serve build"
}
Now, when we run npm run dev, Tailwind CSS will be compiled and saved inside app/styles/app.css.
Also in package.json, make sure to specify the version of Remix you are using:
  "name": "remix-template-remix-js",
  "version": "1.0.0",
  "private": true,
  "description": "",
  "license": "",
  "sideEffects": false,
...
Lastly, we will import and use the compiled app/styles/app.css inside app/root.jsx:
// app/root.jsx
import styles from '~/styles/app.css'

export function links() {
  return [{ rel: 'stylesheet', href: styles }]
}
Creating the header
root.jsx serves as the default layout that every page of our app will use. Since the header will be the same across all pages, we are going to add the header directly inside root.jsx.
Update root.jsx to the following:
import { Link, Links, LiveReload, Meta, Outlet, Scripts, ScrollRestoration } from '@remix-run/react'
import styles from '~/styles/app.css'

export function links() {
  return [{ rel: 'stylesheet', href: styles }]
}

export function meta() {
  return { title: 'Remix Hacker News Clone' }
}

export default function App() {
  return (
    <html lang="en">
      <head>
        <meta charSet="utf-8" />
        <meta name="viewport" content="width=device-width,initial-scale=1" />
        <Meta />
        <Links />
      </head>
      <body className="bg-gray-100">
        <header className="bg-orange-500 py-2">
          <div className="mx-auto max-w-4xl px-8">
            <h1 className="text-lg font-semibold text-white">
              <Link to="/">Hacker News</Link>
            </h1>
          </div>
        </header>

        <div className="mx-auto mt-6 max-w-4xl px-8">
          <div className="rounded-xs bg-white shadow-xs">
            <Outlet />
          </div>
        </div>
        <ScrollRestoration />
        <Scripts />
        {process.env.NODE_ENV === 'development' && <LiveReload />}
      </body>
    </html>
  )
}
Define the Remix application routes
Remix uses a file-based routing system where files inside the app/routes folder are considered as routes. Remix also supports nested routes by treating sub-directories within the routes folder as such. Also, we can define dynamic routes by prefixing them with $.
The structure below is what our routes folder will look like at the end of this section:
├── items
│   └── $id.jsx
└── index.jsx
index.jsx will serve as the homepage, that is, localhost:3000, while items/$id.jsx handles requests from localhost:3000/items/1234.
List of items route
Now that we know how routing works in Remix, it is time to define the routes for our application. Our Remix app already comes with one of the routes that we will use, routes/index.jsx. This will serve as the homepage of our application and render a list of items, in our application's case: Hacker News top stories.
Open the app/routes/index.jsx file and update it with the following:
// app/routes/index.jsx

export default function Index() {
  return <div className="divide-y">{/* list of items will be rendered here */}</div>
}
The list of items will be rendered within div. We will cover this later.
Single item route
The single item route will handle the /items/{id} URL. This is going to be a dynamic route that handles requests from localhost:3000/items/1234 will be handled by /items/$id.jsx.
Inside app/routes, create a items folder and inside of it, create a $id.jsx file and add the code below to it:
// app/routes/items/$id.jsx

export default function ItemId() {
  return (
    <div className="divide-y">
      <div className="flex items-center space-x-4 p-4">
        {/* single item and its comments will be rendered here */}
      </div>
    </div>
  )
}
A single item and its comments will be rendered within the div, which we will cover later.
Fetching data from the Hacker News API
As mentioned in the introduction, we will be fetching data from Hacker News API, for which the docs are available here.
To easily fetch data from the Hacker News API, we will create helper functions. The helper functions are in charge of data fetching and will be reused in different parts of the app. In the app folder, create a new helper folder and create a new fetch.js file in it.
For now, we will create some variables that we will reuse later:
// app/helper/fetch.js

const baseUrl = 'https://hacker-news.firebaseio.com/v0/';
const endpointSuffix = '.json';
...
baseUrl: This is the base API URL.endpointSuffix: This is the ending of the API endpoint and it’s the file type to be fetched.
Fetching Top Stories
In the fetch.js file, create a getTopStories function that will fetch the IDs for top stories (items) from Hacker News:
// app/helper/fetch.js
...
export const getTopStories = async () => {
  const response = await fetch(`${baseUrl}topstories${endpointSuffix}`)

  return response.json()
};
...
Single item
For a single item, create a getItem function that will fetch an individual item. Within Hacker News, a story's comments are basically nested items. Therefore, this function will also be used to fetch an item's comments:
// app/helper/fetch.js
...
export const getItem = async (itemId) => {
  const response = await fetch(`${baseUrl}item/${itemId}${endpointSuffix}`)

  return response.json()
};
...
User info
Lastly, we will create a getUser function that will be used to fetch the details of the user that created an item or commented on an item:
// app/helper/fetch.js
...
export const getUser = async (userId) => {
  const response = await fetch(`${baseUrl}user/${userId}${endpointSuffix}`)

  return response.json()

};
Build the components of our application
So far, we have the routes and functions to fetch data from the Hacker News API. Now, it is time to glue everything together by creating the two components that will be used to render the data: Item and Comment.
Item component
We will start by creating a components directory inside the app directory then within the components directory, create an Item.jsx file that will display each individual item. The Item component will accept the item to display. Add the following code to it:
// app/components/Item.jsx
import { Link } from '@remix-run/react'

export default function Item({ item }) {
  return (
    <div className="flex items-center space-x-4 p-4">
      {item && (
        <>
          <div className="place-self-start self-start font-medium text-orange-500 ">{item.score}</div>
          <div>
            <h3 className="text-gray-700">
              <a href={item.url}>{item.title}</a>
            </h3>

            <div className="flex space-x-1.5 text-xs text-gray-500">
              <span>
                by{' '}
                <Link className="hover:underline" to="/">
                  {item.by}
                </Link>
              </span>
              <span>{item.time}</span>
              <Link className="hover:underline" to={`/items/${item.id}`}>
                {item.descendants} comments
              </Link>
            </div>
          </div>
        </>
      )}
    </div>
  )
}
Here, we display the item's details, specifically the id, title, URL, time, and descendants.
Now that we have created the Item component, we can update our index.jsx routes to show a list of items. Remix uses the concept of data loading for fetching data from an API or a server into components, so we are going to create loaders to fetch data from the Hacker News API.
To fetch the top stories from the endpoint using the getTopStories() we created earlier, add the code below inside routes/index.jsx:
// app/routes/index.jsx
import { getItem, getTopStories } from '~/helper/fetch'

export const loader = async () => {
  const topStoryIds = await getTopStories()
  const items = await Promise.all(topStoryIds.slice(0, 10).map(async (itemId) => await getItem(itemId)))

  return items
}
Here, we create a loader function that uses the getTopStories function to fetch the top stories. The /topstories endpoint will return an array of item IDs. Since the /topstories endpoint will return up to 500 item IDs, we are using slice() to get only the first 30 and we map through them passing each ID to the getItem function to fetch the item's details.
Next, add the portion to render the items:
// app/routes/index.jsx
import { useLoaderData } from '@remix-run/react'
import Item from '~/components/Item'
import { getList } from '~/helper/fetch'

export const loader = async () => {
  const res = await getList('topstories')

  return res
}

export default function Index() {
  const items = useLoaderData()

  return (
    <div className="divide-y">
      {items.length > 0 &&
        items.map((item) => {
          return <Item item={item} key={item.id} />
        })}
    </div>
  )
}
Using useLoaderData() we get the items fetched earlier by loader(). Then we perform a simple check to only render the Item component when the array of items is not empty. Then we loop through each item passing it to the Item component.
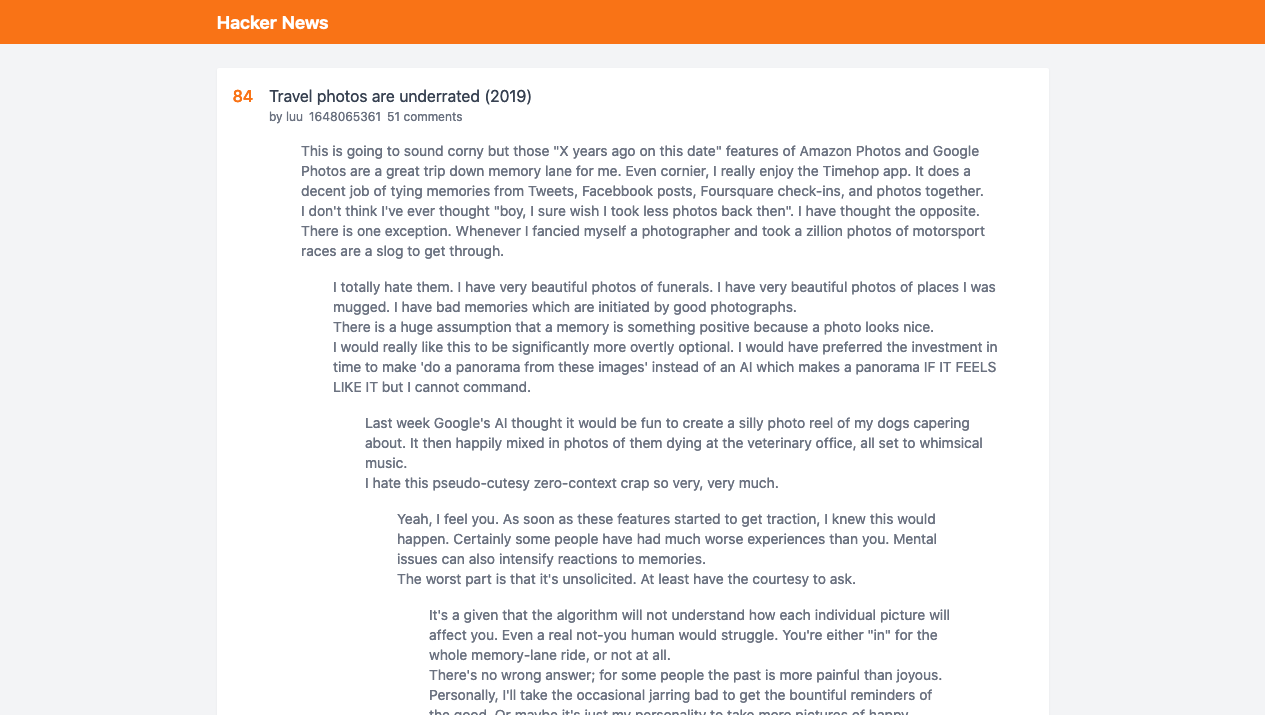
Here is what the rendered list of items will look like:

Comment component
Next, we will create the Comment component, which will be used to display an item’s comments. In the components folder, create a new file Comment.jsx.
The Comment component will accept a comment (item) and renders the comment details. Also, the Comment component checks if each comment has descendants and calls itself and renders until there are no longer any nested descendants.
Add the following to Comment.jsx:
// app/components/Comment.jsx
import { Link } from '@remix-run/react'

export default function Comment({ comment }) {
  return (
    <div className="flex items-center space-x-4 p-4">
      {comment && (
        <>
          <div className="place-self-start self-start font-medium text-orange-500">{comment.score}</div>
          <div>
            {comment.text && !comment.deleted && (
              <div
                className="overflow-hidden text-sm text-gray-500"
                // eslint-disable-next-line react/no-danger
                dangerouslySetInnerHTML={{
                  __html: comment.text,
                }}
              />
            )}
            {comment.kids && comment.kids.map((kid) => <Comment item={kid} key={kid} />)}
            <div className="flex space-x-1.5 text-xs text-gray-500">
              <span>
                by{' '}
                <Link className="hover:underline" to="/">
                  {comment.by}
                </Link>
              </span>
              <span>{comment.time}</span>
            </div>
          </div>
        </>
      )}
    </div>
  )
}
Update $id.jsx to display a single item and its comments using the Comment component:
// app/routes/items/$id.jsx
import { Link, useLoaderData } from '@remix-run/react'
import Comment from '~/components/Comment'
import { getItem } from '~/helper/fetch'

export const loader = async ({ params }) => {
  const item = await getItem(params.id)

  const comments = await Promise.all(item.kids.map(async (itemId) => await getItem(itemId)))

  return { item, comments }
}

export default function ItemId() {
  const { item, comments } = useLoaderData()

  return (
    <div className="flex items-center space-x-4 p-4">
      {item && (
        <>
          <div className="place-self-start self-start font-medium text-orange-500 ">{item.score}</div>
          <div>
            <h3 className="text-gray-700">
              <a href={item.url}>{item.title}</a>
            </h3>
            <div className="flex space-x-1.5 text-xs text-gray-500">
              <span>
                by{' '}
                <Link className="hover:underline" to="/">
                  {item.by}
                </Link>
              </span>
              <span>{item.time}</span>
              <Link className="hover:underline" to={{ pathname: '/items', query: { id: item.id } }}>
                {item.descendants} comments
              </Link>
            </div>
            {comments && comments.map((comment) => <Comment comment={comment} key={comment.id} />)}
          </div>
        </>
      )}
    </div>
  )
}
Here, we created a loader function that uses the getItem() to fetch a particular item. The function takes the ID of the item to fetch from the URL parameter. Also, we fetch the item's comments by looping through the item's descendants. Using useLoaderData() we get both the item and comments fetched by the loader(), then render the item's details as well as its comments. For the item's comments, we make use of the Comment component passing to it the item.
With this code, your application will render a story's comments like this:
Deploy the Remix app to Koyeb
Koyeb is a developer-friendly serverless platform to deploy apps globally. No-ops, servers, or infrastructure management and it has supports for different tech stacks such as Rust, Golang, Python, PHP, Node.js, Ruby, and Docker.
We will use git-driven deployment to deploy on Koyeb. To do this, we need to create a new GitHub repository from the GitHub web interface or by using the GitHub CLI with the following command:
gh repo create <YOUR_GITHUB_REPOSITORY> --private
Initialize a new git repository on your machine and add a new remote pointing to your GitHub repository:
git init
git remote add origin git@github.com:<YOUR_GITHUB_USERNAME>/<YOUR_GITHUB_REPOSITORY>.git
git branch -M main
Add all the files in your project directory to the git repository and push them to GitHub:
git add .
git commit -m "Initial commit"
git push -u origin main
From the Koyeb Console, on the Overview tab, click on the Create Web Service button to begin.
On the App Creation Page:
- Choose GitHub as your deployment method.
- Select your repository from the list.
- Choose a name for your App and Service, for example
remix-hn, and click Deploy.
Voilà! Your app is now being built and deployed, and a public URL will be provided soon to view your application. If you want to learn how Koyeb automatically builds your application from git, make sure to read our how we build from git documentation.
By deploying on Koyeb, our application benefits from native global load balancing, autoscaling, autohealing, and auto HTTPS (SSL) encryption with zero configuration on your part.
If you would like to look at the code for the demo application, you can find it here.
Conclusion
In this guide, we showcased how to build a Hacker News clone application with Remix and Tailwind and deploy it on Koyeb. Since we deployed to Koyeb using git-driven deployment, a new build will be automatically triggered and deployed on Koyeb whenever you push your changes to your GitHub repository.
Your changes will go live as soon as your deployment passes all necessary health checks. In case of a failure during deployment, Koyeb maintains the latest working deployment in production to ensure your application is always up and running.
Remix is a great framework with potential. It is an entirely new approach to building hybrid React web applications that are built upon the advancements we have seen in both modern and legacy web technologies over the years.
Finally, if you have any questions or suggestions to improve this guide, join us on the community platform to chat!