Deploy Remote MCP Servers to Koyeb using Streamable HTTP Transport
The Model Context Protocol (MCP) is an open protocol released by Anthropic to standardize how applications provide context to large language models (LLMs). By using MCP, LLMs and AI agents can interact with different tools and data sources in a consistent, standardized way.
MCP follows a client-server model where host applications connect to multiple servers:
- MCP Hosts: Applications like Claude Desktop, ChatGPT Desktop, Cursor, and Windsurf that let you access data through MCP
- MCP Clients: Establish and maintain the connection with servers within the host application
- MCP Servers: Local or remote programs that each expose specific capabilities like tools through the MCP protocol
Most MCP Servers you’ve probably used rely on the standard input/output (stdio) transport, where the client launches the server as a subprocess. In addition to this standard transport layer, MCP also supports a recently introduced transport layer: Streamable HTTP, replacing the previous HTTP + SSE (Server-Sent Events) transport, following a change in the MCP specification.
This change allows MCP Servers to be implemented in plain HTTP, enabling stateless servers and removing the need for long-lived connections. Servers can still optionally make use of SSE to stream multiple server messages. Streamable HTTP offers several benefits—particularly in terms of efficiency, reliability, and compatibility—by supporting on-demand resource allocation, avoiding unnecessary persistent connections, easing scaling and running remote servers in serverless environments.
In this guide, you’ll learn how to build and deploy a remote MCP server using Streamable HTTP transport on Koyeb.
The service deployed on Koyeb will be configured with scale-to-zero so that it only starts when a request is made and shuts down when idle.
Requirements
To successfully follow and complete this guide, you need:
- A local development environment with Node.js and npm installed
- A Koyeb account to deploy the MCP Server
- The Koyeb CLI installed to interact with Koyeb from the command line
Steps
To successfully build and deploy the MCP Server using Streamable HTTP transport to Koyeb, you need to follow these steps:
- Initialize a new project for the MCP Server
- Build a simple MCP Server using Streamable HTTP transport
- Test the MCP Server using MCP Inspector
- Deploy the MCP Server to Koyeb using the CLI
- Test the MCP Server using Claude Desktop
- Start building and deploying remote MCP Servers on Koyeb today!
Initialize a new project for the MCP Server
To get started, open your terminal and navigate to a location of your choice. Create a directory to hold the project files:
mkdir mcp-server-demo
cd mcp-server-demo
Inside the directory, initialize a package.json file. The package.json contains various metadata, gives npm information to identify the project, handles the project's dependencies, etc.
$ npm init -y

{
  "name": "mcp-server-demo",
  "version": "1.0.0",
  "main": "index.js",
  "scripts": {
    "test": "echo \"Error: no test specified\" && exit 1"
  },
  "keywords": [],
  "author": "",
  "license": "ISC",
  "description": ""
}
As our application uses the Express framework to expose the MCP Server, the official TypeScript SDK for Model Context Protocol servers, and Zod for schema declaration and validation, we need to add them as dependencies.
npm install express @modelcontextprotocol/sdk zod --save
The project is built using TypeScript, so we need to add some extra development dependencies: typescript, @types/node, and @types/express. In your terminal, run:
npm install typescript @types/node @types/express --save-dev
Finally, open package.json and add the following updates:
- rename the main file to server.js
- add type
moduleto the project - add a build script to transpile the code and make it executable
- add a start script to launch the server
{
  "name": "mcp-remote-stream",
  "version": "1.0.0",
  "description": "",
-  "main": "index.js",
+  "main": "server.js",
+  "type": "module",
  "scripts": {
+    "build": "tsc && chmod 755 build/server.js",
+    "start": "node build/server.js",
    "test": "echo \"Error: no test specified\" && exit 1"
  },
+  "files": [
+    "build"
+  ],
+  "bin": {
+    "demo": "./build/server.js"
+  },
  "keywords": [],
  "author": "",
  "license": "ISC",
  "dependencies": {
    "@modelcontextprotocol/sdk": "^1.10.1",
    "express": "^5.1.0",
    "zod": "^3.24.3"
  },
  "devDependencies": {
    "@types/express": "^5.0.1",
    "@types/node": "^22.14.1",
    "typescript": "^5.8.3"
  }
}
Add a tsconfig.json at the root of your project to configure TypeScript:
{
  "compilerOptions": {
    "target": "ES2022",
    "module": "Node16",
    "moduleResolution": "Node16",
    "outDir": "./build",
    "rootDir": "./src",
    "strict": true,
    "esModuleInterop": true,
    "skipLibCheck": true,
    "forceConsistentCasingInFileNames": true
  },
  "include": ["src/**/*"],
  "exclude": ["node_modules"]
}
The project environment is now ready, we can now start writing our MCP Server application.
Building a simple MCP Server using Streamable HTTP transport
At the root of your project directory, create a src folder:
mkdir src
Then, within the src folder, add a server.ts file with the following content:
import express, { Request, Response } from "express";
import { z } from "zod";
import { McpServer } from "@modelcontextprotocol/sdk/server/mcp.js";
import { StreamableHTTPServerTransport } from "@modelcontextprotocol/sdk/server/streamableHttp.js";

const server = new McpServer({
  name: "example-server",
  version: "1.0.0",
});

server.tool(
  "add",
  "Use this tool to add two numbers together.",
  {
    a: z.number().describe("The first number to add"),
    b: z.number().describe("The second number to add"),
  },
  async ({ a, b }) => {
    return {
      content: [
        {
          type: "text",
          text: `${a + b}`,
        },
      ],
    };
  }
);

const app = express();
app.use(express.json());

const transport: StreamableHTTPServerTransport = new StreamableHTTPServerTransport({
  sessionIdGenerator: undefined, // set to undefined for stateless servers
});

// Setup routes for the server
const setupServer = async () => {
  await server.connect(transport);
};

app.post('/mcp', async (req: Request, res: Response) => {
  console.log('Received MCP request:', req.body);
  try {
      await transport.handleRequest(req, res, req.body);
  } catch (error) {
    console.error('Error handling MCP request:', error);
    if (!res.headersSent) {
      res.status(500).json({
        jsonrpc: '2.0',
        error: {
          code: -32603,
          message: 'Internal server error',
        },
        id: null,
      });
    }
  }
});

app.get('/mcp', async (req: Request, res: Response) => {
  console.log('Received GET MCP request');
  res.writeHead(405).end(JSON.stringify({
    jsonrpc: "2.0",
    error: {
      code: -32000,
      message: "Method not allowed."
    },
    id: null
  }));
});

app.delete('/mcp', async (req: Request, res: Response) => {
  console.log('Received DELETE MCP request');
  res.writeHead(405).end(JSON.stringify({
    jsonrpc: "2.0",
    error: {
      code: -32000,
      message: "Method not allowed."
    },
    id: null
  }));
});

// Start the server
const PORT = process.env.PORT || 3000;
setupServer().then(() => {
  app.listen(PORT, () => {
    console.log(`MCP Streamable HTTP Server listening on port ${PORT}`);
  });
}).catch(error => {
  console.error('Failed to set up the server:', error);
  process.exit(1);
});
The code above creates a new MCP Server instance with a name and version.
Then, we define a simple tool called add that returns the sum of two numbers.
We use Express to create a web server and define a few routes for the server to handle requests under the /mcp path to handle both client requests and server-to-client notifications.
Here, we don't use any session management, so we set the sessionIdGenerator to undefined. This stateless approach is useful for running the server in a serverless environment when each request is independent.
The MCP server is now ready. Before deploying it to Koyeb, let’s test it locally using MCP Inspector.
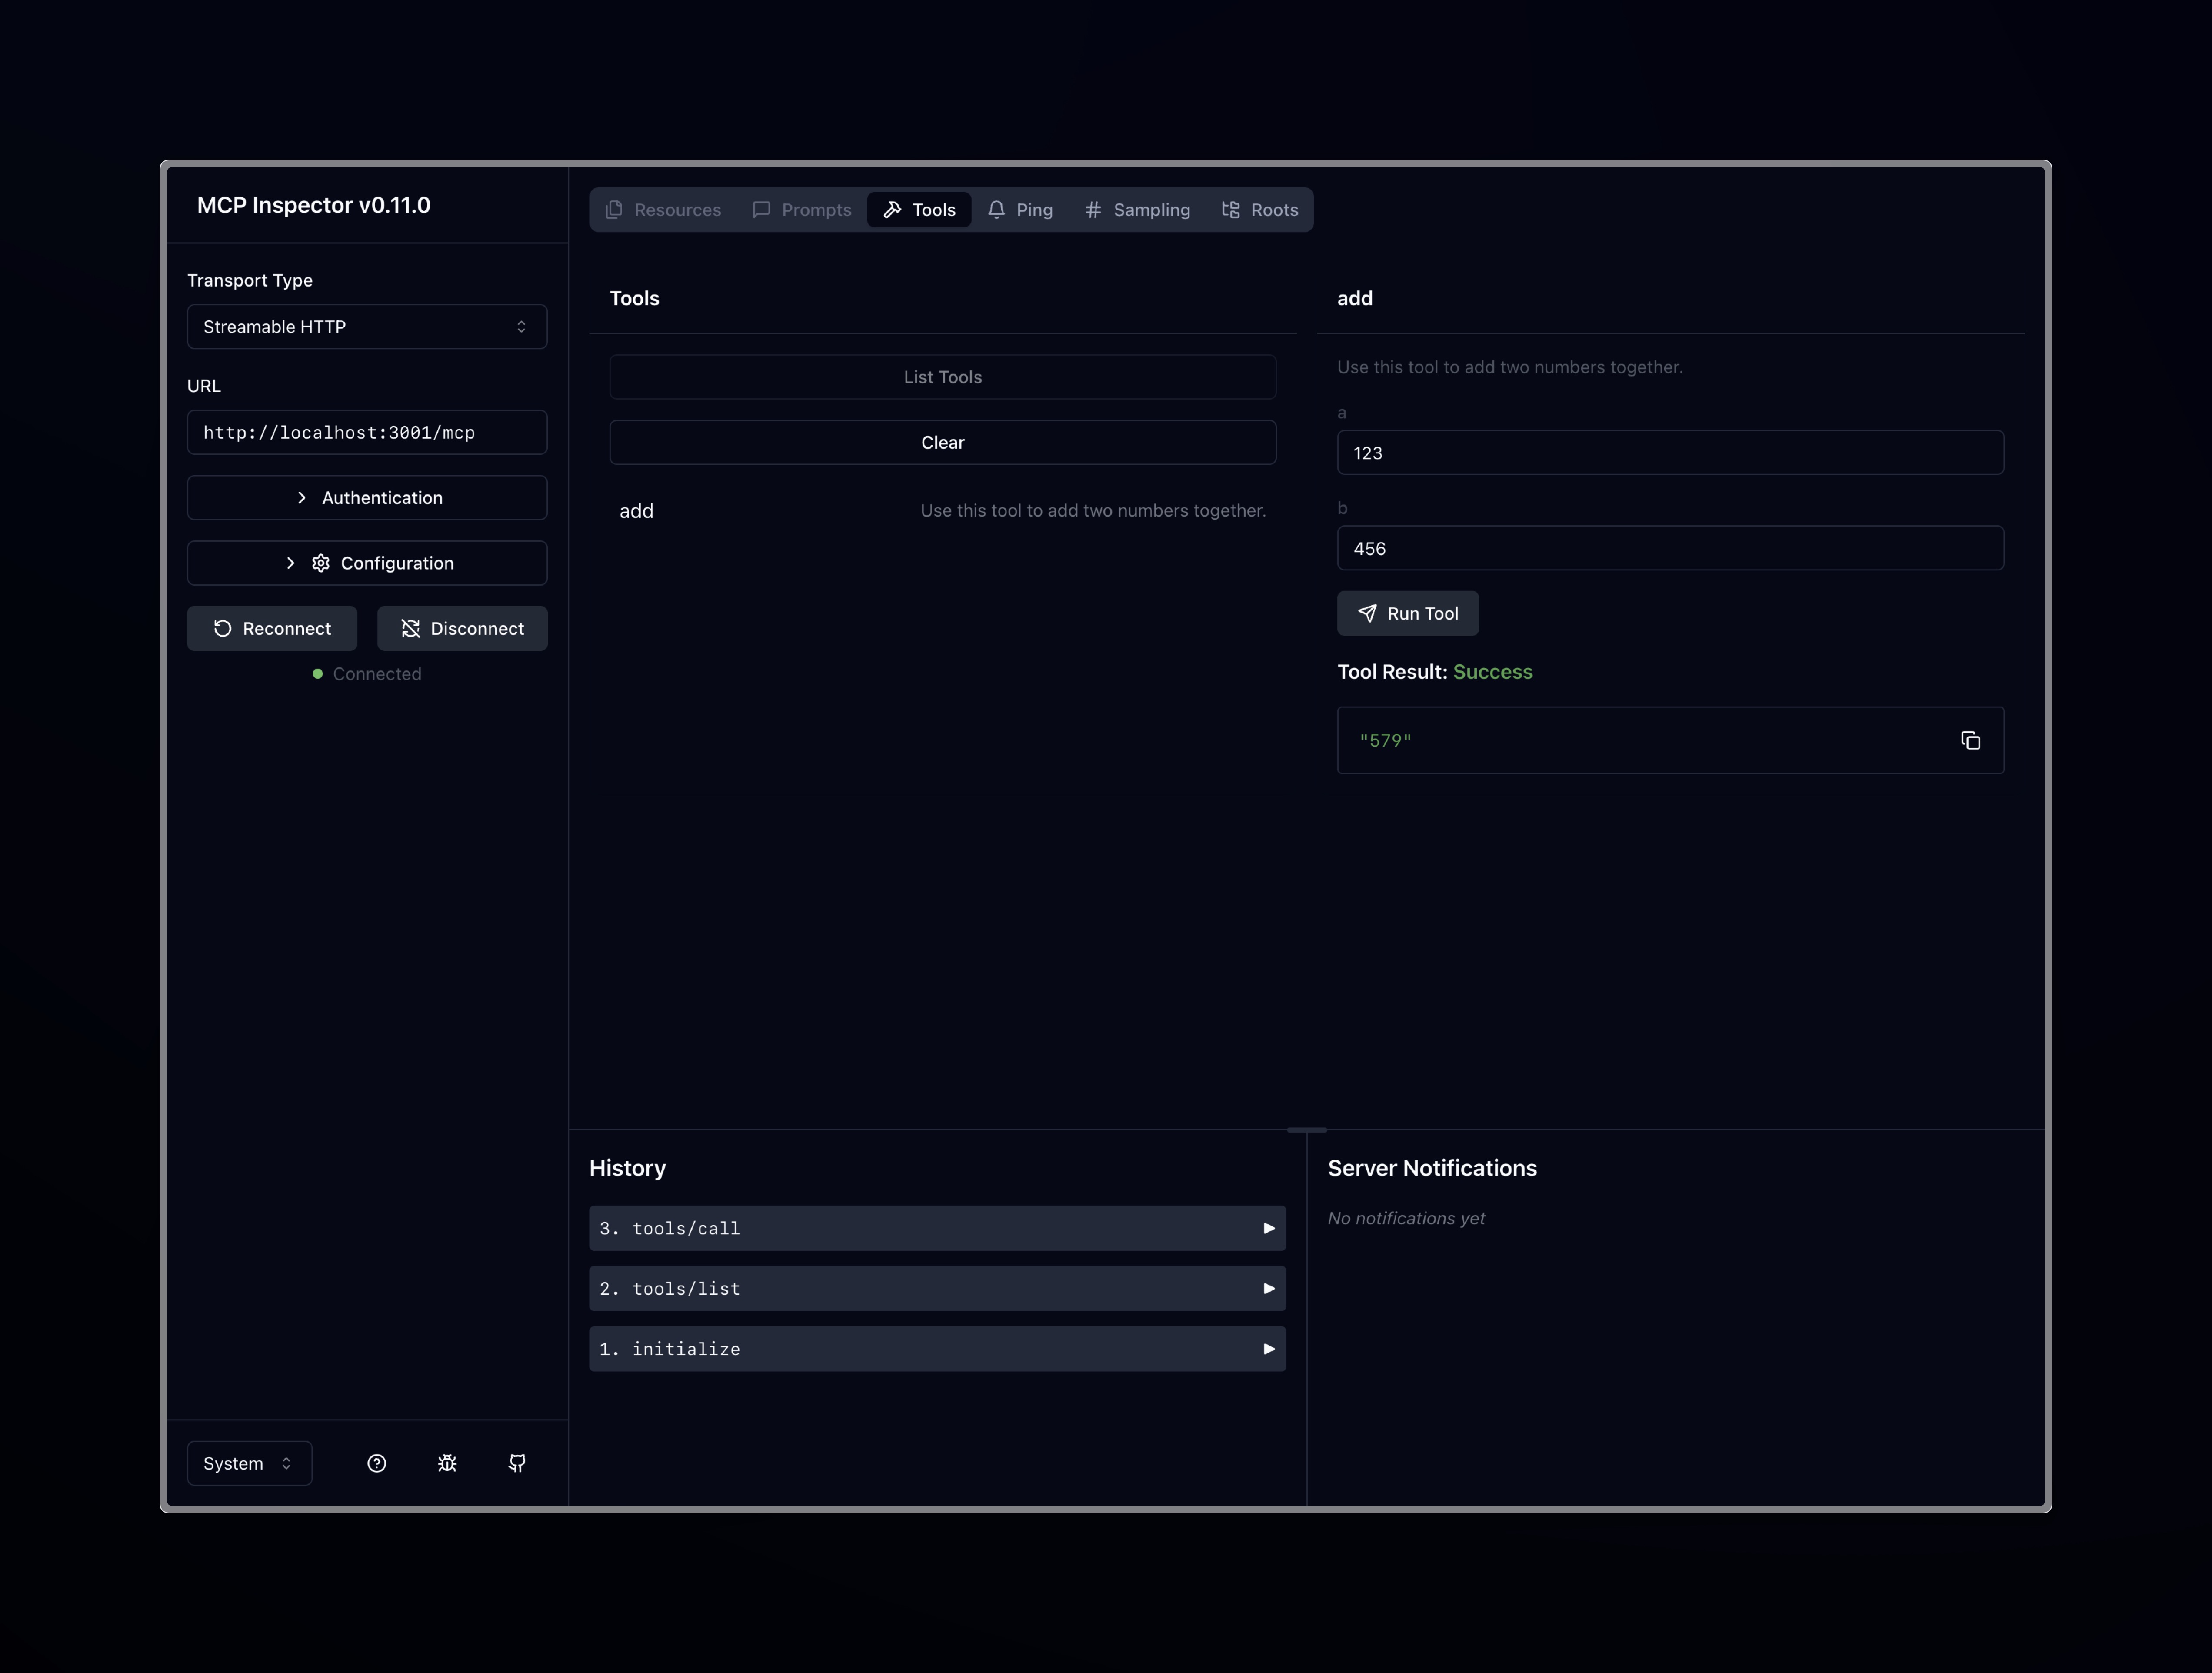
Test the MCP Server using MCP Inspector
To test the MCP Server, we'll use MCP Inspector, a visual testing tool for MCP servers that allows you to inspect the server's capabilities, send requests, and view the responses.
Start by launching the MCP Server locally using the following command:
npm run build
node build/server.js
Then, launch the MCP Inspector and connect to the MCP Server:
npx @modelcontextprotocol/inspector
In your browser, go to http://localhost:6274 to open MCP Inspector.
On the page, choose the Streamable HTTP as Transport Type and ensure the URL is set to http://localhost:3000/mcp.
Click the Connect button to establish the connection.
If successful, the status should display as Connected. You can then click List Tools to see the tools available, in our case add, and call it providing the two numbers to add.
With everything working, we're now ready to deploy the MCP Server to Koyeb.
Deploy Node MCP Server to Koyeb using the CLI
To deploy the Node MCP Server on Koyeb using the Koyeb CLI, you will need the Koyeb CLI installed. Once installed, run the following command in your terminal to create and deploy the service:
koyeb deploy . \
  mcp-example-server/main \
  --instance-type small \
  --region was \
  --type web \
  --min-scale 0 \
  --max-scale 5 \
  --autoscaling-concurrent-requests 5
This Koyeb CLI command will deploy the MCP Server to Koyeb with Scale-to-Zero and autoscaling based on concurrent requests enabled, on a small instance type in the Washington, D.C. region. After a few seconds, your MCP Server will be deployed and running on Koyeb.
Next, we need to retrieve the public URL of our deployment. You can do this by running the following command in your terminal:
$ koyeb app get mcp-example-server
ID      	NAME              	STATUS 	DOMAINS                                     	CREATED AT
22284dd0	mcp-example-server	HEALTHY	["mcp-example-server-ed-e5f1a08a.koyeb.app"]	05 May 25 10:43 UTC
Copy the domain ending with .koyeb.app; we’ll use it to configure the MCP Server with our client. Here, we use Claude Desktop as an example.
Test the MCP Server using Claude Desktop
To test the MCP Server using Claude Desktop, you need to add the following "ExampleServer" entry to your client's MCP server configuration file.
For Claude Desktop, the configuration file is located in ~/Library/Application\ Support/Claude/claude_desktop_config.json. Open the file and add the following entry:
{
  "mcpServers": {
    "ExampleServer": {
      "command": "npx",
      "args": ["-y", "mcp-remote", "https://<REPLACE_ME>.koyeb.app/mcp"]
    }
  }
}
Be sure to replace
<REPLACE_ME.koyeb.app>with your MCP Server’s domain retrieved earlier from the Koyeb CLI.
In Claude Desktop, make sure the MCP Server is properly configured and you can see the ExampleServer entry in the list of MCP servers.

Next, let's ask a simple question that will trigger the MCP Server to call the add tool with the numbers 42 and 42:
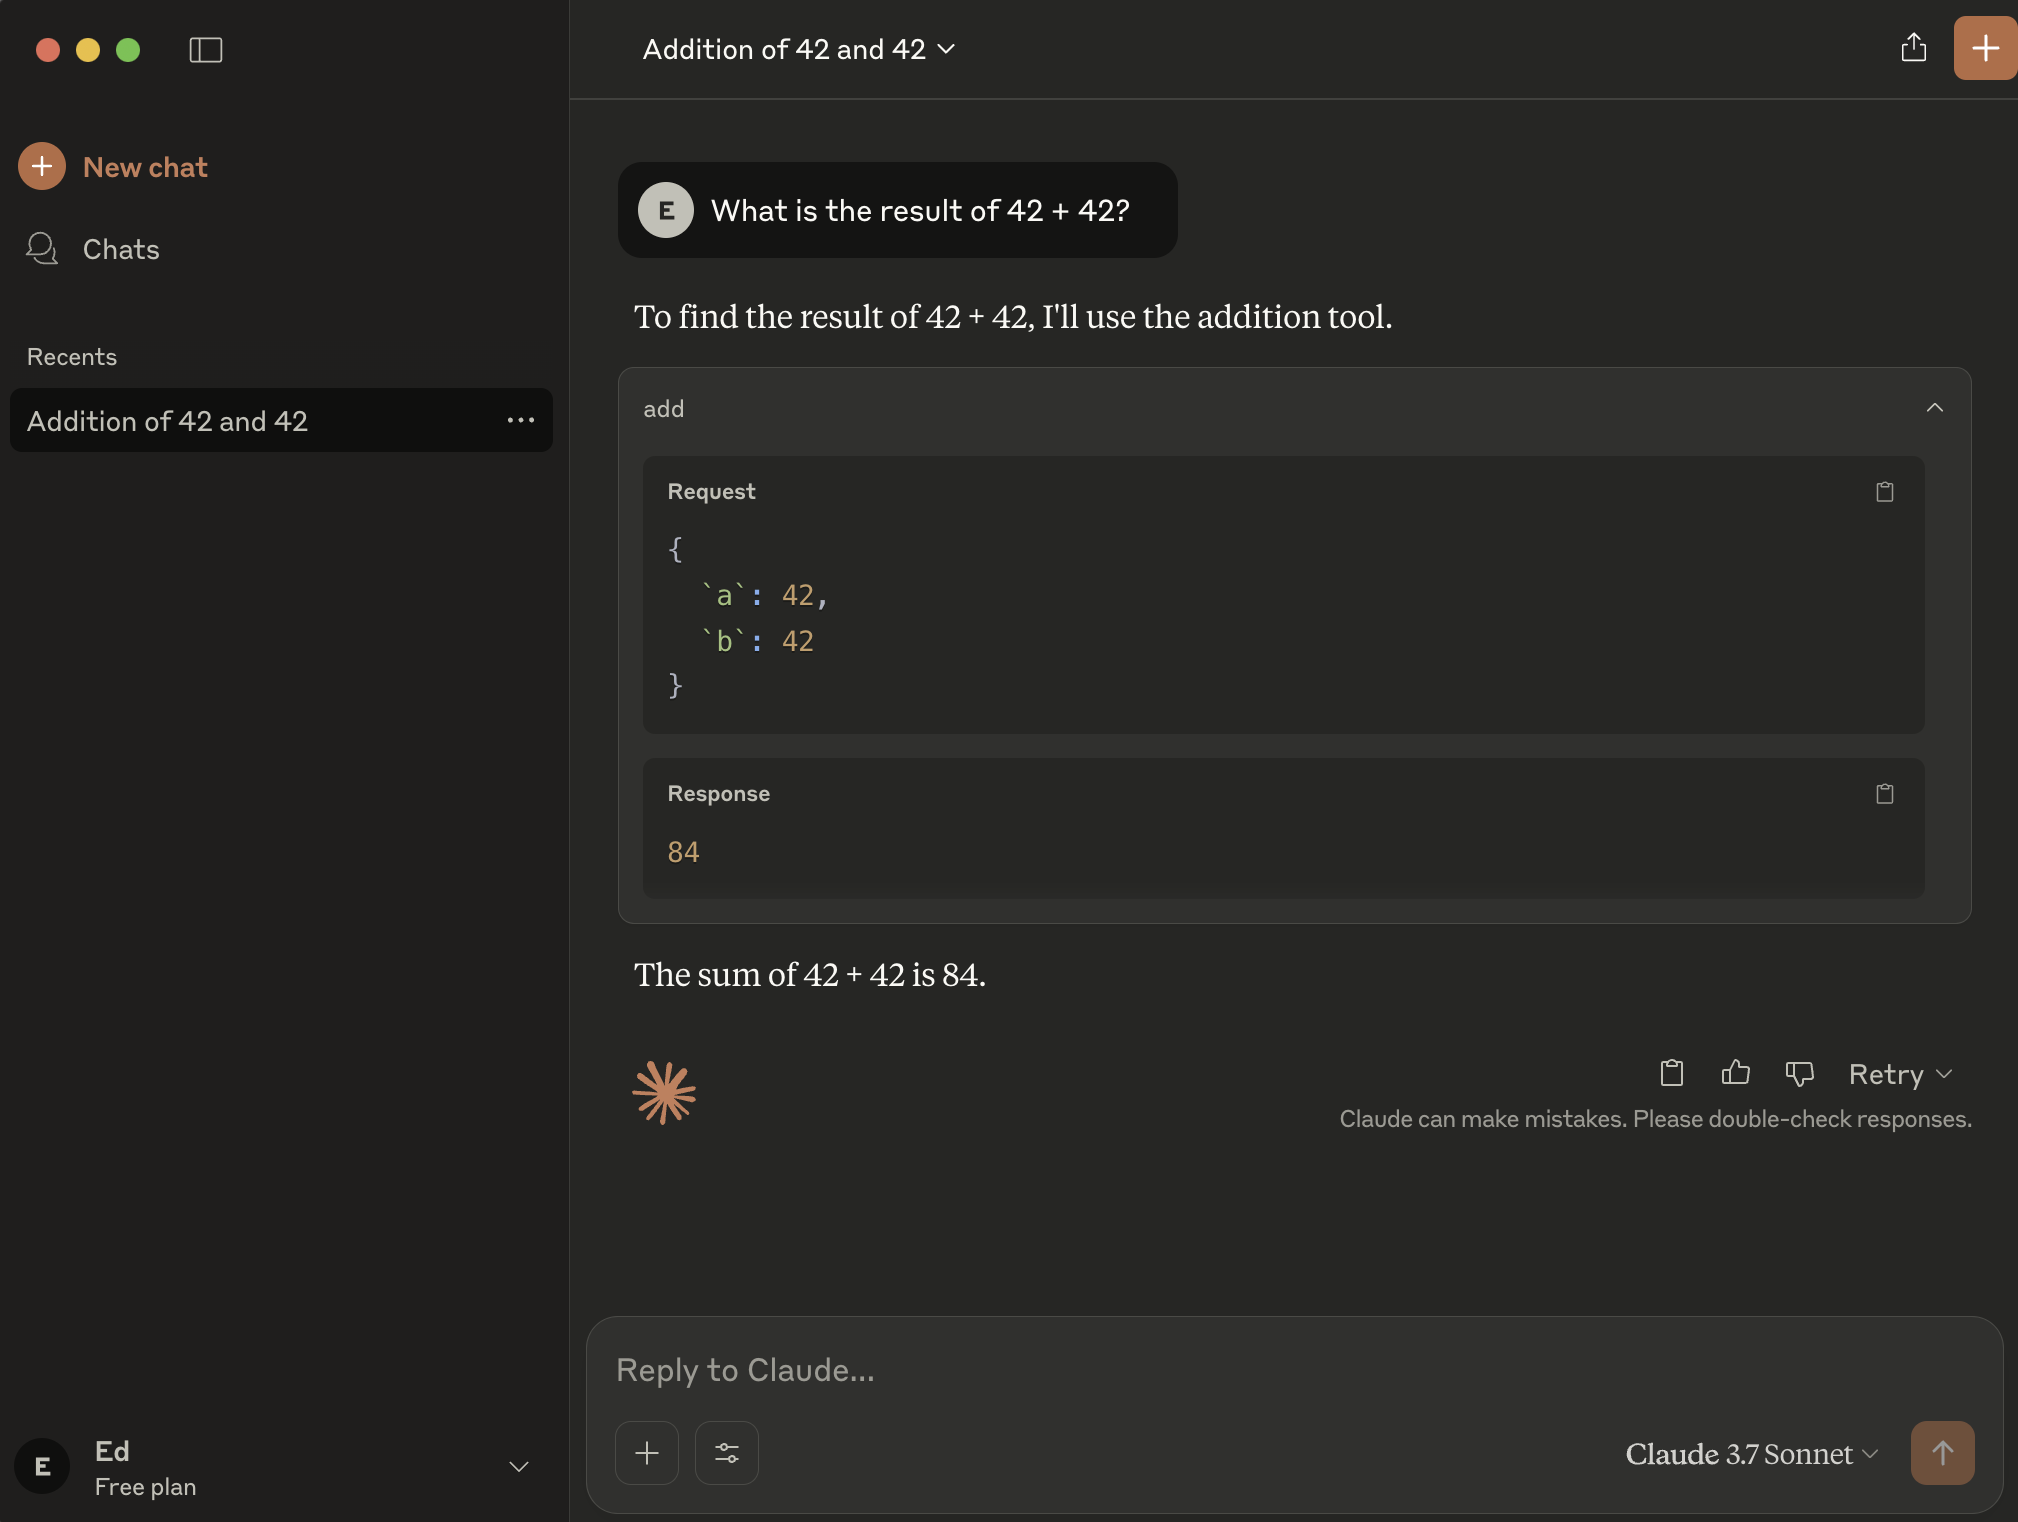
As shown in the screenshot below, Claude Desktop successfully called the MCP Server, and the add tool was used to calculate the sum of 42 and 42
Start building and deploying remote MCP Servers on Koyeb today!
In this guide, we showcased how to build and deploy a simple MCP Server using Node and deployed it to Koyeb using the Koyeb CLI.
We leveraged the Streamable HTTP transport without relying on session management. This stateless approach allows us to demonstrate how to benefit from scale-to-zero and autoscaling, available natively on Koyeb.
With this implementation, the MCP server automatically scales based on concurrent requests and sleeps when idle, allowing you to optimize your infrastructure and costs effortlessly.
In a real-world implementation, you should secure the MCP Server with authentication and authorization, which we didn’t cover in this guide.
To learn more, visit the Model Context Protocol documentation and explore other language implementations.