Dynamically Start GitHub Action Runners on Koyeb
Introduction
GitHub Actions are a great way to automate parts of your development and release workflows by running jobs in response to repository events. While native runners are available to execute these jobs on GitHub, often self-hosting your runners can provide a better price-performance ratio.
In our guide on running GitHub runners on Koyeb, we demonstrated how to configure Koyeb GitHub runners to execute GitHub Actions for an example application. This configuration lets us choose the appropriate performance profile for our tasks while saving money compared to the higher-tier native GitHub runners. One problem, however is that you don't necessarily need the runners operating at all times. When no jobs are being run, this needlessly increases costs without providing any value.
In this guide, we'll show you how to improve the Koyeb GitHub runner configuration by taking advantage of a companion project, koyeb-github-runner-scheduler. Instead of deploying a continuously-running, high-performance GitHub runner on Koyeb directly, you can deploy a smaller scheduler app that dynamically spins up GitHub runners as necessary to complete jobs. The Koyeb Scheduler can be used to dispatch jobs for either an entire organization or for a specific repository. We'll be configuring our Scheduler to run for a specific repository in this demonstration.
How the scheduler works
The scheduler is a small application that you can deploy on Koyeb to manage GitHub Actions job requests. It listens for jobs from GitHub and dispatches them to an appropriate runner on Koyeb. If a runner is not available, the scheduler provisions a new one and hands the job over once it is running. It automatically spins down the GitHub runners that have been idle for a configurable period of time.
This system allows you to run a small, always-on application and dynamically provision high-performance resources to execute your jobs when needed. You can configure the scheduler to receive requests from an entire organization or a single repository.
The basic order of operations that occurs when a GitHub Action, like a unit test, is triggered is as follows:
- Your GitHub repository sends a webhook to the Koyeb Scheduler.
- The Koyeb Scheduler checks if an appropriate runner is available to run the job. If one is not found, it initiates a new runner instance on Koyeb, tailored to your pre-defined size and geographic location requirements.
- The Koyeb Scheduler dispatches the job to the matching GitHub runner.
After a pre-configured timeout, the Koyeb Scheduler shuts down the runner if no new jobs are initiated. This timeout is adjustable, offering you further control over cost and performance.
Requirements
To follow along with this guide, you'll need:
- A Koyeb account to deploy and run the Koyeb Scheduler.
- A GitHub account to store your repositories and configure the GitHub Actions behavior.
Steps
In this guide, we'll deploy the Koyeb Scheduler on Koyeb and configure GitHub to pass GitHub Actions jobs to it through the following steps:
- Clone the Koyeb GitHub runner scheduler demo application
- Create a GitHub personal access token
- Create a Koyeb personal access token
- Deploy the Koyeb GitHub Scheduler on Koyeb
- Configure a webhook for the GitHub repository
- Test the Scheduler
Clone the Koyeb GitHub runner scheduler demo application
To get started, visit the Koyeb GitHub runner scheduler demo application repository and clone it to your account.
The repository contains the same code from the Koyeb GitHub runner demo application, but with a different GitHub Actions definition:
name: Run unittests

on:
  push:
    branches:
      - '*'

jobs:
  run-tests-in-frankfurt:
    runs-on: koyeb-fra-small
    steps:
      - name: Checkout repository
        uses: actions/checkout@v4
      - name: Run tests
        run: |
          echo "Hello from a Small Koyeb Instance in Frankfurt!"
          python -m unittest
Rather than targeting a runner based on the koyeb-runner label, this action uses the format expected by the Scheduler:
koyeb-<REGION>-<INSTANCE_TYPE>
You can find the available values for regions and instance types in the Koyeb documentation. This allows the Scheduler to spin up different runners of various sizes in different locations depending on what the job requires.
Create a GitHub personal access token
Before we can deploy the Koyeb Scheduler on Koyeb, we need to generate a new personal access token in GitHub.
On GitHub, click your user icon in the top right corner and go to Settings. From there, go to Developer settings at the bottom of the left hand navigation menu and select Fine-grained tokens under the Personal access tokens section. Click Generate new token to access the token creation form.
Give the token a name and set the expiration date as you'd like. In the Repository access section, choose Only select repositories and then choose the project repository. In this tutorial, we focus on configuring the token for a single repository, but you can check the koyeb-github-runner-scheduler repository for instructions on configuring for an entire organization.
In the Permissions section, expand the Repository permissions category. In the drop down menu for the Administration permission, select Read and write.
When you are finished, click Generate token. Copy the token value and store it in a safe location so we can use it later. This value cannot be retrieved later, so the token will have to be recreated if you lose it.
Create a Koyeb personal access token
In order to spin up resources on your Koyeb, the Koyeb Scheduler needs a token that authorizes it to do so.
To get started, in the Koyeb control panel, click your user icon in the top right corner and click Account settings. Click the Personal Access Tokens item in the left-hand menu.
Give your new token a recognizable name and a useful description and then click Create API Access Token. Copy the token value and store it in a safe location so that we can use it in the next step. This value cannot be retrieved later, so the token will need to be recreated if you lose it.
Deploy the Koyeb GitHub Scheduler on Koyeb
Now that we have the GitHub and Koyeb tokens, we can deploy the Koyeb GitHub Scheduler to our account.
Click the "Deploy to Koyeb" button to configure the deployment. Be sure to alter the GITHUB_TOKEN, KOYEB_TOKEN, and API_SECRET environment variables to reflect your own values:

If you'd like to deploy manually, on the Overview tab of the Koyeb control panel, click Create Web Service to get started:
- Select Docker as the deployment method.
- Enter
github.io/koyeb/github-runner-scheduleras the Docker image. - In the Environment variables and files section, create the following variables:
GITHUB_TOKEN: The personal access token you generated on GitHub.KOYEB_TOKEN: The personal access token you generated on Koyeb.API_SECRET: A random secret used to authenticate requests from GitHub webhooks. You will need to provide the same value when configuring the webhook on GitHub afterwards. A good way to generate this secret is by using the output of this command:openssl rand -base64 30.MODE: Set this torepositorysince we're configuring the Scheduler for a single repository (if we were configuring for an organization, this would instead be set toorganization). Additionally, you may also want to set the following optional variables depending on your needs:DISABLE_DOCKER_DAEMON: Set this totrueif you do not need to start a Docker daemon to run your jobs. Disabling this will reduce both the startup time and memory usage for your runners. If you're using the Python application from the previous guide, you can safely set this totrue.RUNNERS_TTL: You can optionally set this to the number of minutes after the most recent job that you want to wait before spinning down the GitHub runners. The default behavior is to wait 120 minutes (2 hours).
- When you are ready, click Deploy to start up the Koyeb GitHub Scheduler on your account.
On the Service page, copy the Public URL for your Scheduler. You'll need it when configuring the webhook in the next step.
Configure a webhook for the GitHub repository
Now that the Scheduler is up and running, you can finish the integration by configuring a webhook for the repository.
On your GitHub repository page, click the Settings tab and select Webhooks. Click Add webhook to begin the configuration.
Paste the public URL you copied from your Koyeb Scheduler into the Payload URL field. For the Content type, select application/json. In the Secret field, paste the same secret you used as the value for the API_SECRET environment variable when deploying the Scheduler.
In answer to the question Which events would you like to trigger this webhook?, choose Let me select individual events. In the list that follows:
- De-select the Pushes item
- Select the Workflow jobs item
Click Add webhook when you are finished.
Test the Scheduler
Once you push your new changes to GitHub, the workflows should begin to execute using the new Scheduler system.
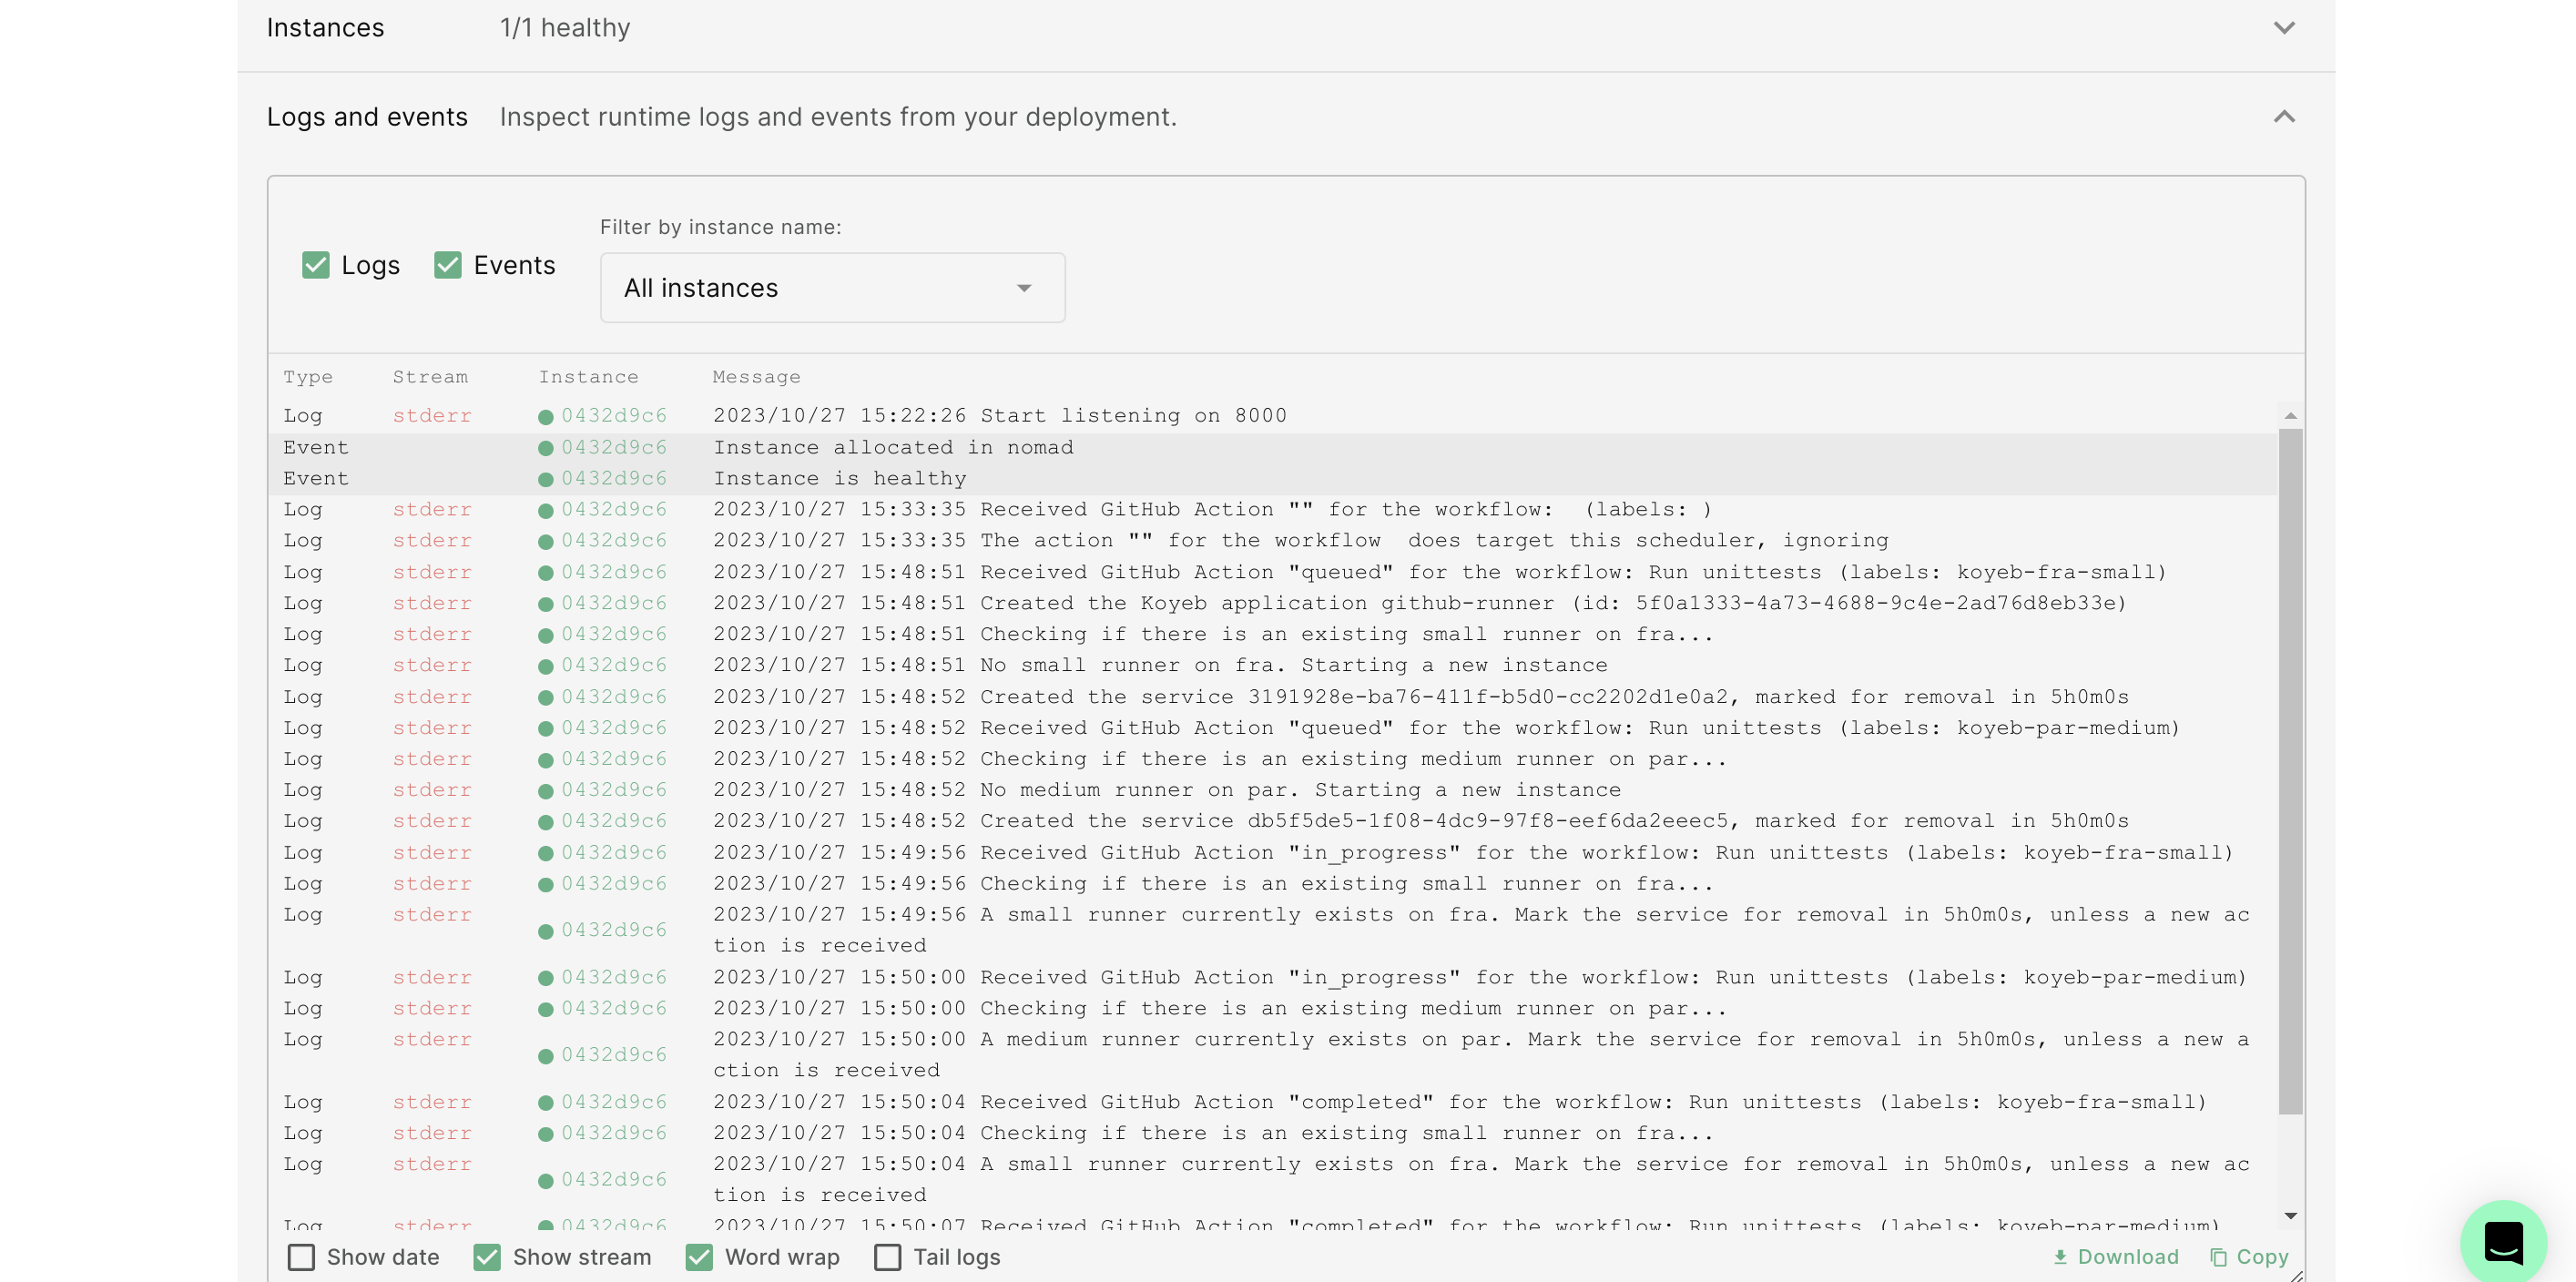
If you visit the runtime logs of the Koyeb GitHub Scheduler app in the Koyeb control panel, there should be messages indicating that a new job has been received from GitHub. They'll look for GitHub runners with the appropriate label and, finding none, will provision the new instance:
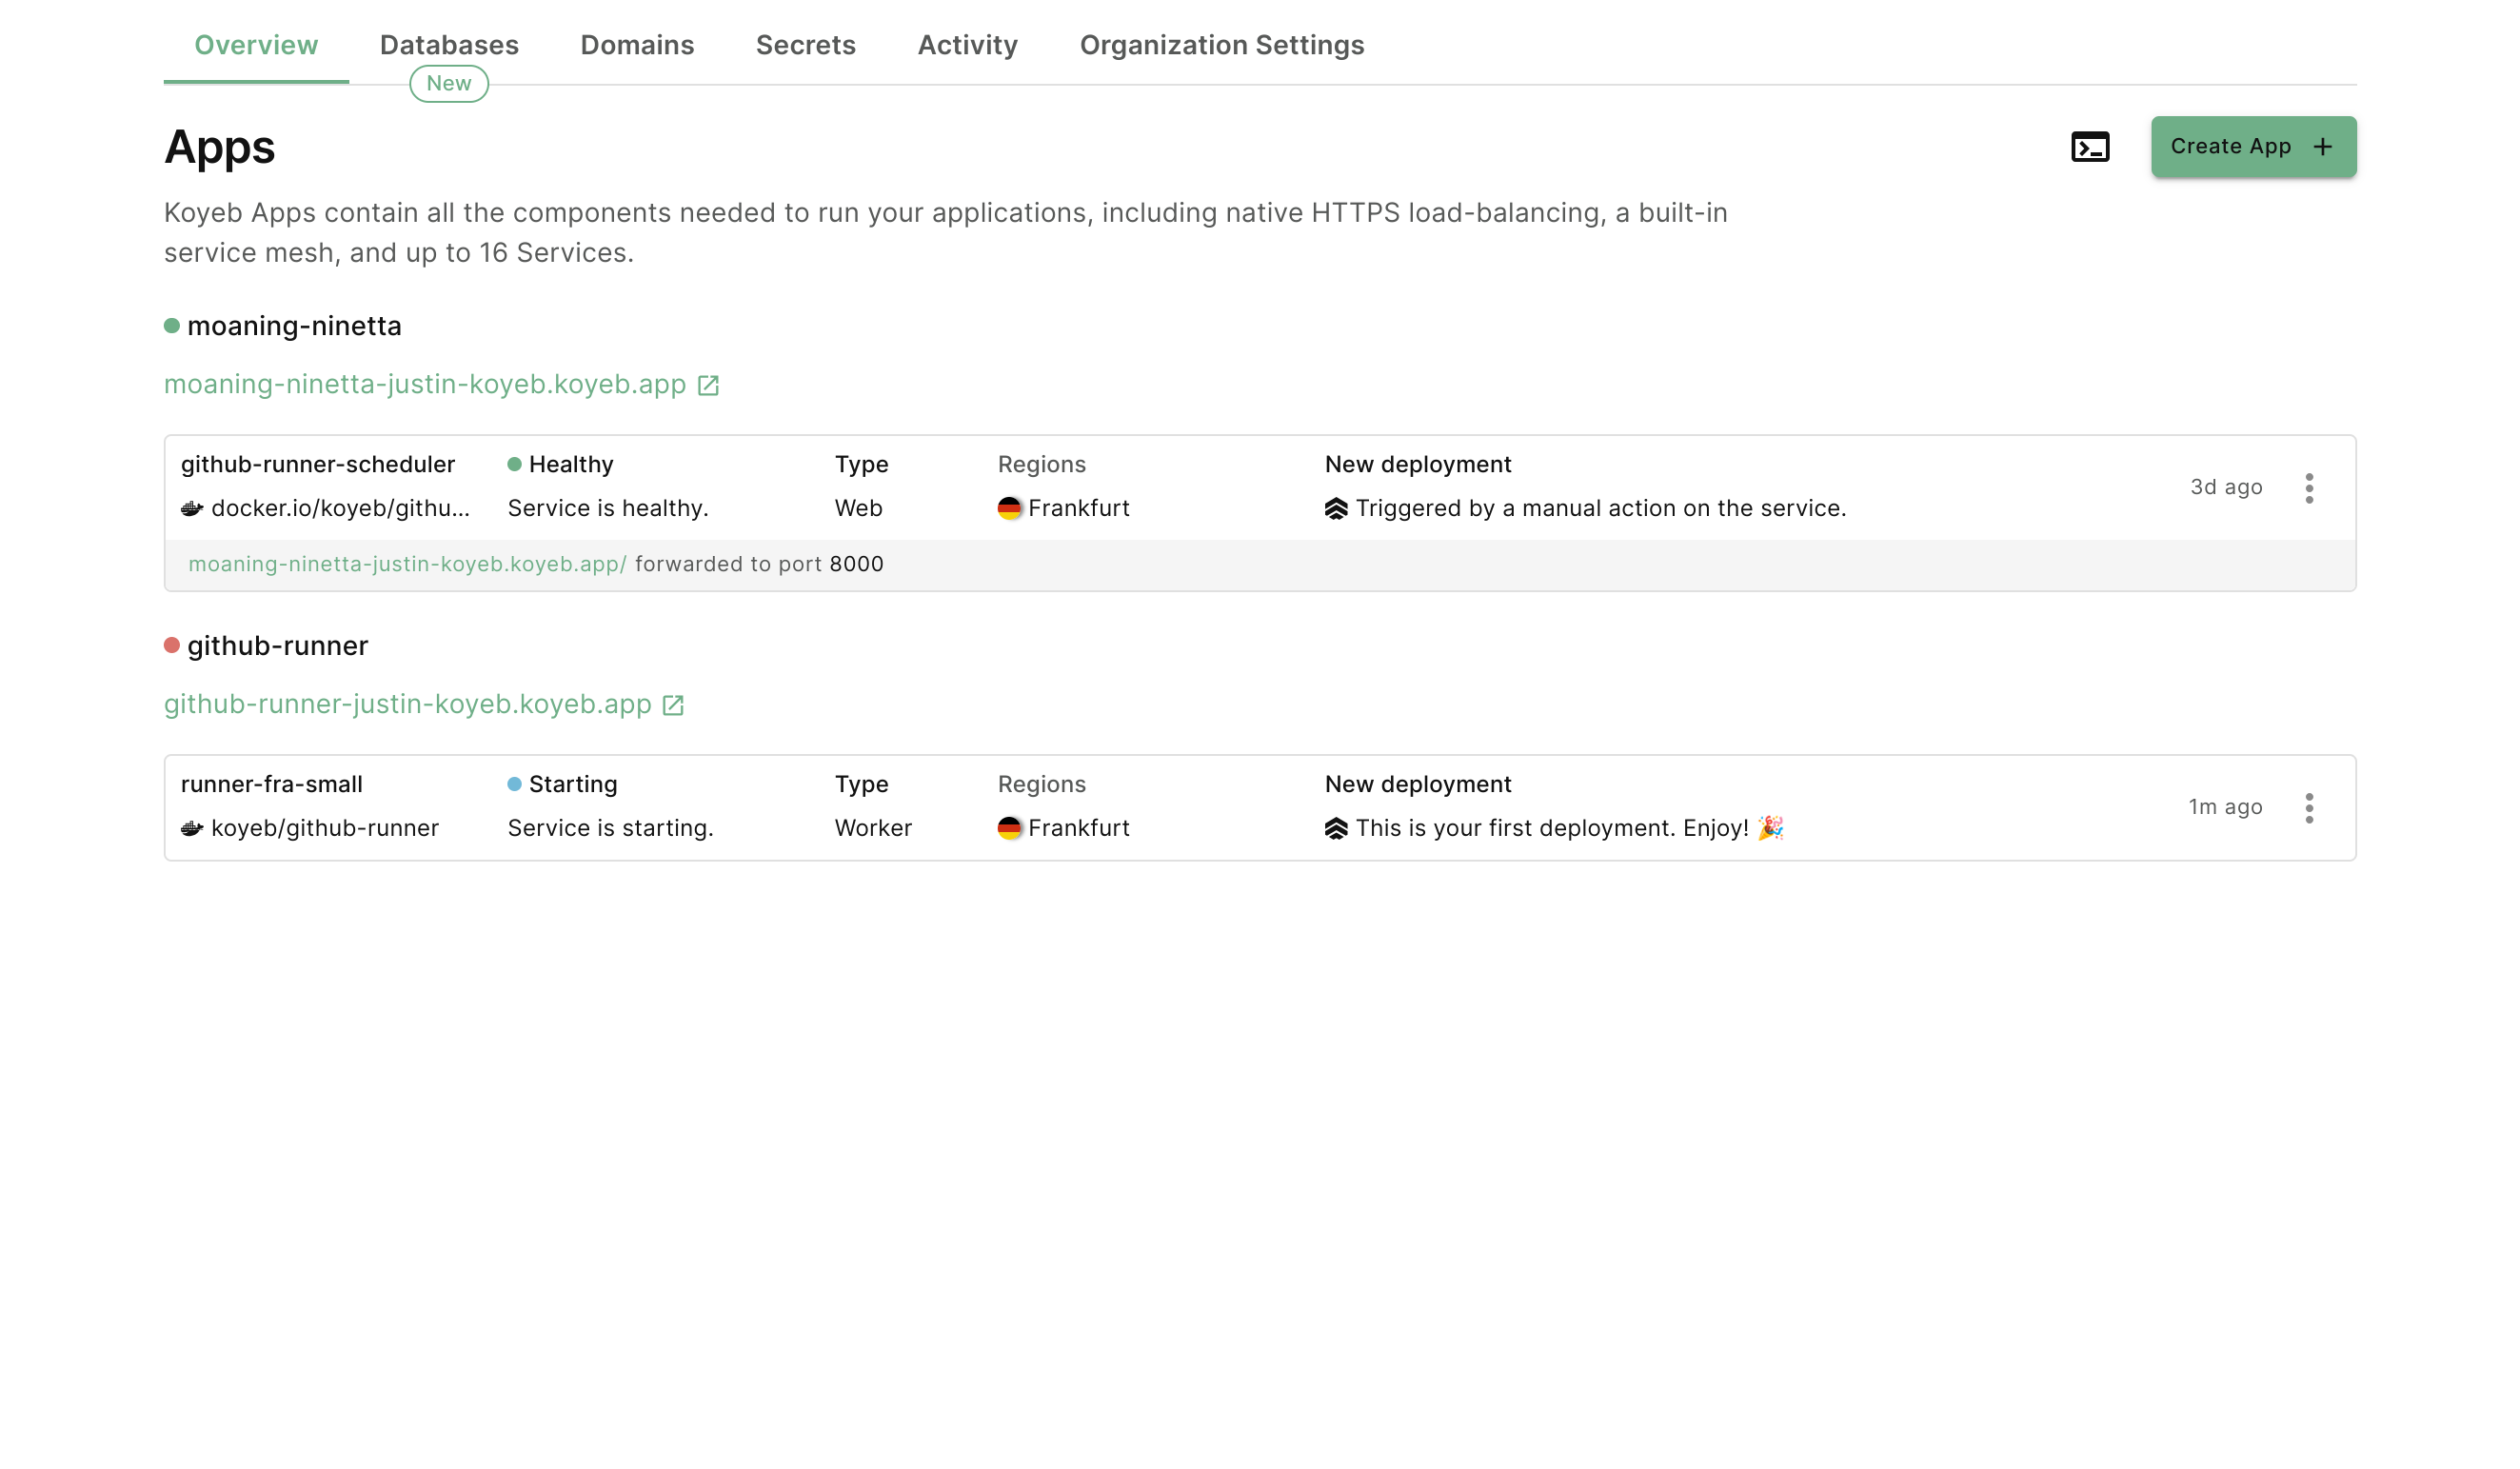
If you go back to the main Koyeb Apps list, a new GitHub runner Service should be in the process of deploying in Frankfurt:
Next, visit the Actions tab in your GitHub repository. You should see the test run history. If you click through the jobs, you'll a new job defined by your workflow:
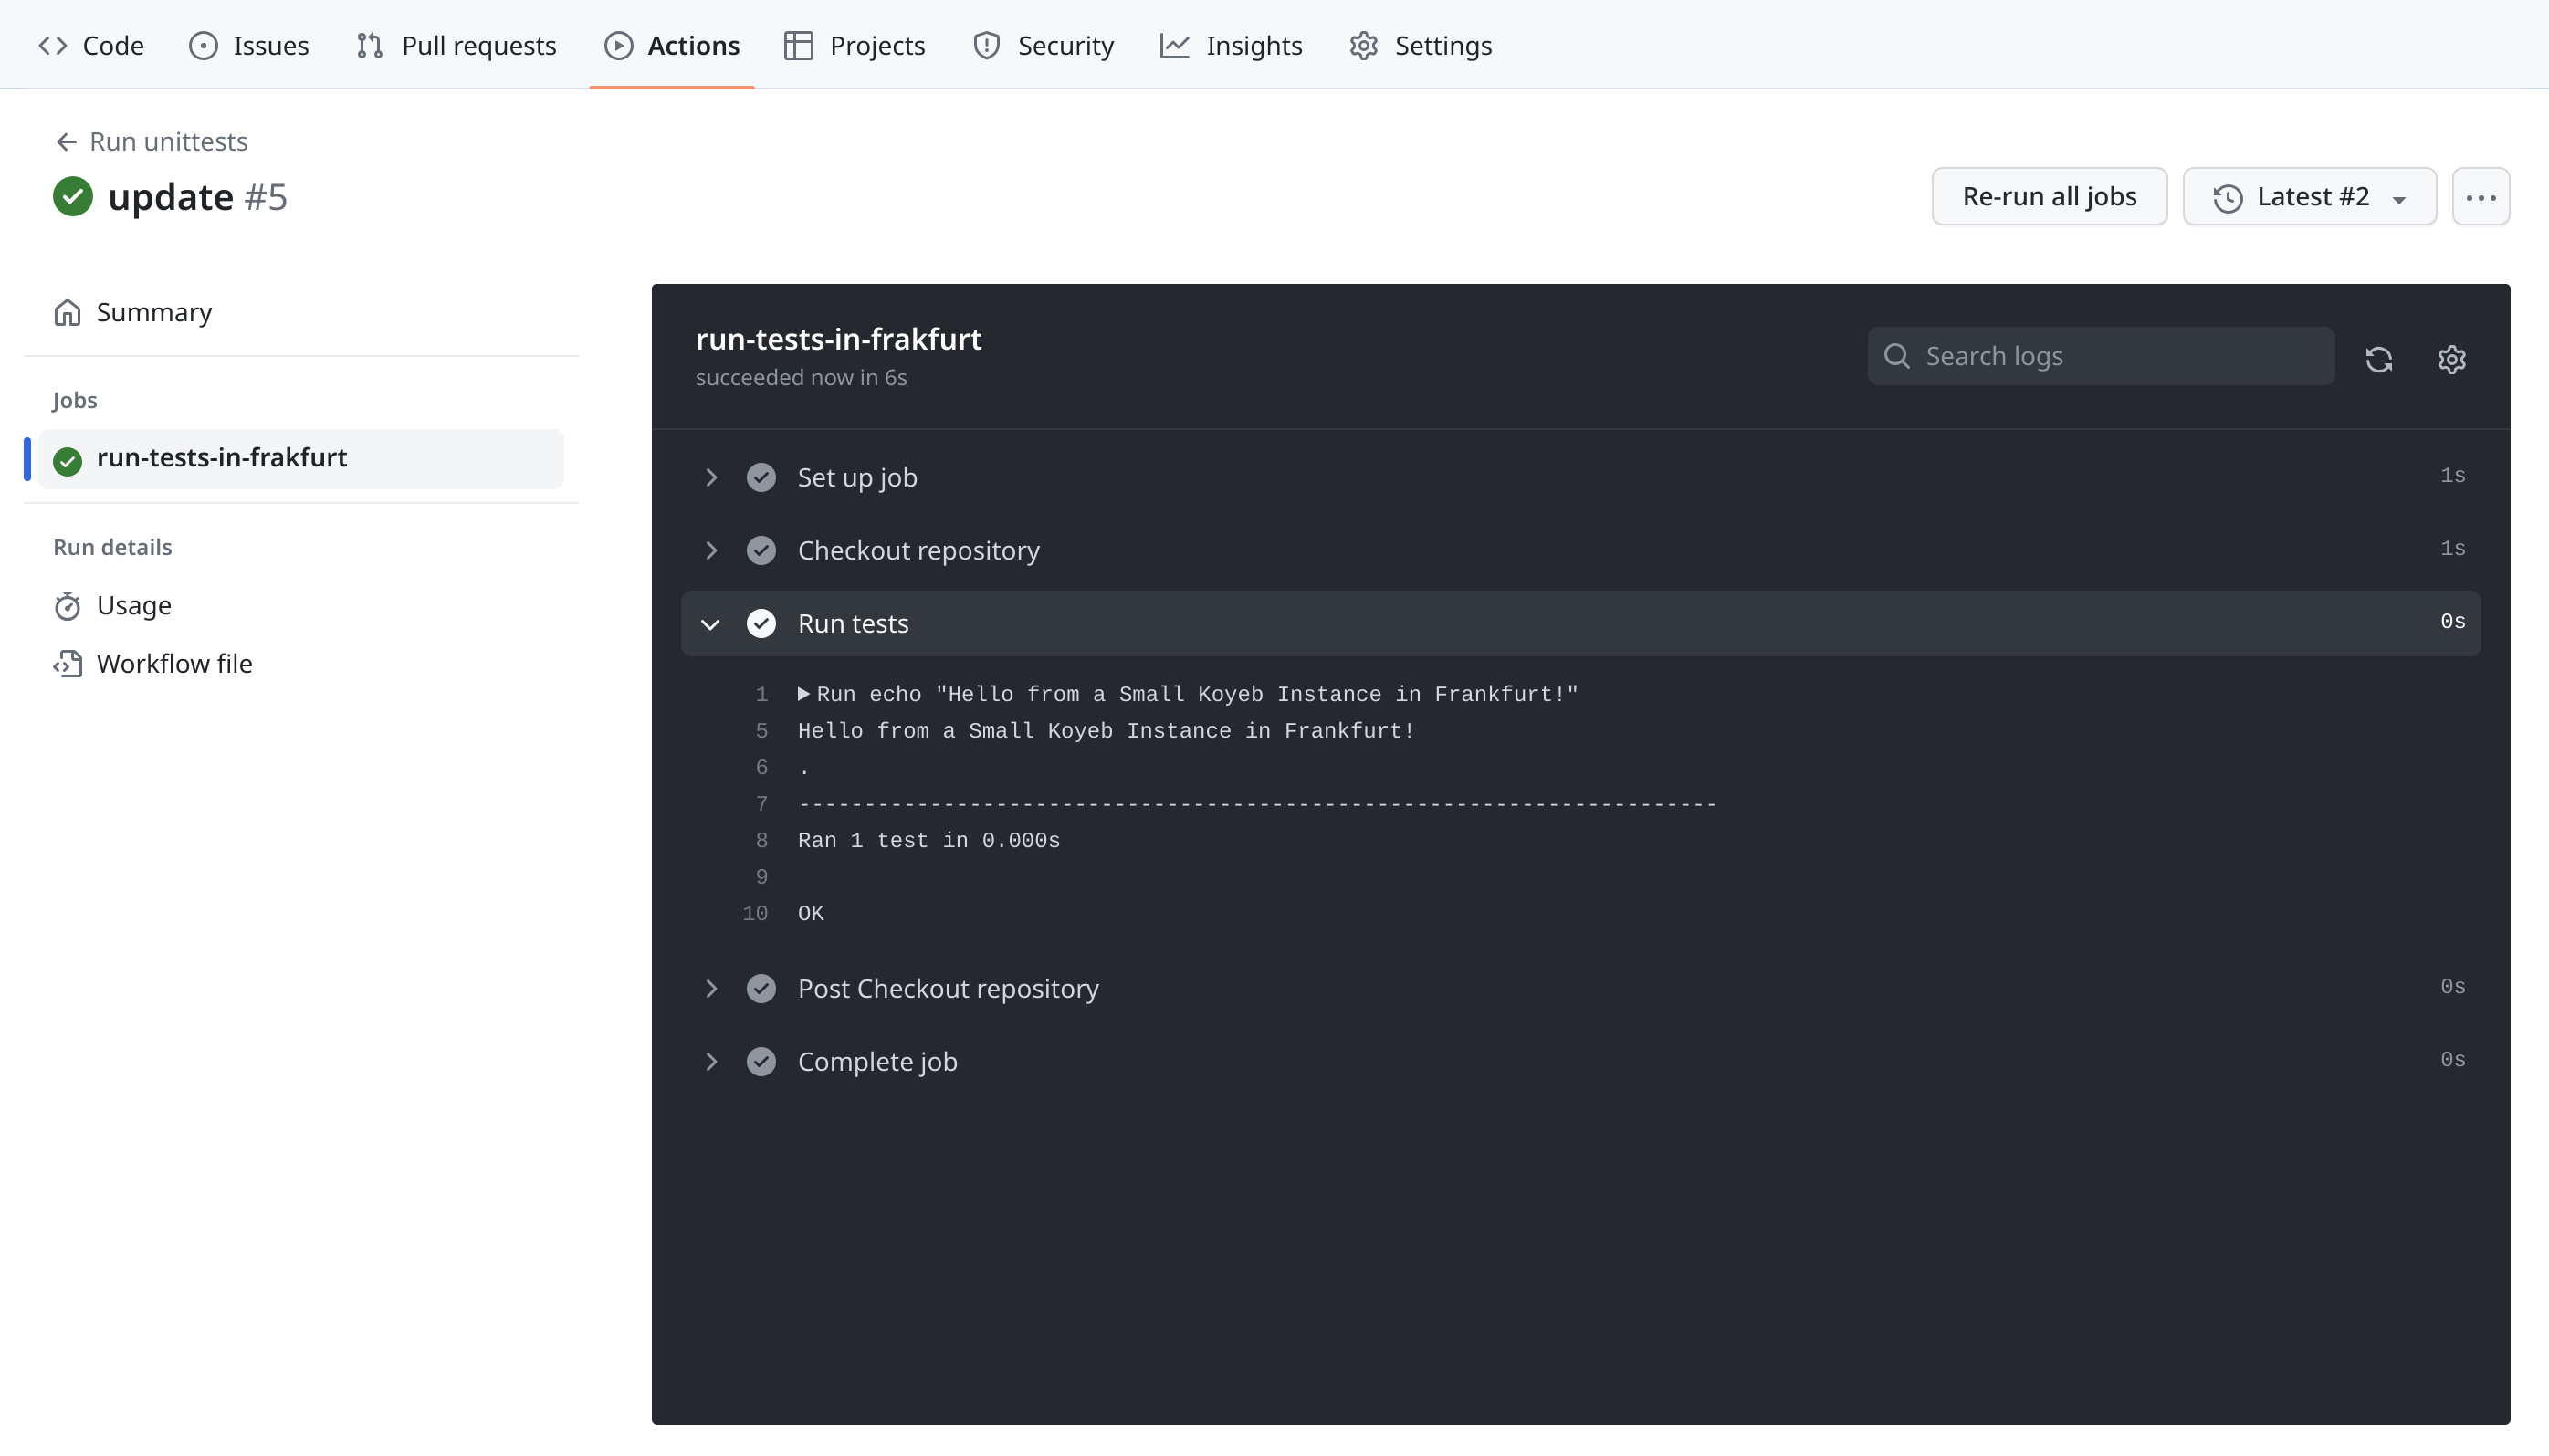
The GitHub Actions were successfully executed by runners that the Scheduler dynamically provisioned. After the idle timeout is reached, the Scheduler will delete the runner, saving you money when it is not being used.
Conclusion
In this guide, we improved a self-hosted GitHub runners set up by replacing our always-on GitHub runners with Koyeb Scheduler, a small application that can dynamically provision runners as needed. We configured the GitHub repository to send webhook messages to the Scheduler when GitHub Actions jobs occur and modified the workflow file to use the Scheduler label syntax.
By replacing the GitHub runner with the Scheduler, we are able to more easily control costs by only running instances when required by our GitHub jobs. By adjusting the time-to-live value for runners, we can confidently use higher performance instances without having to worry about paying for unnecessary usage.
To learn more about using the Koyeb Scheduler for your projects, check out the Koyeb Scheduler repository on GitHub and the Scheduler image on Docker Hub.