Deploy Authorizer to Handle User Authentication on Koyeb
Introduction
Authorizer is an open-source authentication and authorization platform for applications. It supports a number of different authentication methods including basic authentication, magic links, social logins, and multi-factor authentication. Using Authorizer, you can configure a secure authentication layer that can be used across various applications and servers, helping you provide account-based services to your applications without the headache.
In this guide, we will go over how to deploy and configure an Authorizer instance on Koyeb to provide authorization and authentication services for your other applications and services.
You can deploy and configure Authorizer as configured in this guide using the Deploy to Koyeb button below:

Note: Remember to replace the value of the DATABASE_URL environment variable with the connection URL for your own PostgreSQL database.
Requirements
To follow along with this guide, you will need to create accounts with the following services. You can use each service's entry-level plan to get started:
- Koyeb: We will use Koyeb to deploy, run, and scale our Authorizer instance.
- Neon: We will use Neon to provision a PostgreSQL database to store and manage Authorizer's data including user information and authentication providers.
- Mailgun: We will use Mailgun to send messages to users for verification, two factor authentication, and other authentication-related transactional emails.
Steps
This guide will cover how to deploy Authorizer to Koyeb with the following steps:
- Create a PostgreSQL database with Neon
- Set up the Mailgun SMTP service
- Deploy Authorizer to Koyeb
- Configure Authorizer
Create a PostgreSQL database with Neon
The Authorizer application stores its configuration data in a database.
To make it simpler to scale the application as well as ensure the availability of the data across restarts, we'll configure Authorizer to use an external database. Specifically, we will deploy Authorizer to a PostgreSQL database provisioned using Neon since they offer a free tier that is suitable for our purposes.
To create a new PostgreSQL database, log into your Neon account. In the Neon console, follow these steps to create a new PostgreSQL database:
- In the Projects section, click the Create a project link on the bottom of the page.
- Choose a name for your PostgreSQL database. We will use
authorizerfor this guide. - Leave the version to the default selection (15 at the time of writing).
- Select the region to deploy your database. In this guide, we will select "Europe (Frankfurt)" to demonstrate deploying resources in Europe, but you should choose the region closest to your users.
- Click the Create project button to begin provisioning your new database.
The following screen will show the connection details for your new database. Click on the copy icon associated with the psql connection string to copy it and save it to a safe place for later reference. We will use this value when we configure Authorizer so that it can connect to and authenticate with the database.
Set up the Mailgun SMTP service
Next, you need to copy the SMTP information for your Mailgun account. Authorizer uses email to verify user accounts, send magic sign-in links, or provide additional security through multi-factor authentication.
To begin, log into your Mailgun account. In the side navigation pane, open the Sending menu. Next, click the Overview sub-menu item.
Mailgun offers sandbox domains to test its functionality. These are useful, but restricted to sending emails only to previously authorised email addresses. We can use this to test the mail delivery with Authorizer for free. On the right sidebar of the Overview page, enter the email address you want to send test emails to in email address input field of the Authorized Recipients section and click the Save Recipient button.
Mailgun will send a verification email to the provided address. In the verification email, click the I Agree button to complete the authorisation process. If you refresh the page in Mailgun, you see that the target email address is now marked as verified.
From this same page, click the Select box associated with "SMTP" to see the information you need to send email using your Mailgun account. The information related to using SMTP with your Mailgun account will be displayed. Copy and save the following information:
| Mailgun SMTP info | Authorizer environment variable | Example |
|---|---|---|
| SMTP hostname | SMTP_HOST | smtp.mailgun.org |
| Port | SMTP_PORT | 587 |
| Username | SMTP_USERNAME and SENDER_EMAIL | postmaster@sandboxbac59f0e6dac45cdab38e53aee4e1363.mailgun.org |
| Password | SMTP_PASSWORD | e627704d99111f00c7aedf3805961383-262b123e-66b6979f |
You will need to provide this information either as environment variables when deploying Authorizer or in the web-based administration page after the service is up and running.
Deploy Authorizer to Koyeb
With the database connection string in hand, you can now deploy an Authorizer instance to Koyeb.
Start by logging into your Koyeb account. Follow these steps to deploy the default Authorizer container image to the platform:
- On the Overview tab of the Koyeb console, click Create Web Service.
- Select Docker as your deployment method.
- Set the Docker image to
docker.io/lakhansamani/authorizer. Optionally, append an image tag if you'd like to deploy a specific version. - In the Environment variables and files section, click the Add variable button to add the following variables and values:
DATABASE_TYPE: Set topostgres.DATABASE_URL: Set to the connection URI you copied from Neon.
- (Optional) If you'd like to configure your SMTP settings now, you can do so by setting the following additional variables:
SMTP_HOST: The name of the SMTP host (smtp.mailgun.org).SMTP_PORT: The port of the SMTP service (587).SMTP_USERNAME: The username to authenticate to your Mailgun account. This starts withpostmaster@and ends in.mailgun.orgSMTP_PASSWORD: The password to authenticate to your Mailgun account.SENDER_EMAIL: The sending email address. This should match the value set in theSMTP_USERNAME.
- Choose a name for your App and Service and click Deploy.
Koyeb will pull the Authorizer container image from Docker Hub and use it to provision a new container. The Authorizer process will start up, connect to and initialize the database, and begin listening on the port specified in the configuration.
Configure Authorizer
Once Authorizer is up and running, you can visit your Koyeb Service's subdomain (you can find this on your Service's page) to connect. It will have the following format:
https://<YOUR_APP_NAME>-<KOYEB_ORG_NAME>.koyeb.app
Set up the admin account
When you visit Authorizer's URL, you will be redirected to the admin login page.
The first time you visit, you'll be asked to set an administrative password:
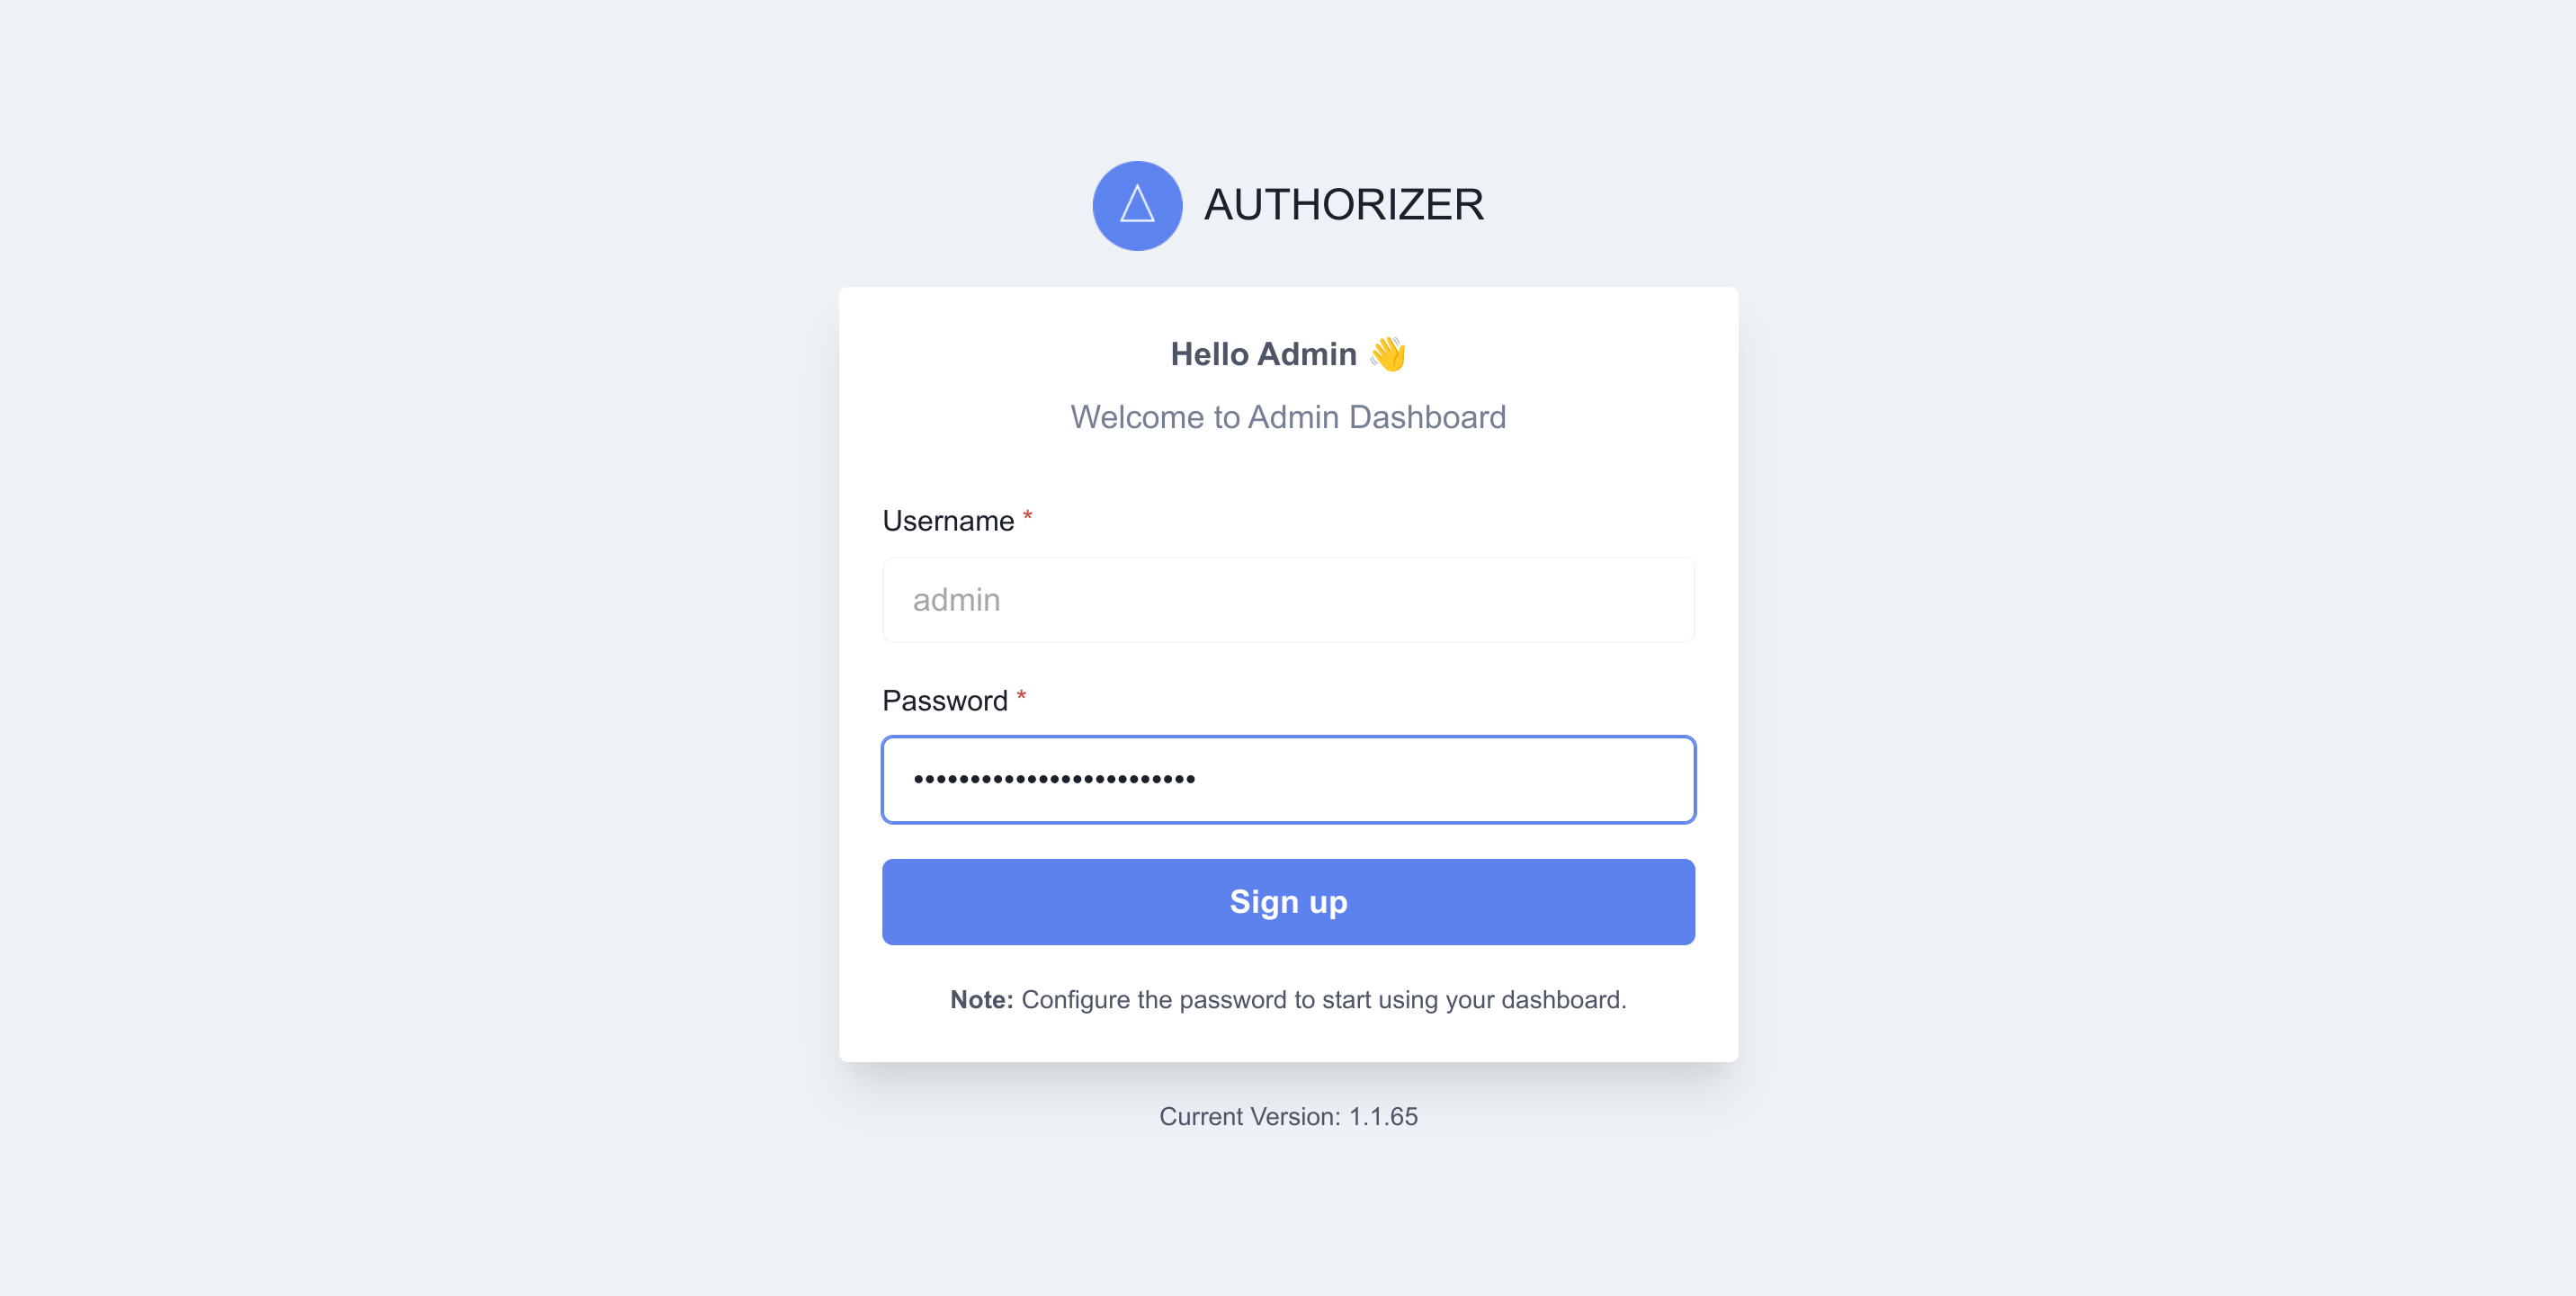
Choose a secure password and the click Sign up to continue.
You will be taken to the administration dashboard:
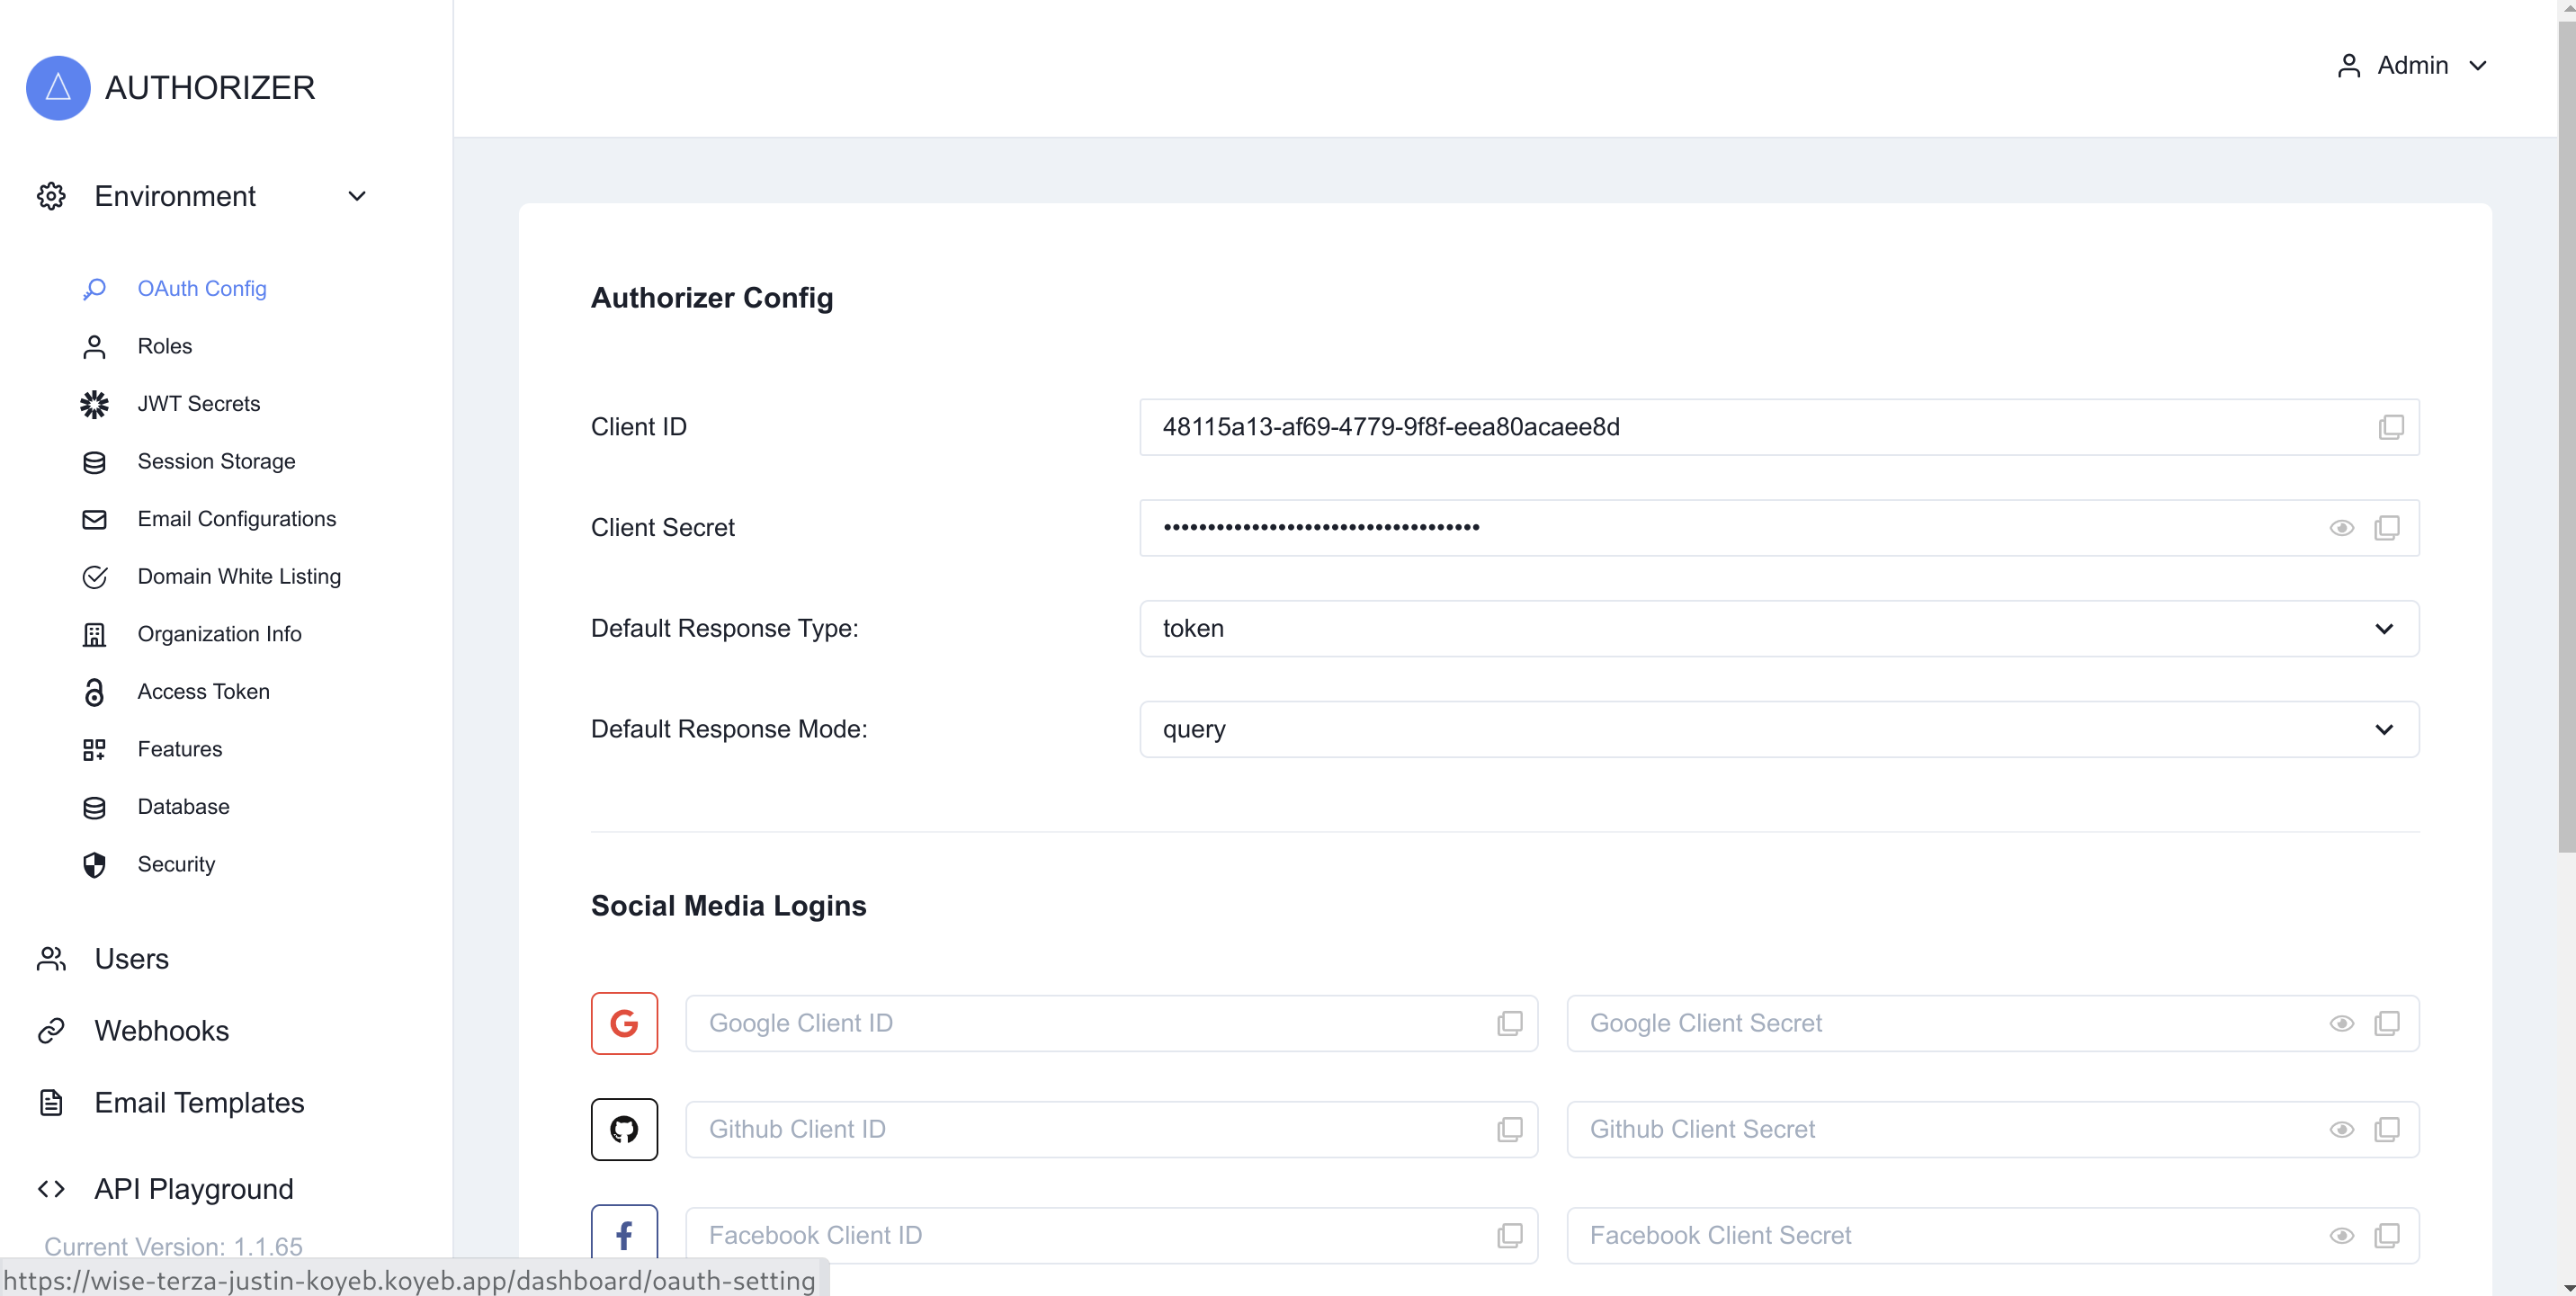
From here, you can modify settings and continue configuring your instance.
Configure SMTP for email
In the Environment section on the left side menu, click Email Configurations to see the settings currently configured for your SMTP service.
If you deployed Authorizer with the SMTP environment variables set, you should see those settings reflected in the form on this page:
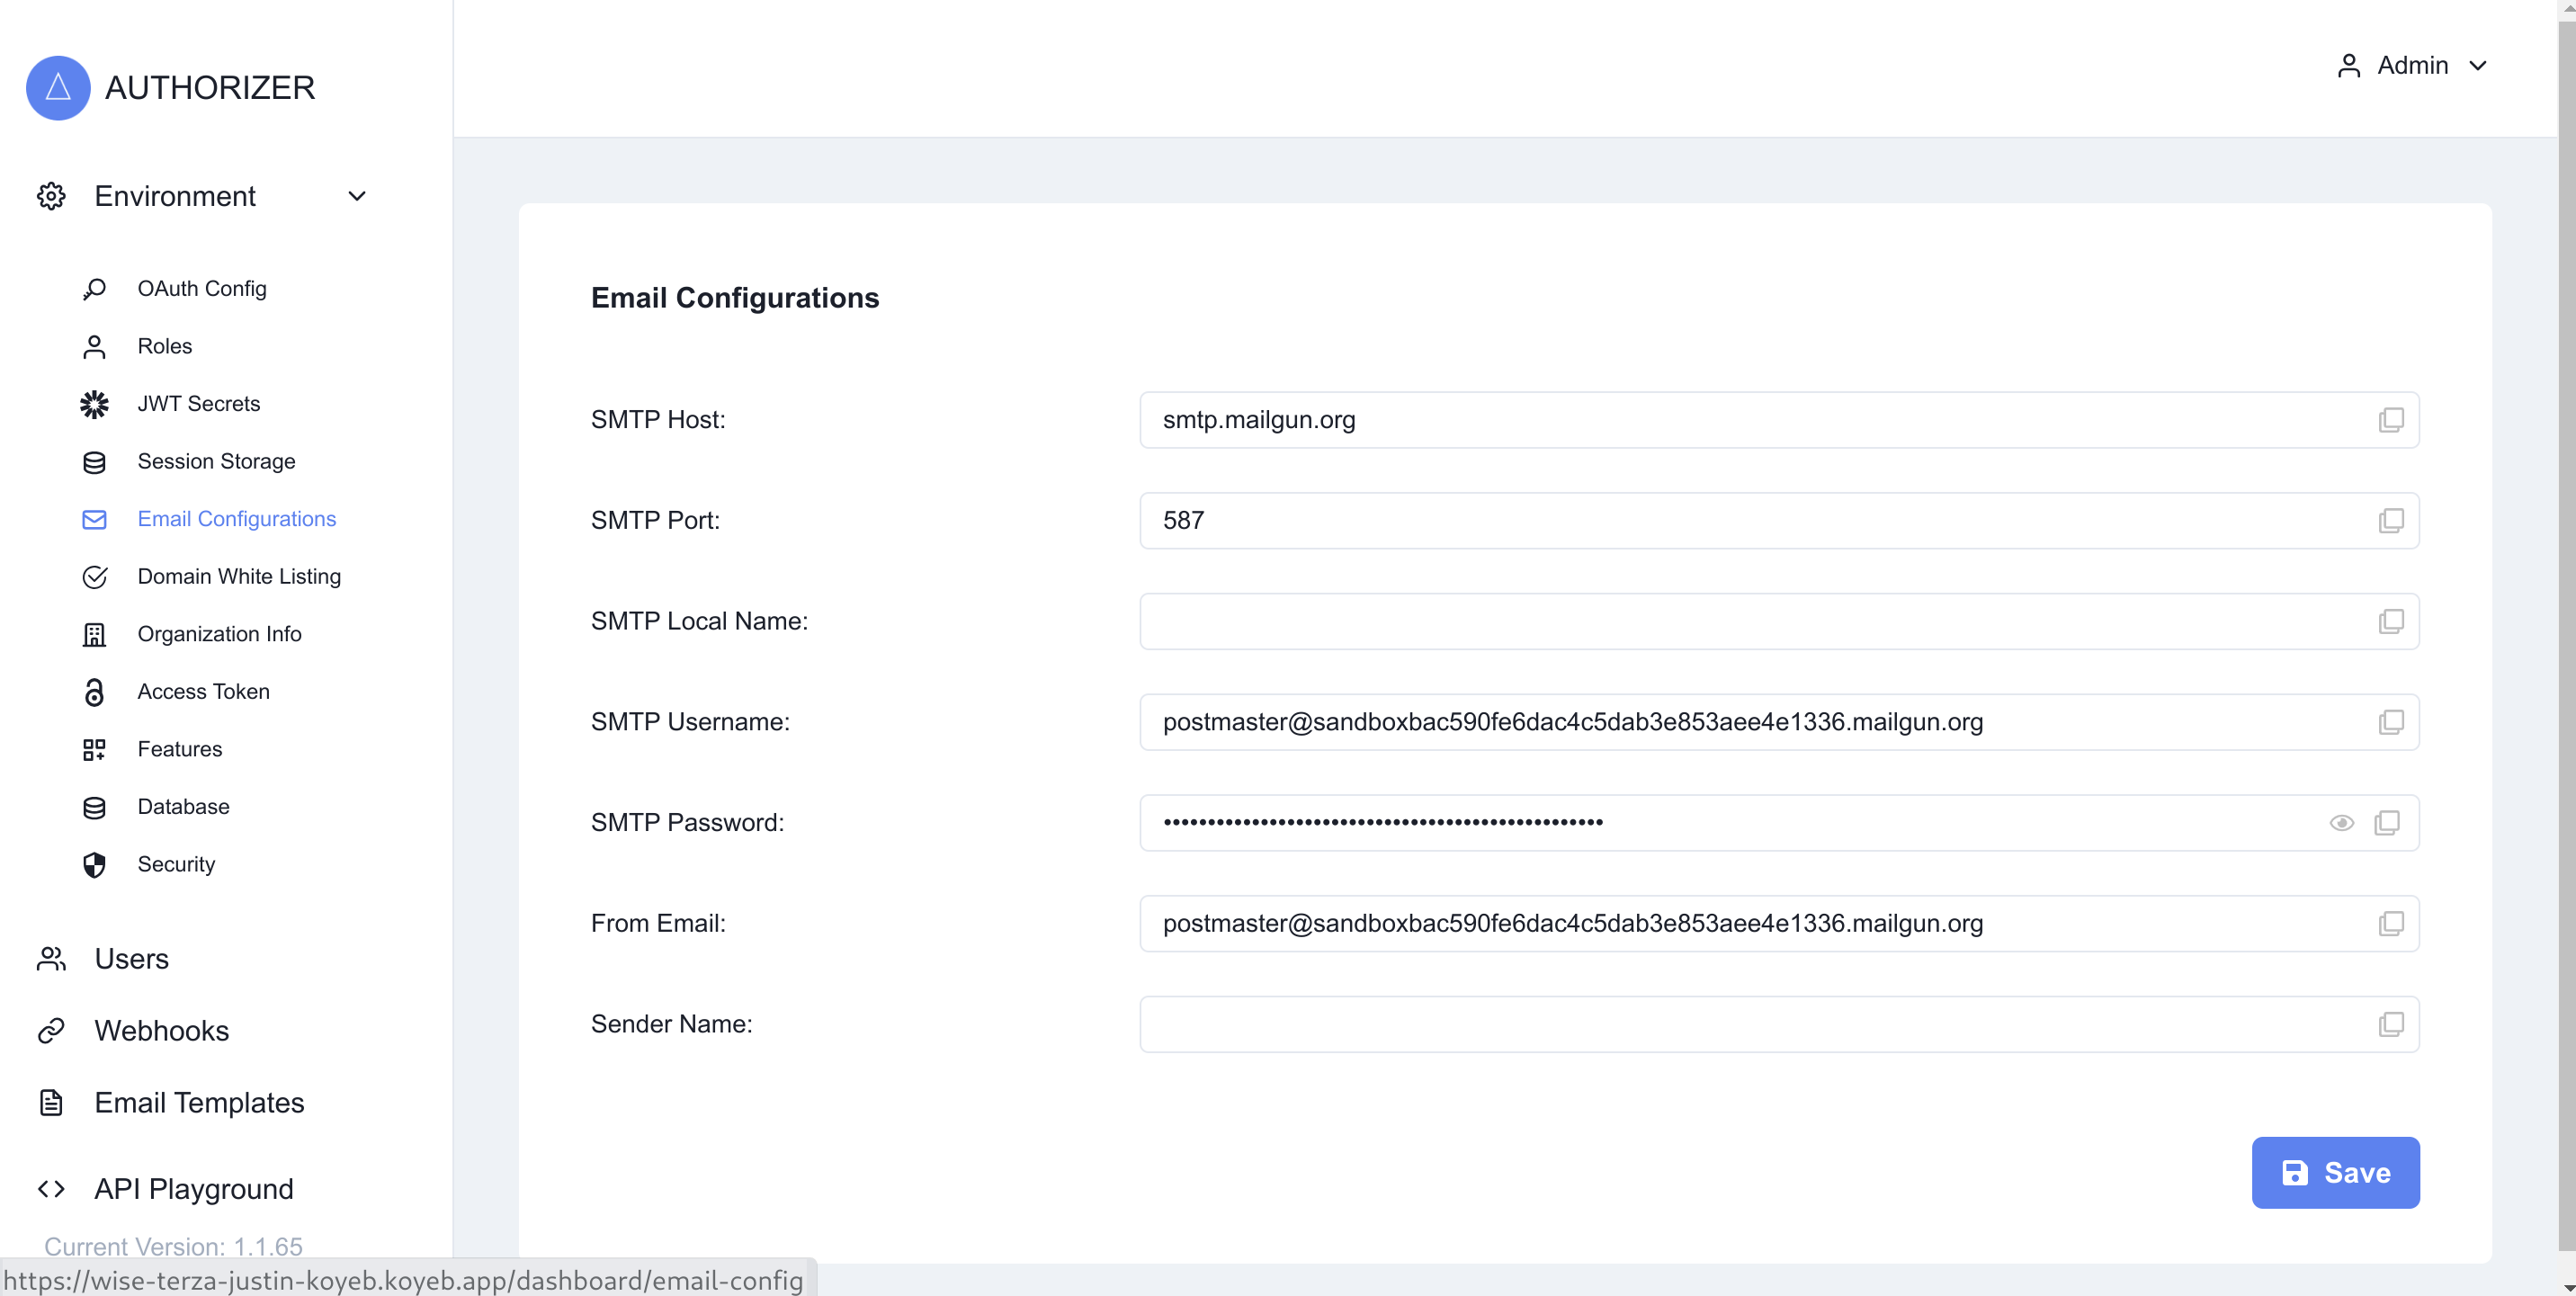
If you skipped adding your SMTP settings during the initial deployment, you can set those now. You should set the following fields:
- SMTP Host: The name of the SMTP host (
smtp.mailgun.org). - SMTP Port: The port of the SMTP service (587).
- SMTP Username: The username to authenticate to your Mailgun account. This starts with
postmaster@and ends in.mailgun.org - SMTP Password: The password to authenticate to your Mailgun account.
- From Email: The sending email address. This should match the value set in the "SMTP Username" field.
Click Save when you are finished to start using your new email configuration.
Configure Authorizer features
Next, click the Features item in the Environment section of the left side menu.
Here, you can select the features that are enabled in your Authorizer instance. Depending on how you initially deployed your service, certain features may be enabled or disabled by default. All email-related features require valid SMTP settings in order to function correctly.
For our testing, we will enable the following features. We will toggle all other features off:
- Login Page
- Email Verification
- Basic Authentication
- Sign Up
- Strong Password
- Use Secure App Cookie
- Use Secure Admin Cookie
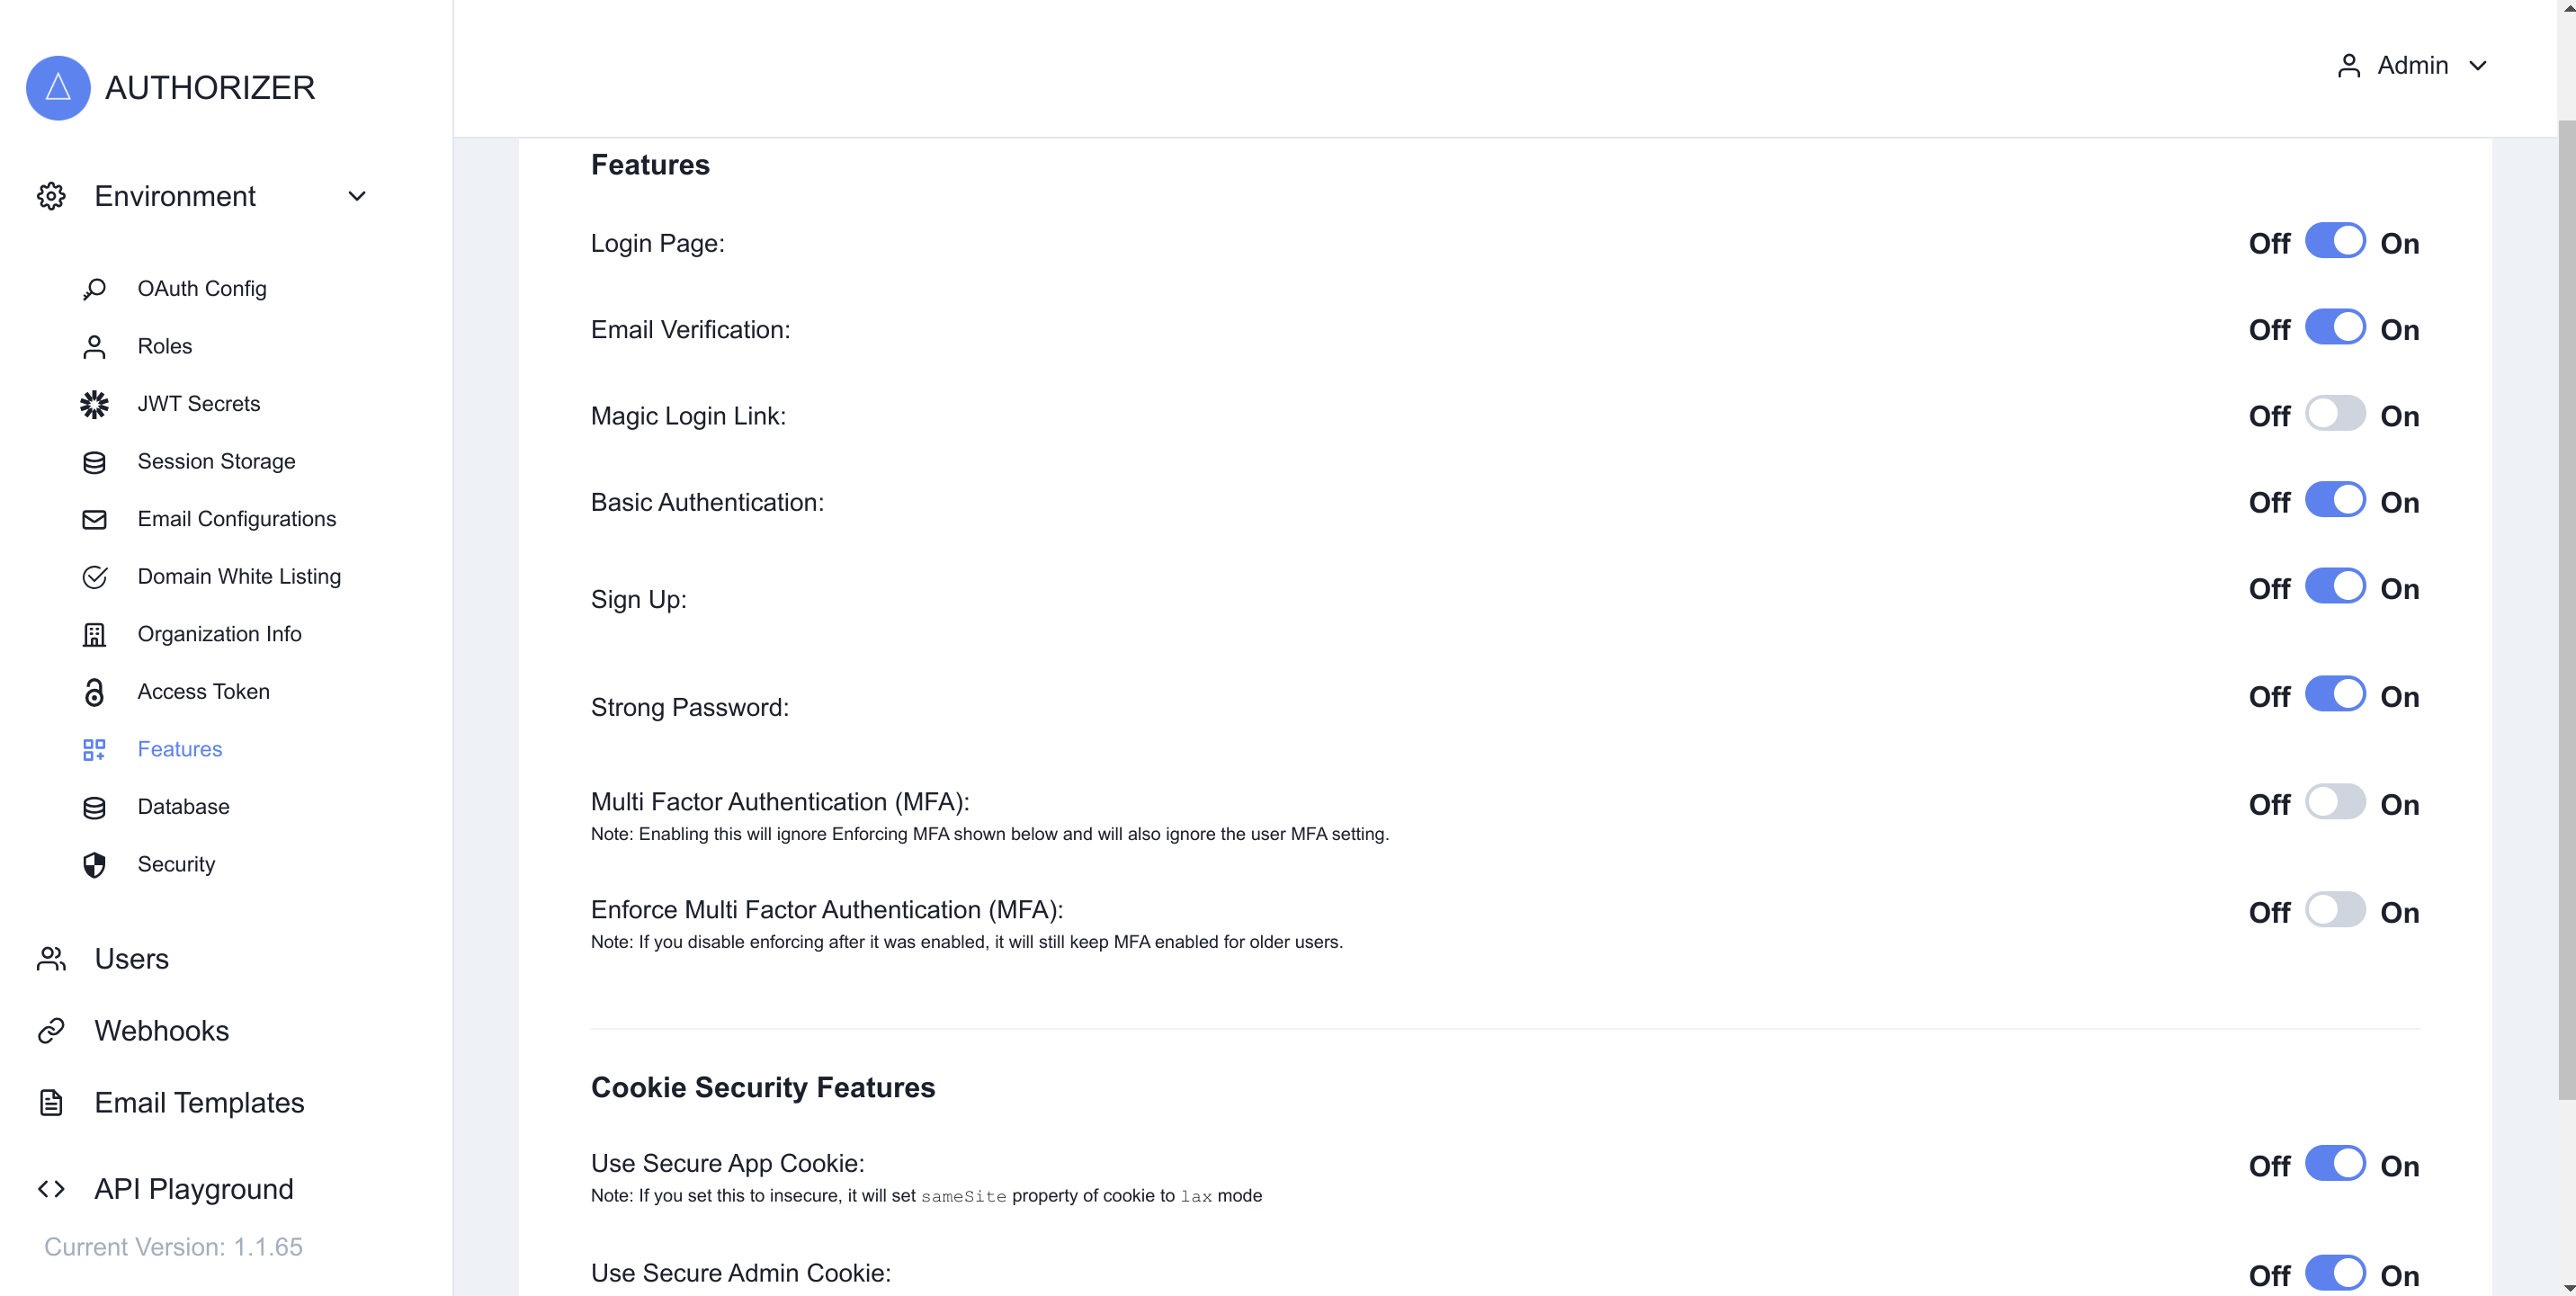
Click Save when you are finished to modify the current configuration.
Test the sign up and authentication workflow
To test the new settings, visit the built-in authentication page by appending /app to the end of Authenticator's base URL. It should look something like this:
https://<YOUR_APP_NAME>-<KOYEB_ORG_NAME>.koyeb.app/app
Assuming you've enabled only the features we outlined above, you should see a fairly conventional login page with an email field, a password field, a log in button, as well as links to sign up or to recover your account if you forgot your password:
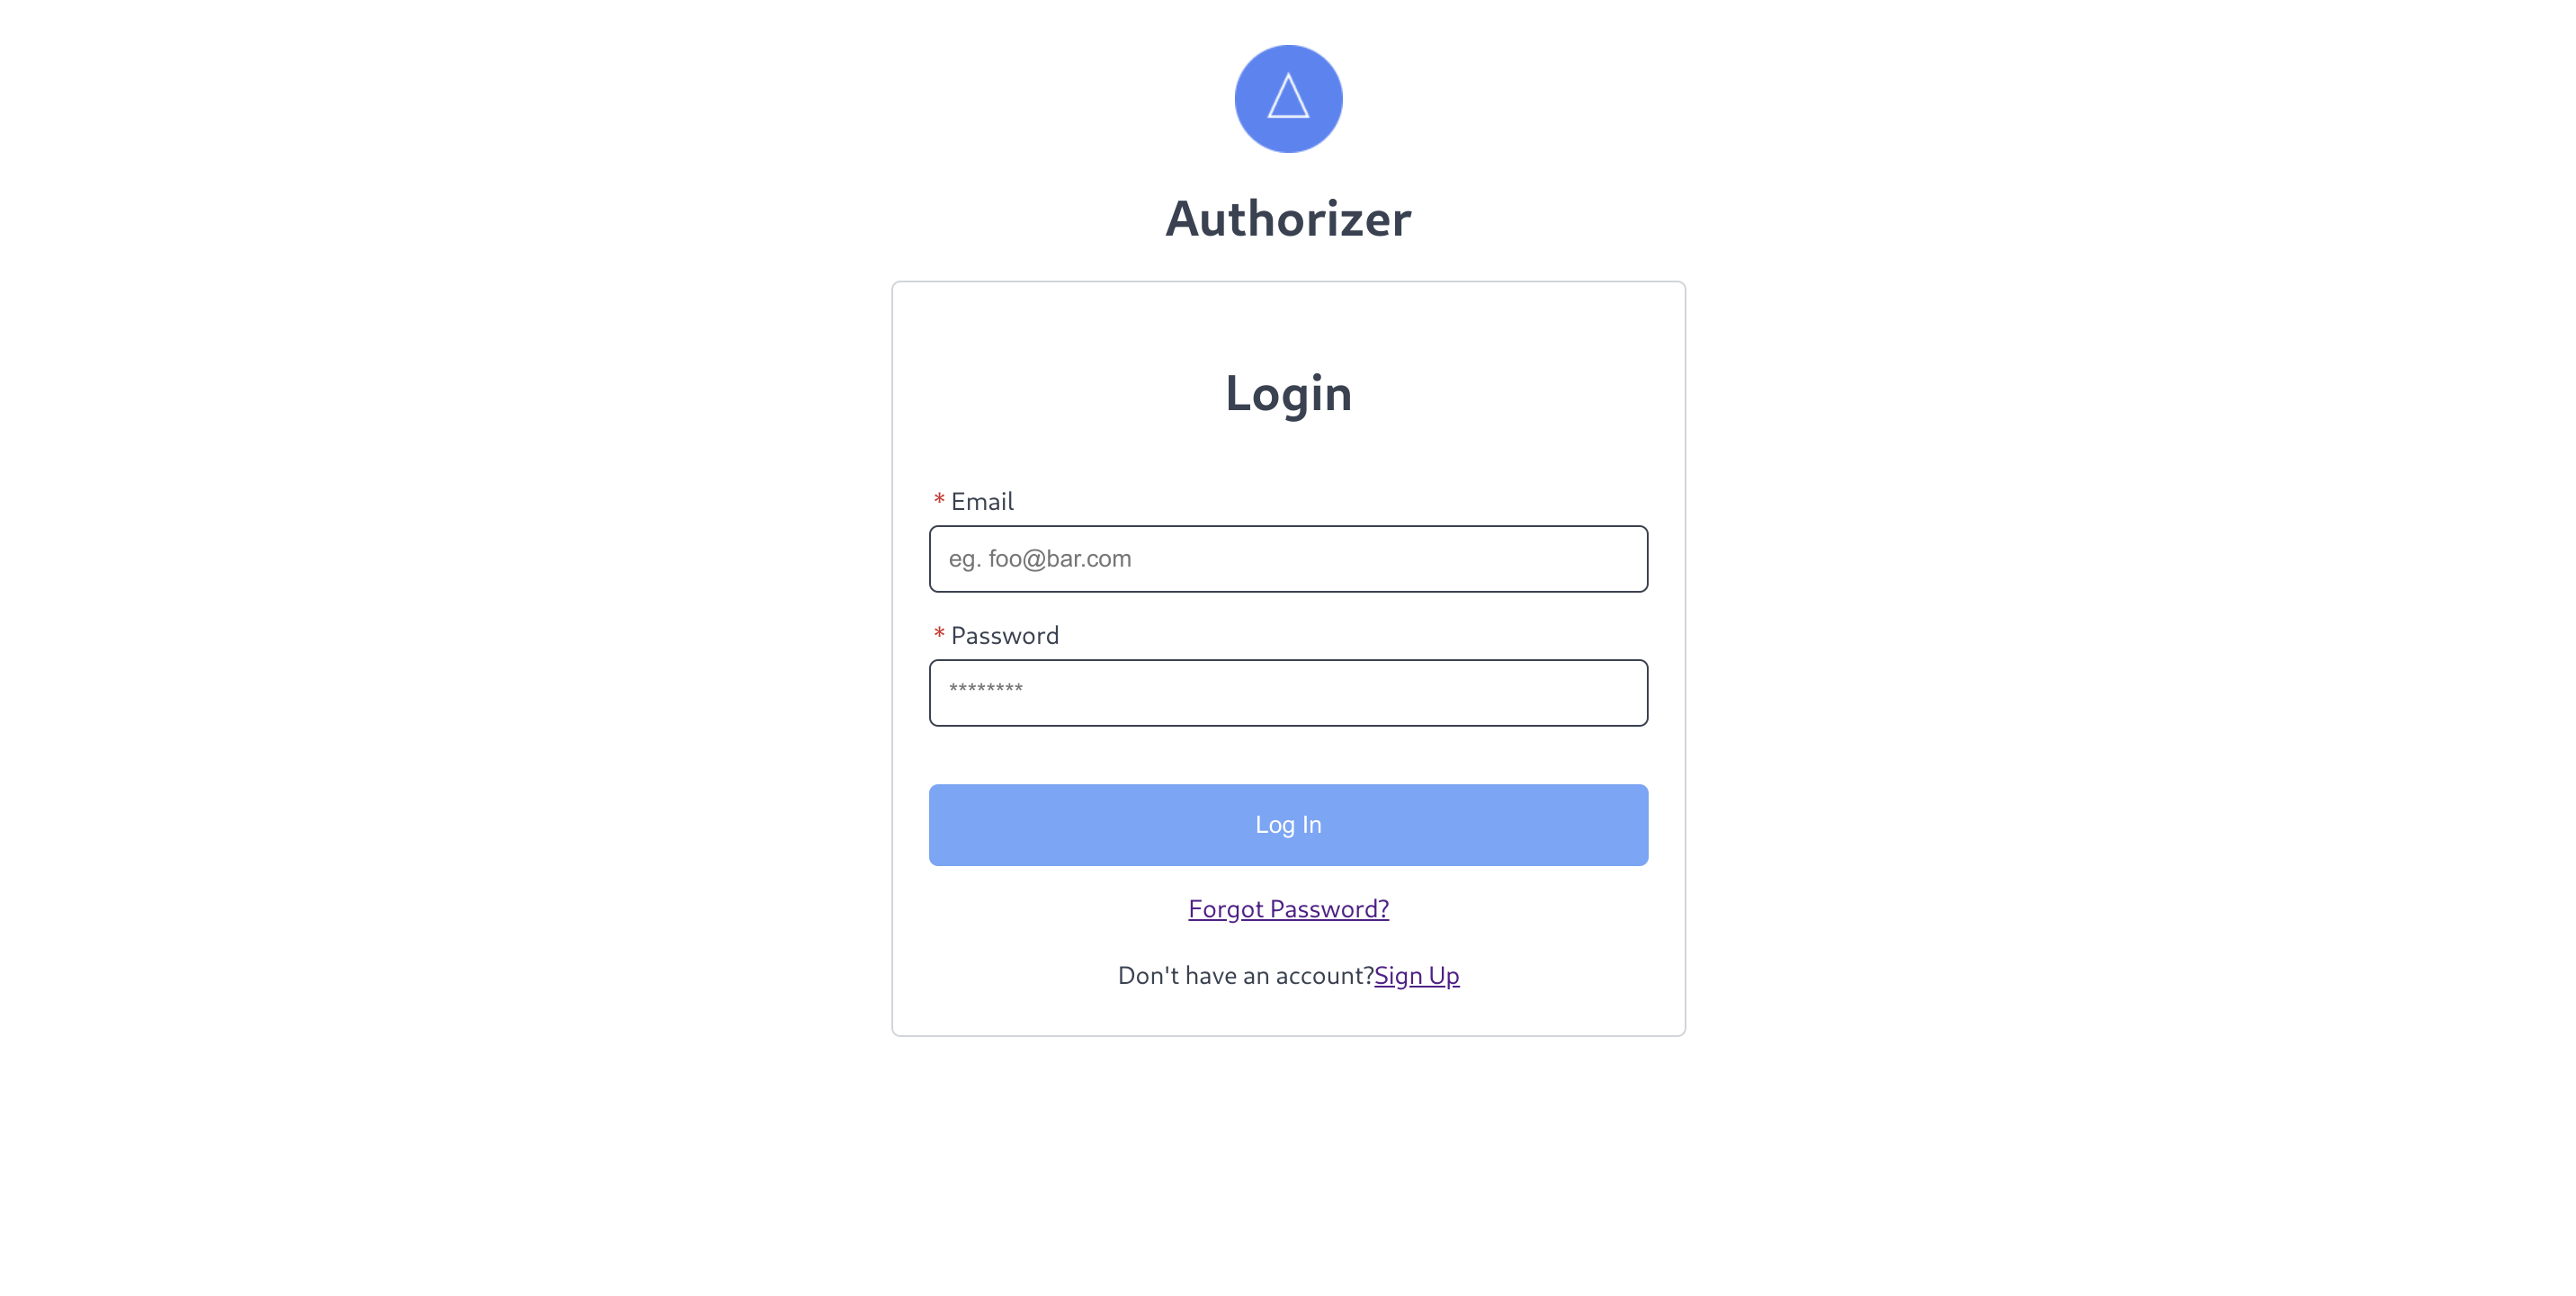
Since we do not yet have a user account, click the Sign up link at the bottom of the page. You will be taken to an account creation page:
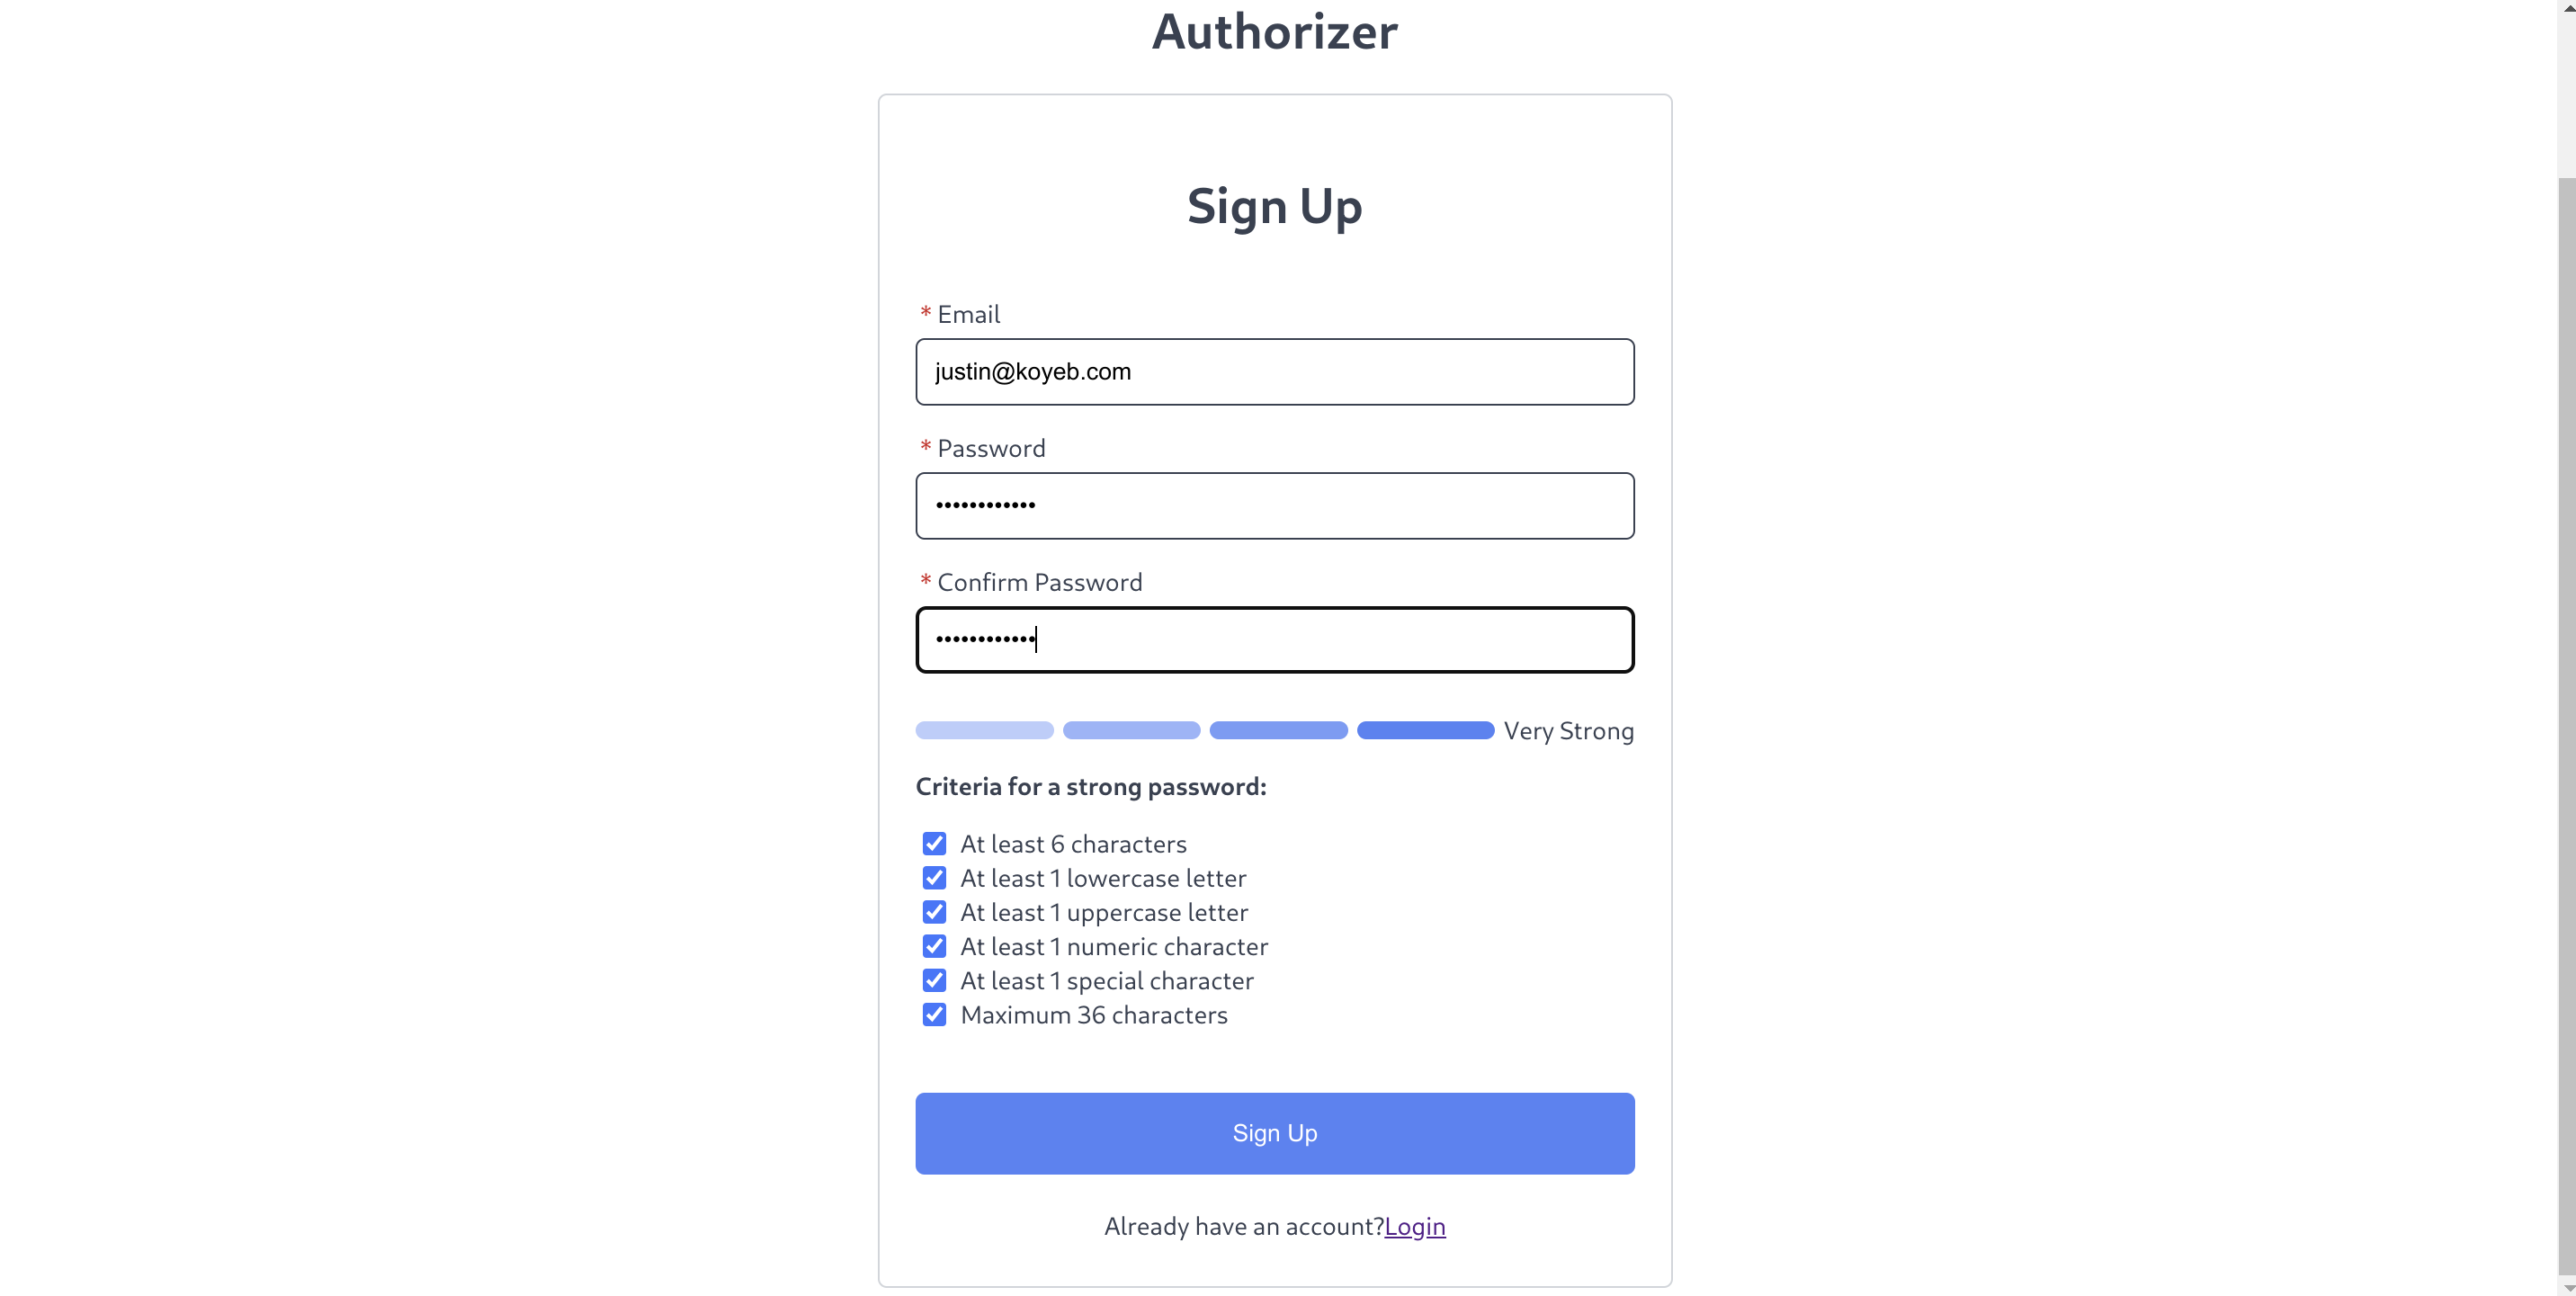
Create an account to test the authentication settings by inputting your email address and setting and confirming a secure password.
Note: Be sure to use the same email address you authorized in your Mailgun account. Your email will not be delivered otherwise.
Click Sign up when you are finished. Authorizer will show you a message indicating that it has sent an email to the provided address to confirm the registration:
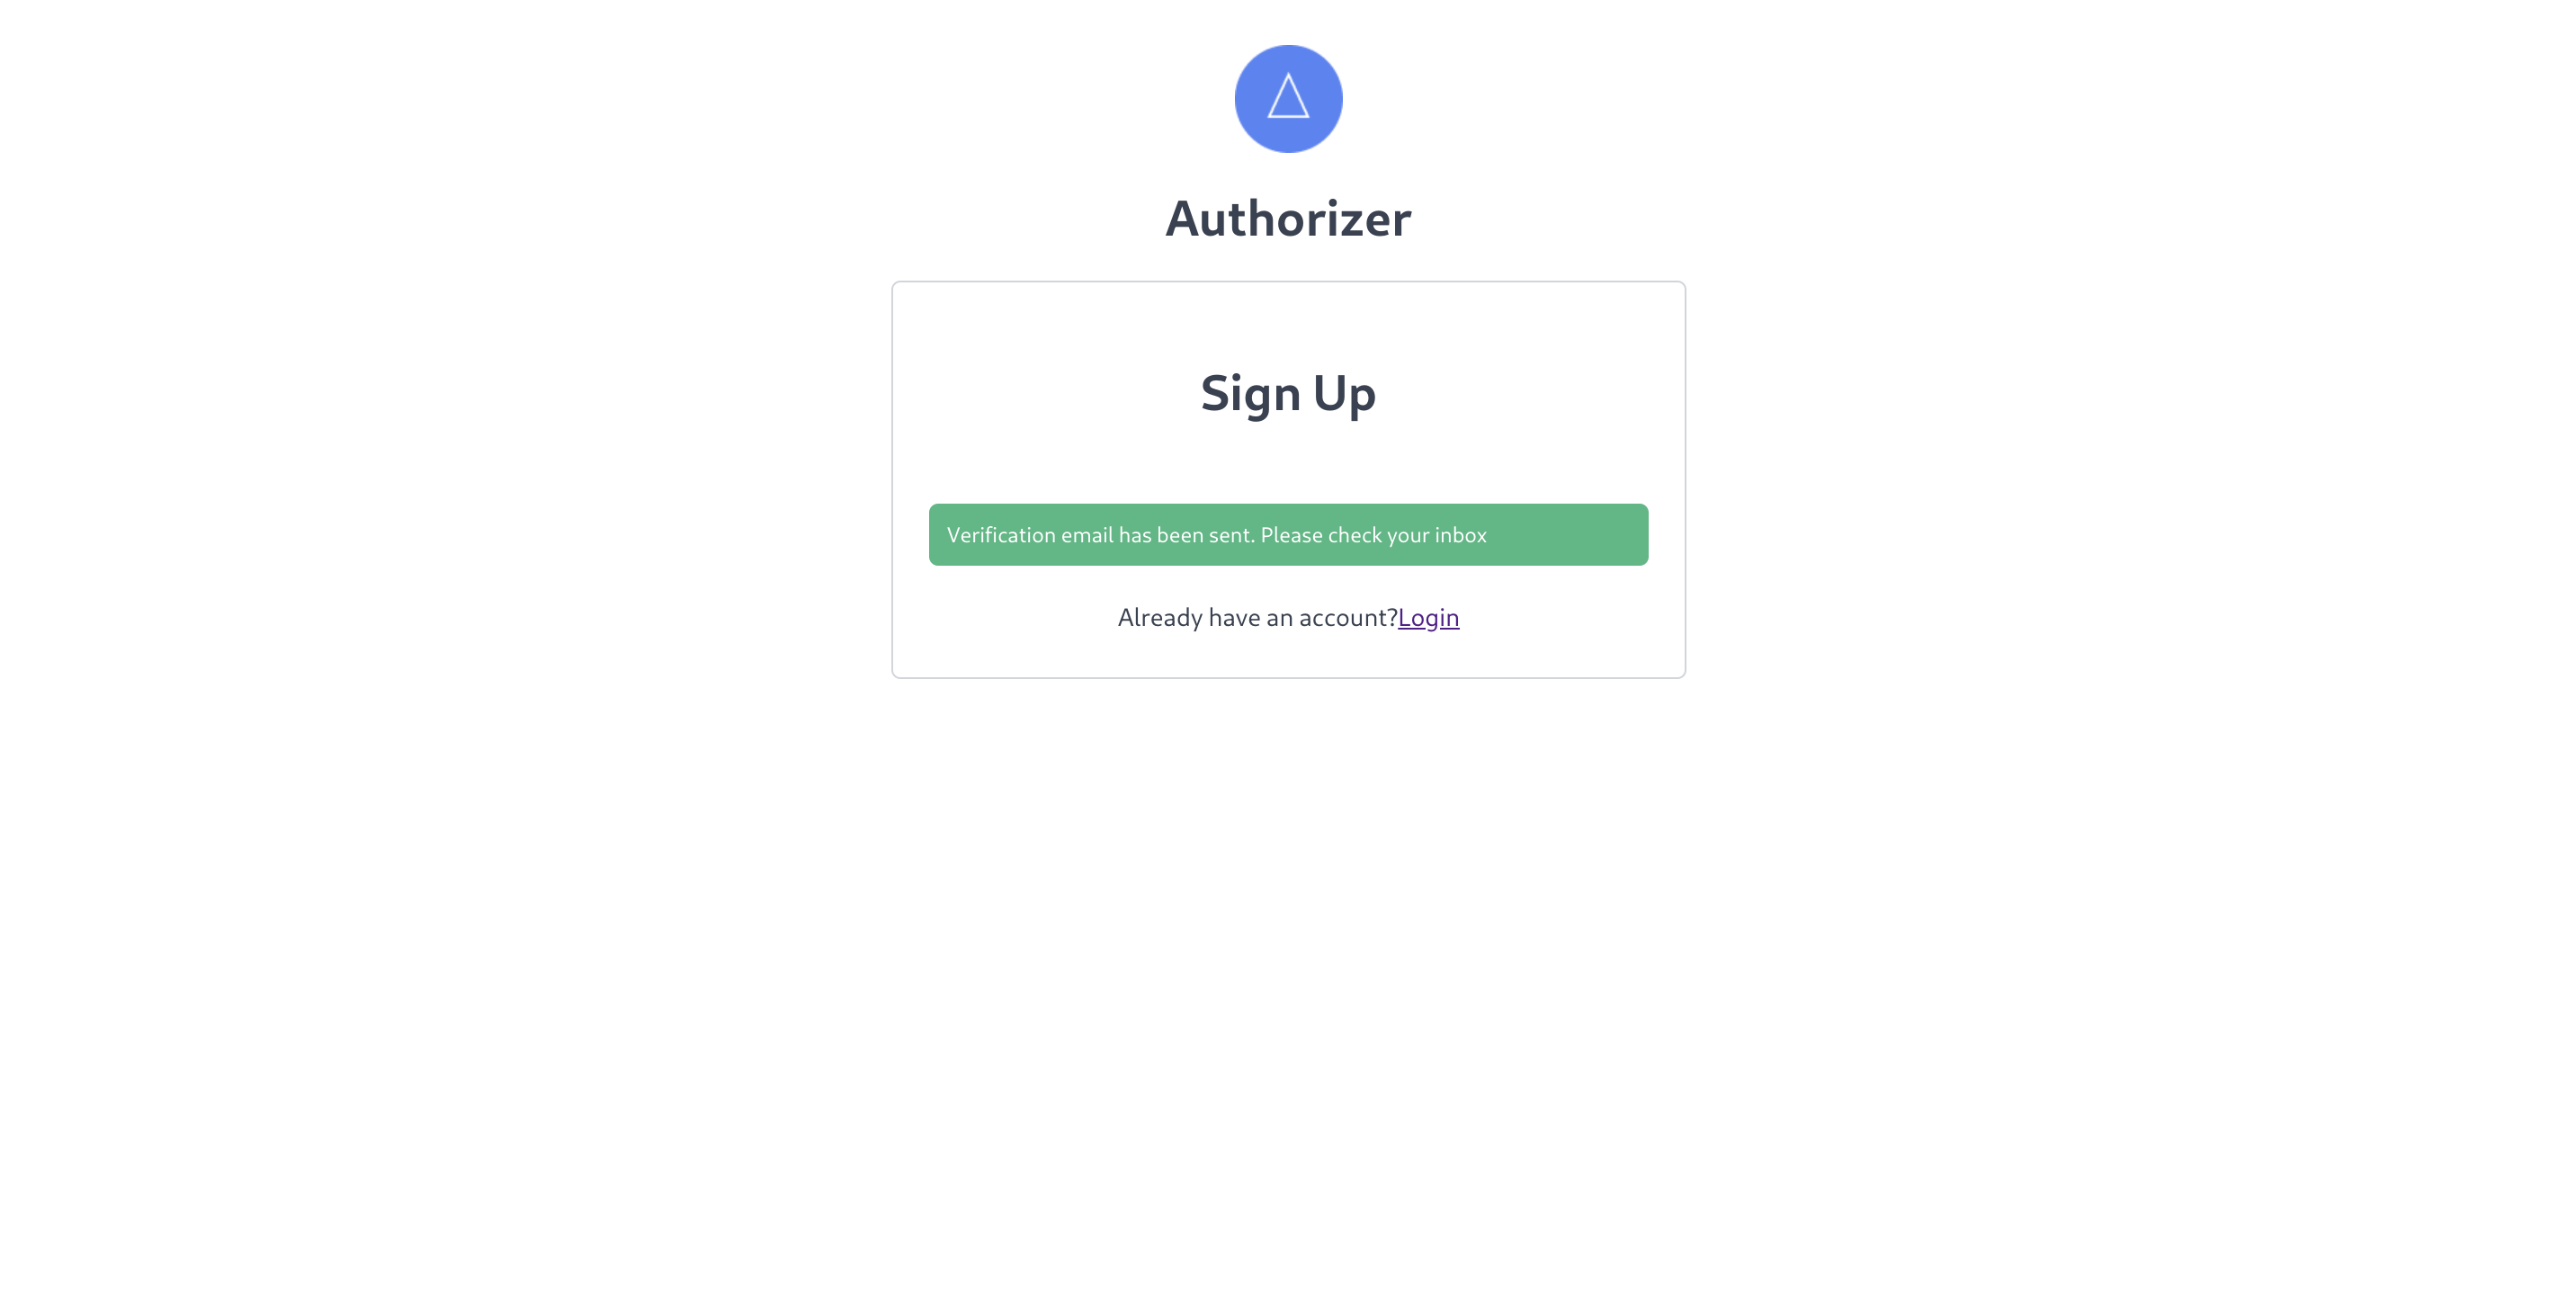
Check the associated email address (be sure to also check the spam folder since we are sending from an untrustworthy sandbox domain) and click Confirm Email in email you receive to activate your account.
Revisit the login page to sign in with your new account. Fill in your email address and password and click Log In.
Upon successfully authenticating, you will see a short message confirming that the authentication was successful:
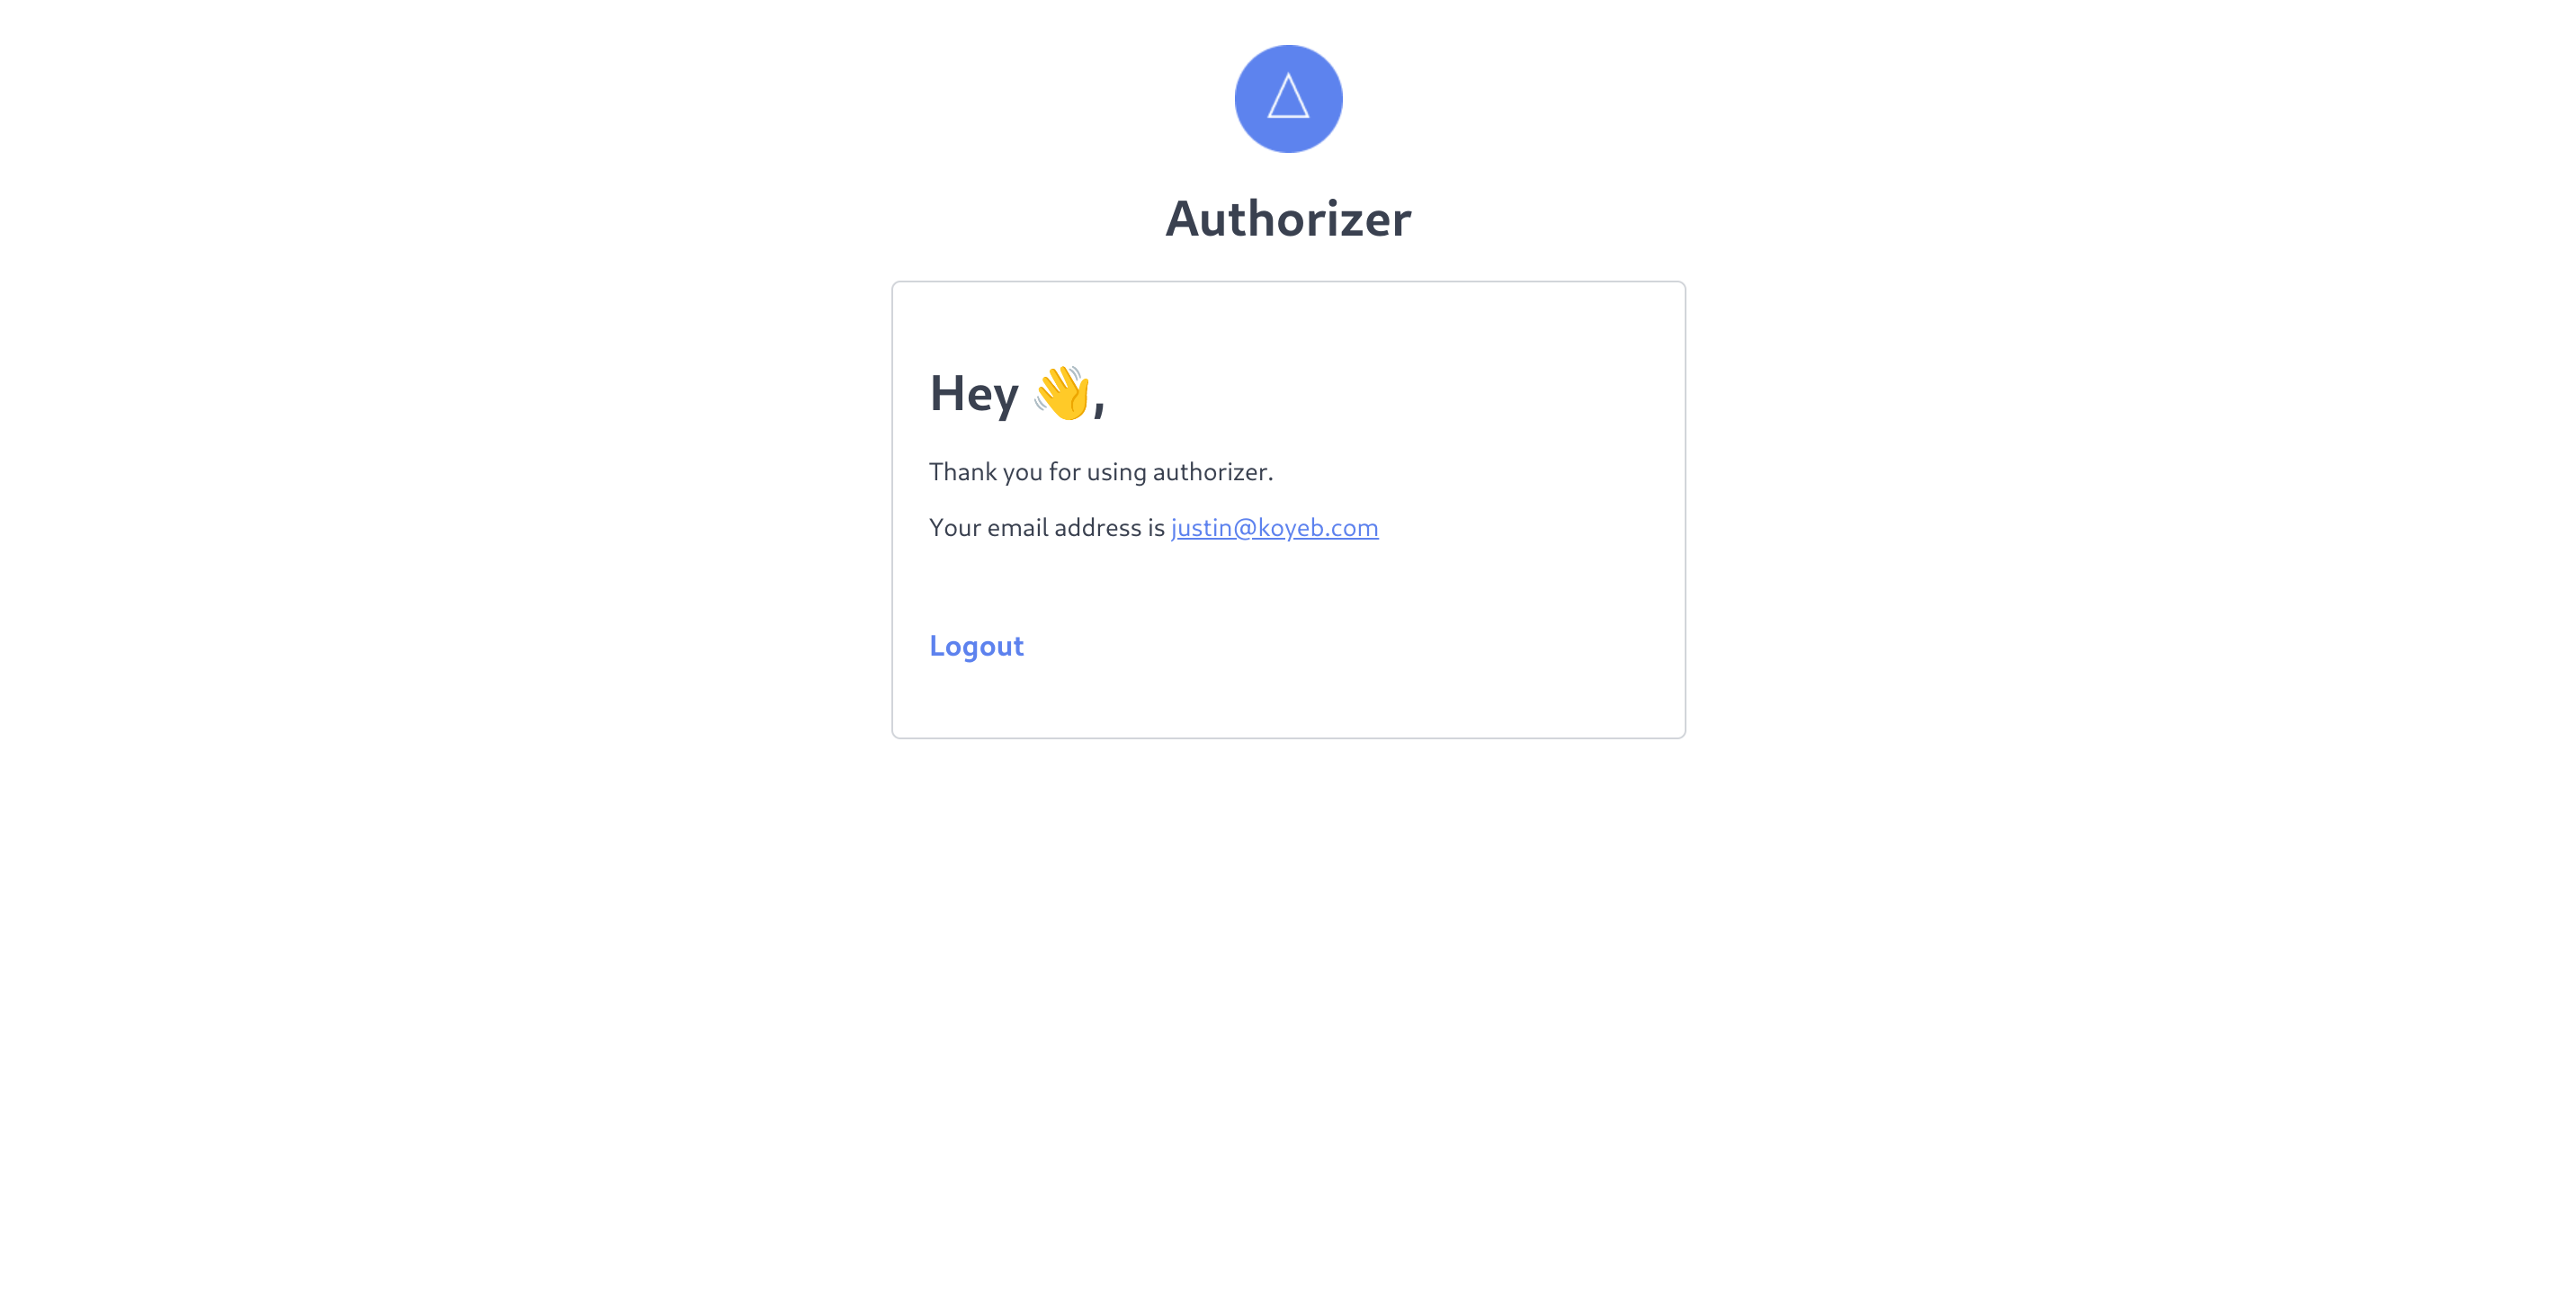
This verifies that Authorizer is able to complete the sign up and login flows successfully. You can use these same flows with your application using one of the SDKs provided by Authorizer.
Conclusion
In this guide, we installed and configured the Authorizer authentication and authorization framework on Koyeb. We provisioned a PostgreSQL database with Neon to store the configuration used by the application and set up Mailgun to handle mail delivery for account-related events. We then deployed Authorizer and configured it to handle account lifecycle management like user sign ups, verification, logins and more.
By exploring the Authorizer administration interface, you can learn about the different features it offers and the integrations it supports. You can connect with social media networks to allow users to authenticate with their existing accounts through OAuth, set up webhooks to listen to authorization events to integrate deeply with your applications, and configure customized email templates to add your own design elements to account messaging. Visit the Authorizer documentation to learn more about what is possible and how to make it happen.