Inside AI Engineer Paris 2025 Part 2 – How We Built a Photobooth with Flux Kontext + Qwen 3 VLM
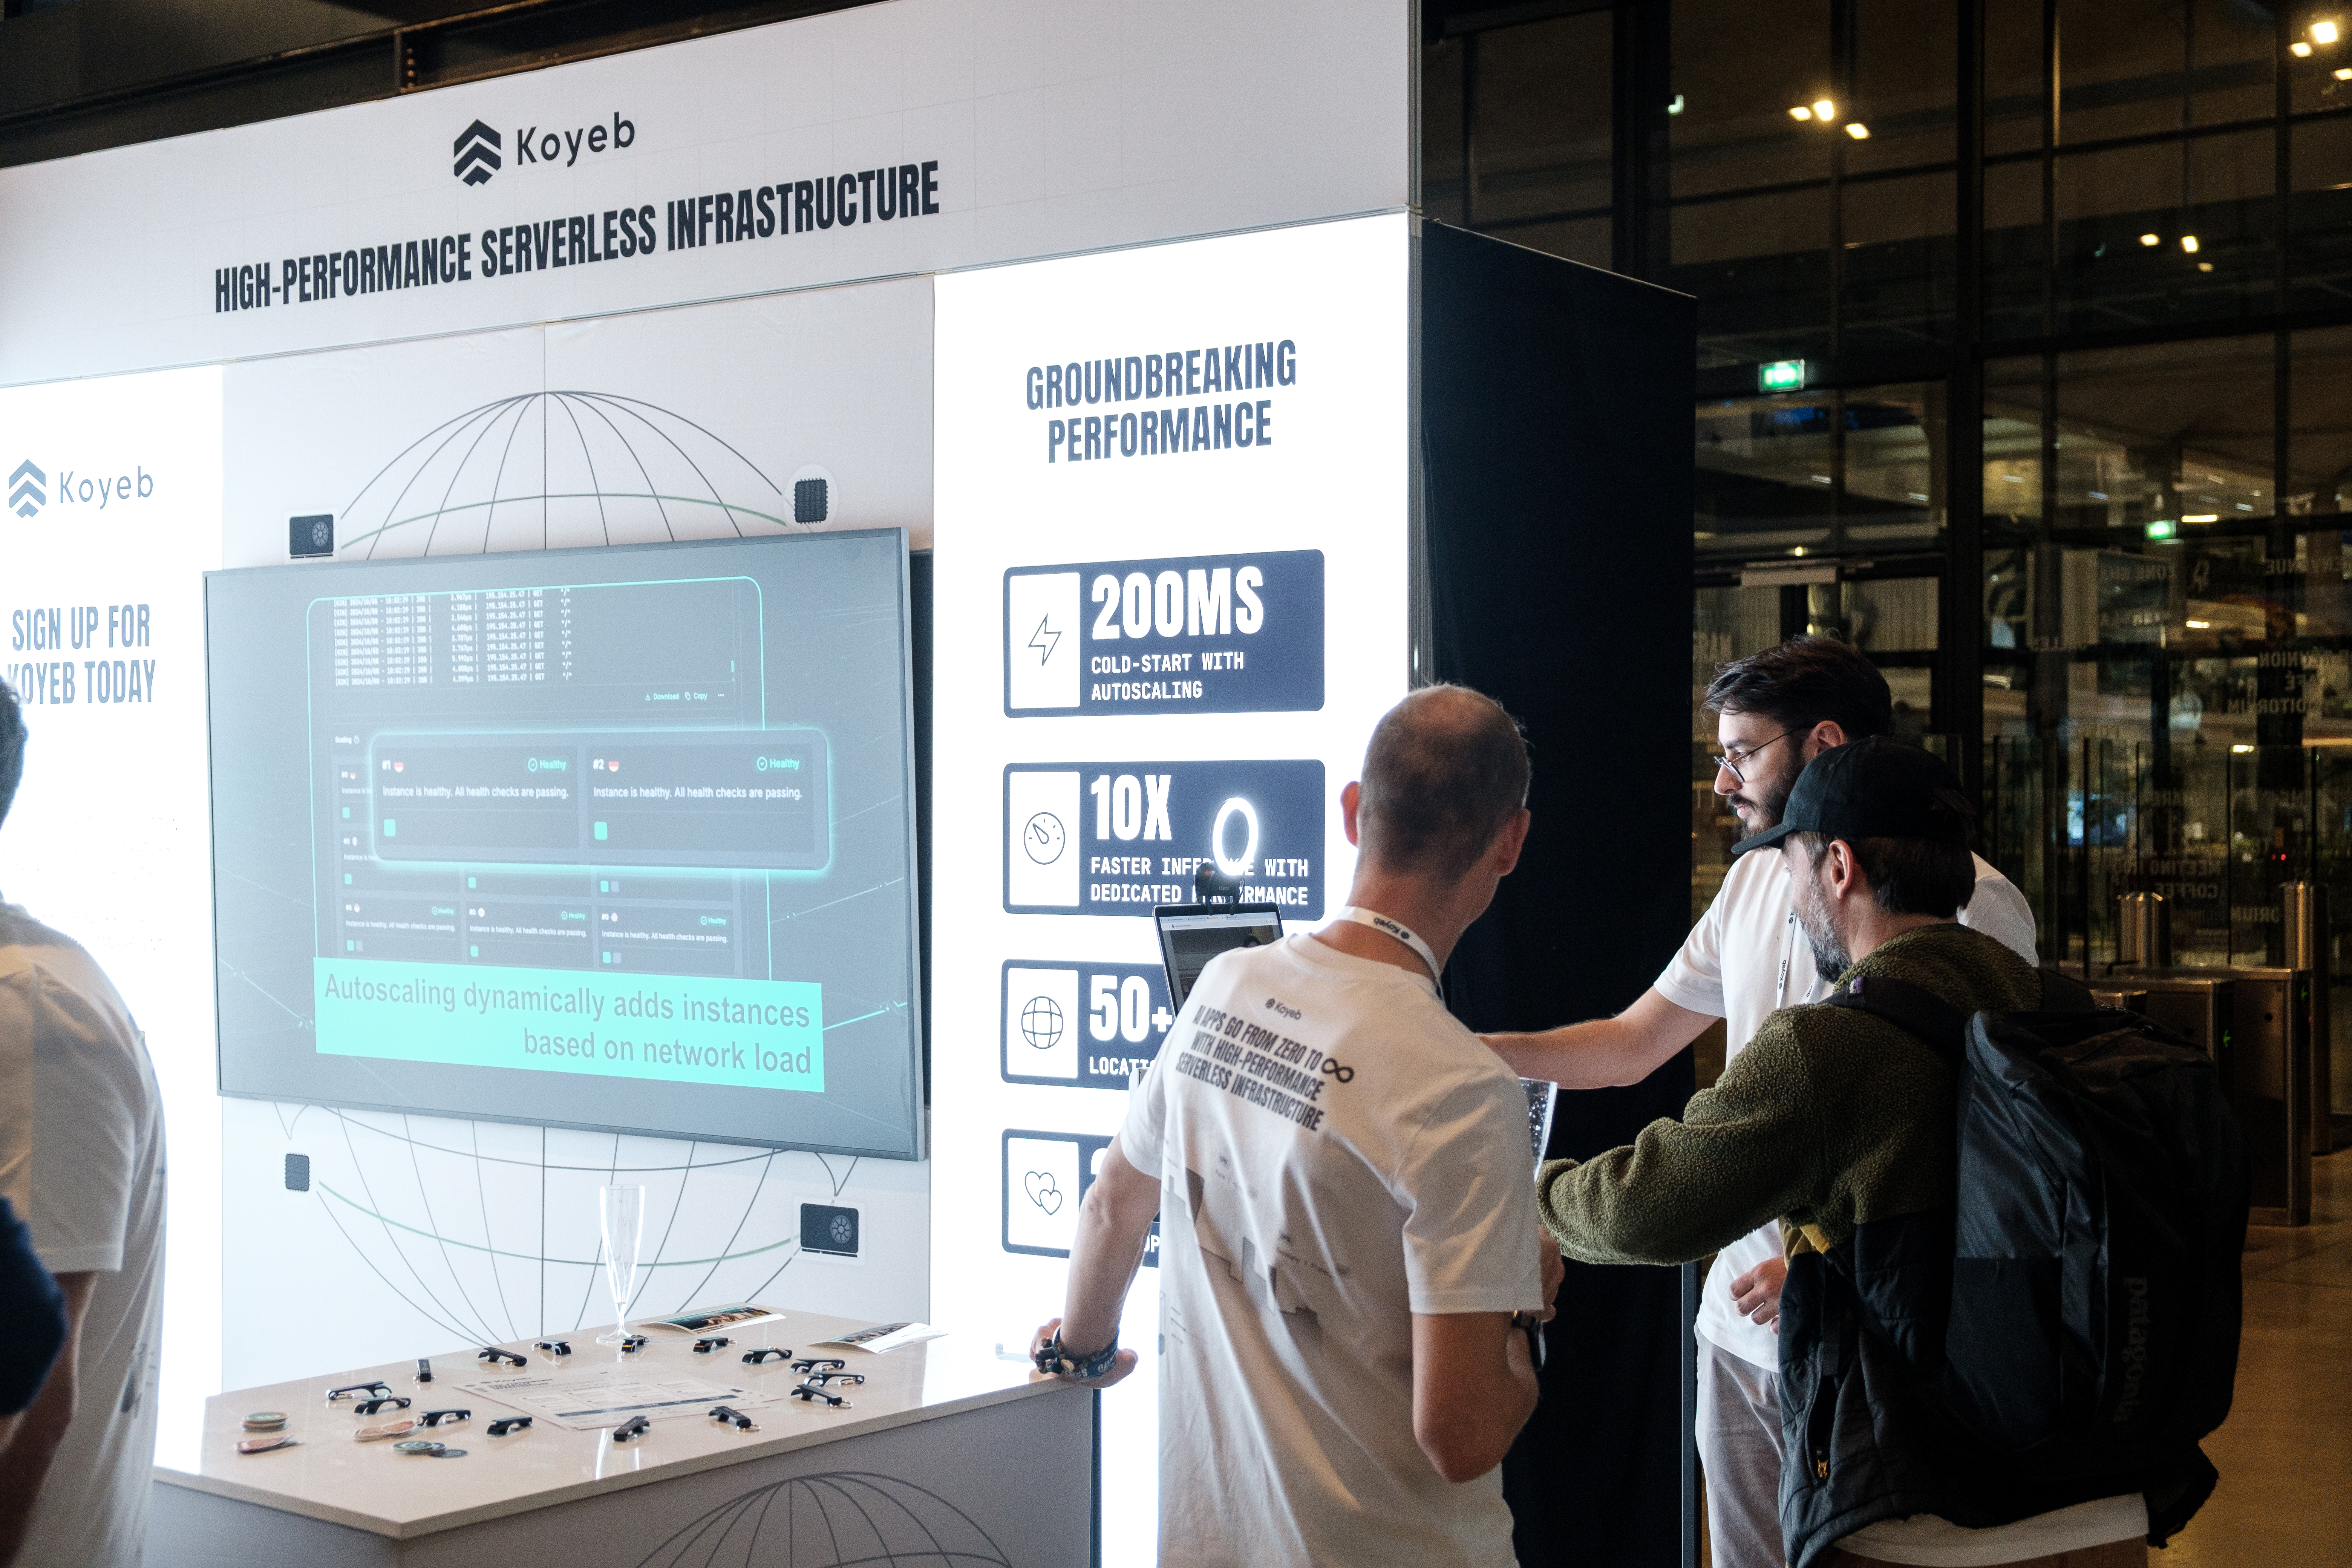
On September 23 and 24, we hosted AI Engineer Paris 2025 at Station F — a one-day gathering of builders, researchers, and practitioners exploring the future of applied AI. With five talk tracks, 48 sessions, and 25 sponsors, the event brought together the best of the AI engineering community in Europe and worldwide.
If you want a full recap of the key themes and takeaways from the talks, check out our event recap blog post.
In this post, we’ll zoom in on one of the demos we built for the Koyeb booth that was powered by an AI agent interacting with three models deployed from our one-click app library.
The challenge: a unique and memorable demo
When we started prepping for AI Engineer Paris, we knew we didn’t just want a booth with slides and stickers. We wanted something interactive, something that would make people smile and give them a reason to stick around. And of course, we wanted something that showcased Koyeb’s platform and features.
So we asked ourselves: what could we build in just a few days that would be fun, fast, and show off what we do best?
The answer: a photo booth with a twist.
The idea
Photo booths are a staple of conferences and celebrations. They often include props like hats, wigs, and sunglasses to make photos more unique and memorable. But rather than provide a couple of feather boas or a mustache on a stick, we wanted to give booth-goers the freedom to bring any prop into their photo. Fortunately, image-editing models make it possible to incorporate an unlimited number of props!
Here’s the experience we imagined:
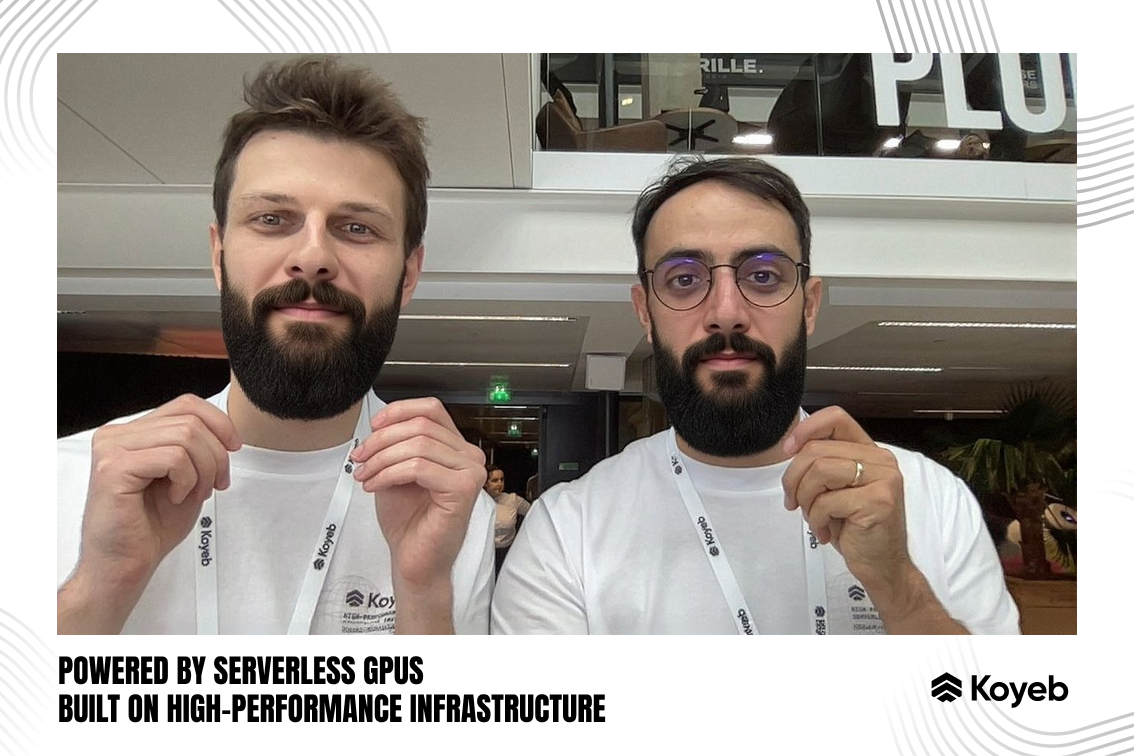
- You walk up to the booth and snap a photo holding a piece of paper with a word on it describing the object you want in your photo.
- The photo gets reviewed and approved by us (no surprises there).
- A few seconds later, your paper is gone and the object you wrote down has been swapped in.
Write “cowboy hat” on your paper? Yeehaw! Suddenly you’re holding a cowboy hat. Write “donut”? You’re now balancing a pink-frosted treat.
It’s playful, quick, and personal. Plus, it’s something people will remember, as you get a printed copy of your photo! It’s exactly what we wanted to attract attendees on a busy conference floor. And because it uses Koyeb under the hood, it would also serve as an opportunity to explain our platform.
How we built it
Since we’re busy building and maintaining features of Koyeb, there wasn’t a lot of time to allocate to the demo. We ended up having only three days to build the photo booth, so we relied heavily on tools and frameworks that let us move fast.
Here’s a look at the stack:
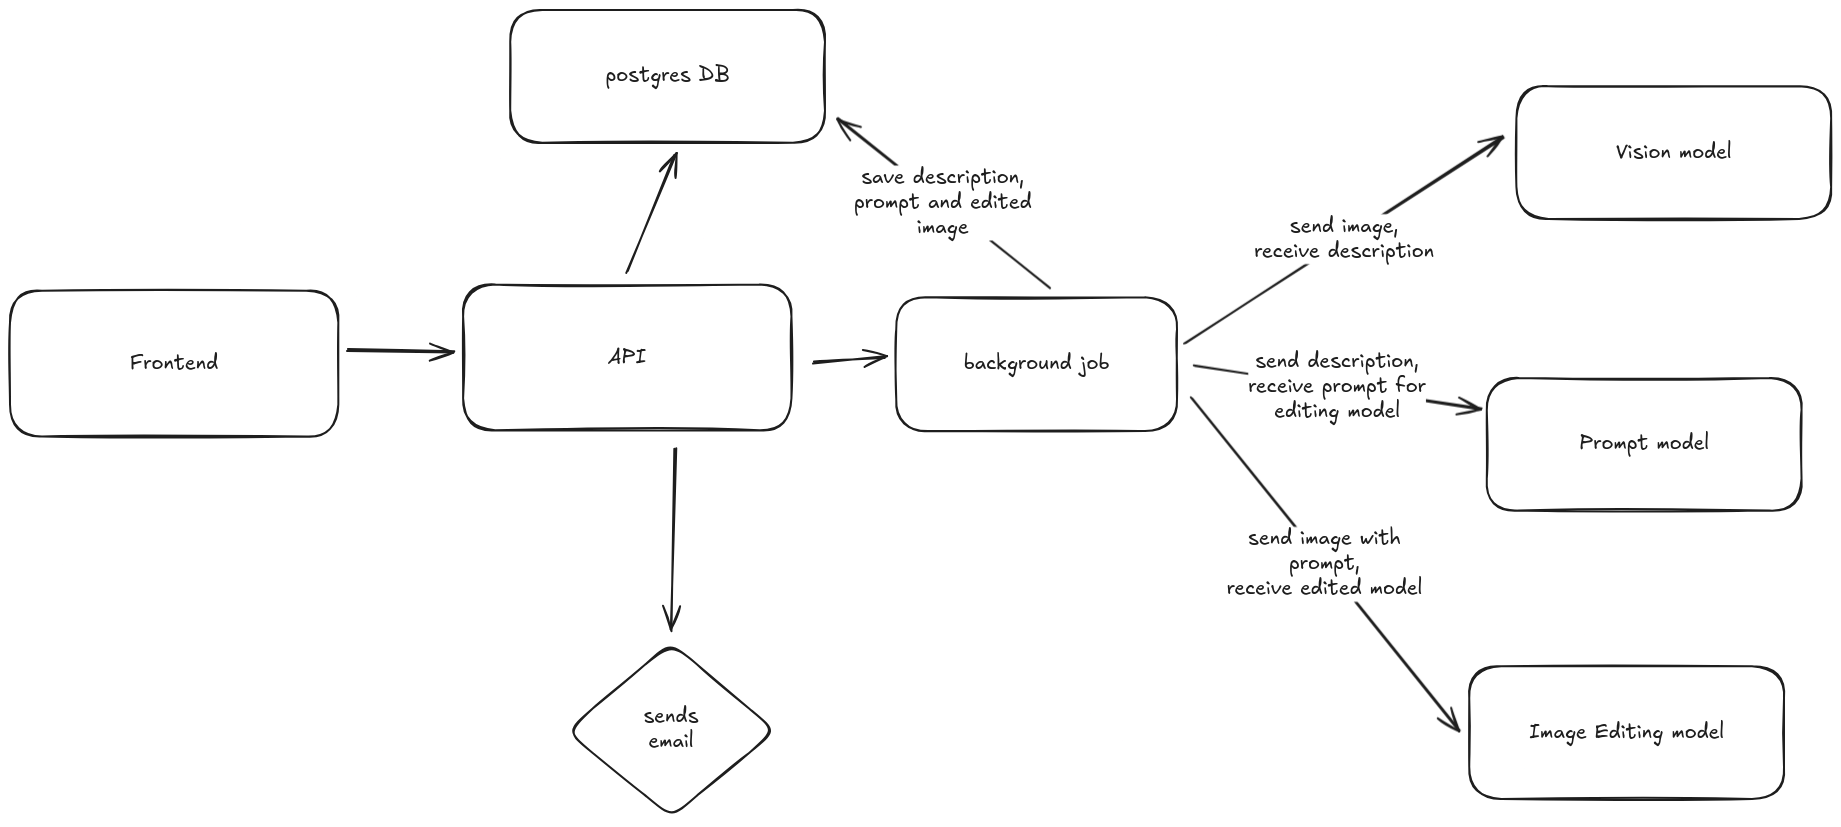
- The frontend client passes an image, name, and email to the agent via REST API.
- The agent sends the image to a vision model that generates a description of what's in the image, focusing on including what text is in the image and where it's located.
- The agent gets this image description and provides it to an LLM that generates an image editing prompt based on a set of instructions.
- The prompt created by the LLM is finally fed to an image editing model to generate the final image.
You might be wondering why we used an agent that connects to 3 different models. Couldn't we simply give the image to the image editing model and give it a set of instructions like “Replace any text in the image with what's described in the text"? Rather than describe the reason, we can show you what happens:
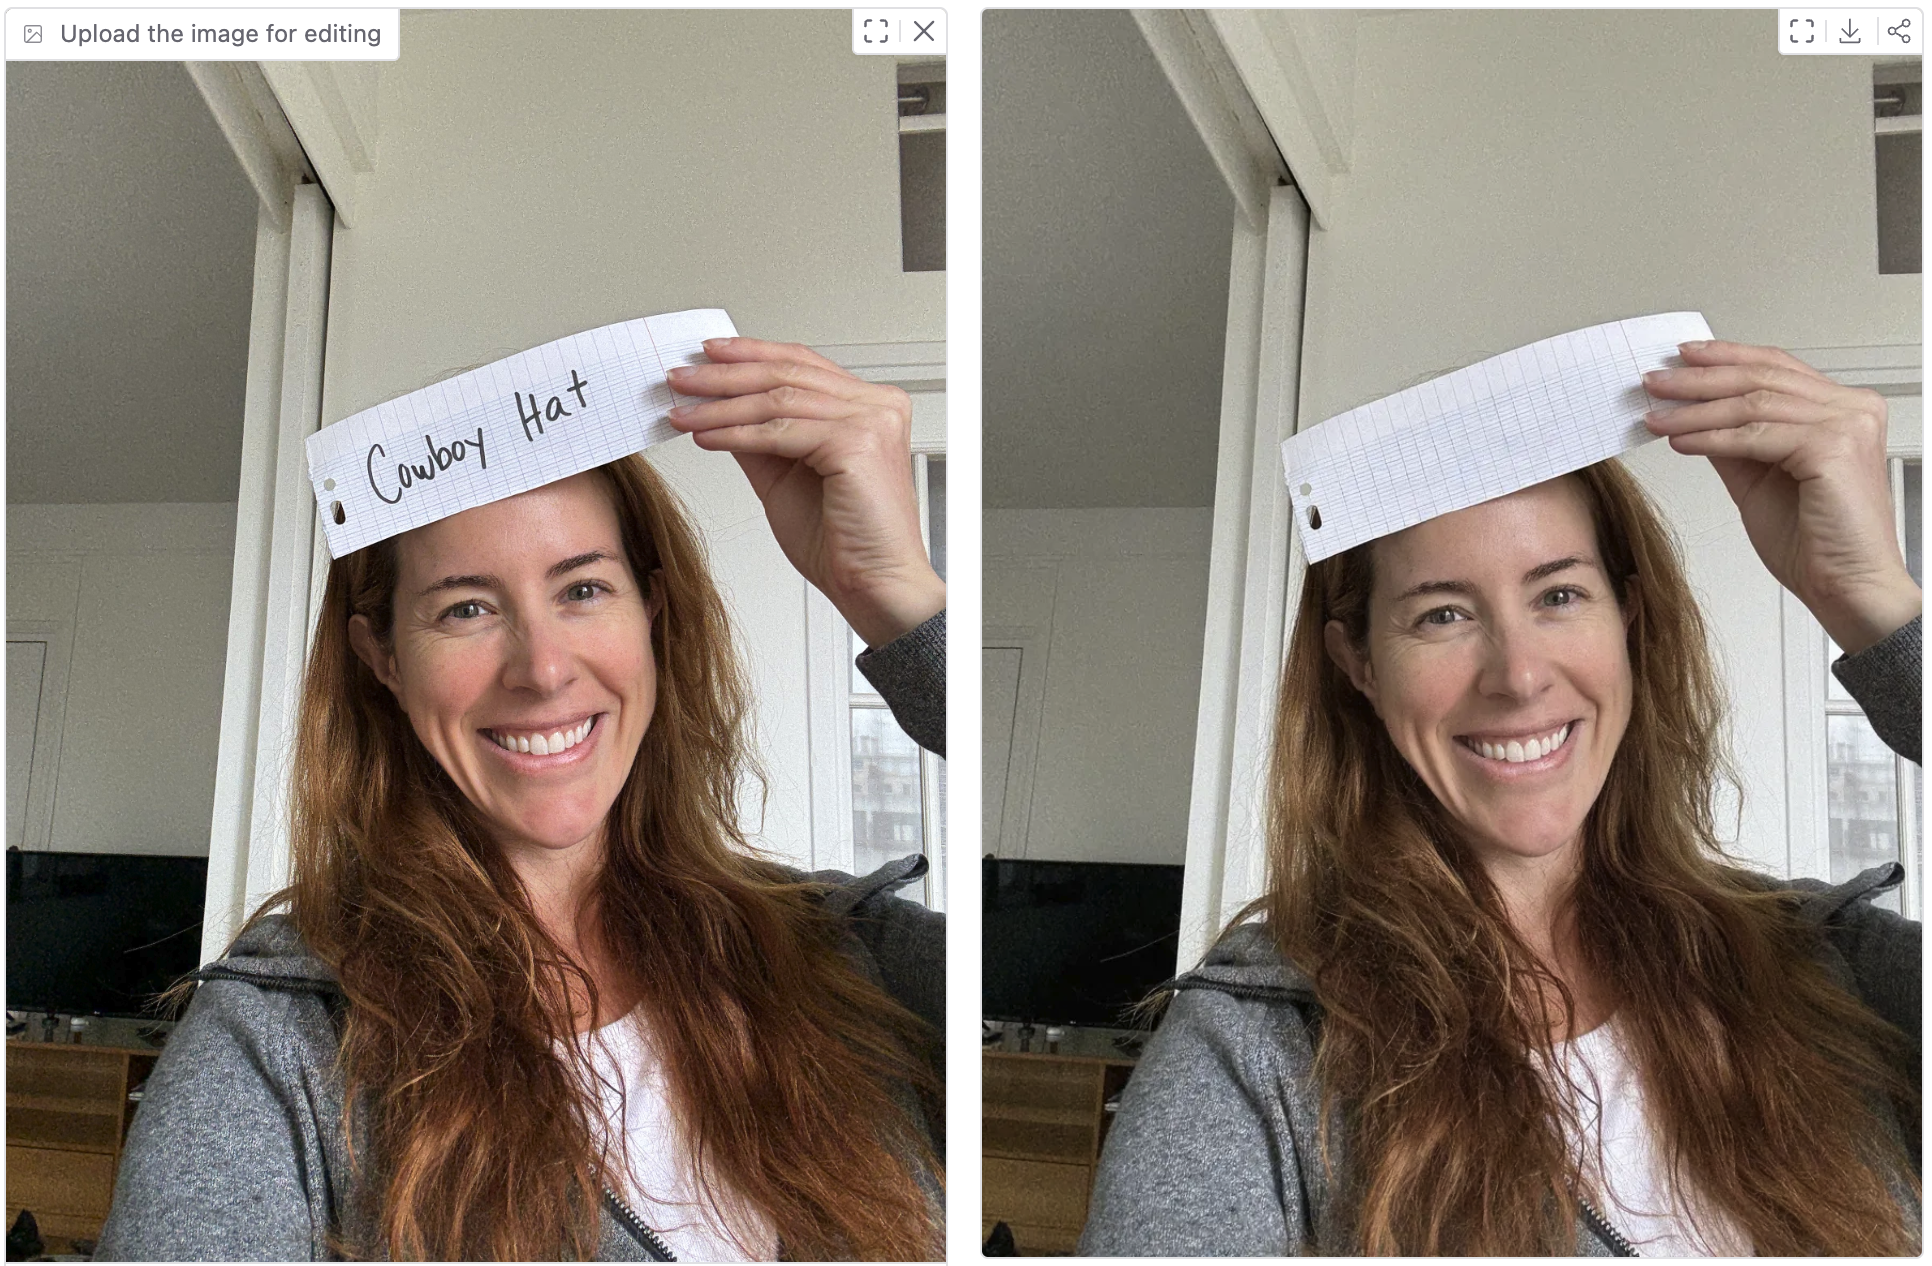
The reasoning of the image editing model was not able to achieve this type of task on its own (yet!), but we're looking forward to seeing what models are capable of by next year's AI Engineer Paris conference.
Hosting and deployment
All the components of our architecture ran on Koyeb:
- GPU Instances made it easy to experiment with models.
- vLLM gave us efficient containerized model serving.
- GitHub integration meant every push to
mainwas deployed in under a minute. - Logs and debugging were just a click away.
Database
To store all the scenes, we went with Postgres running on Koyeb because it is simple, reliable, and ready to scale. All the photos were stored in a GCS bucket for quick storage. This provided an easy way to make the photos publicly available for a designated amount of time thanks to signed urls.
Frontend
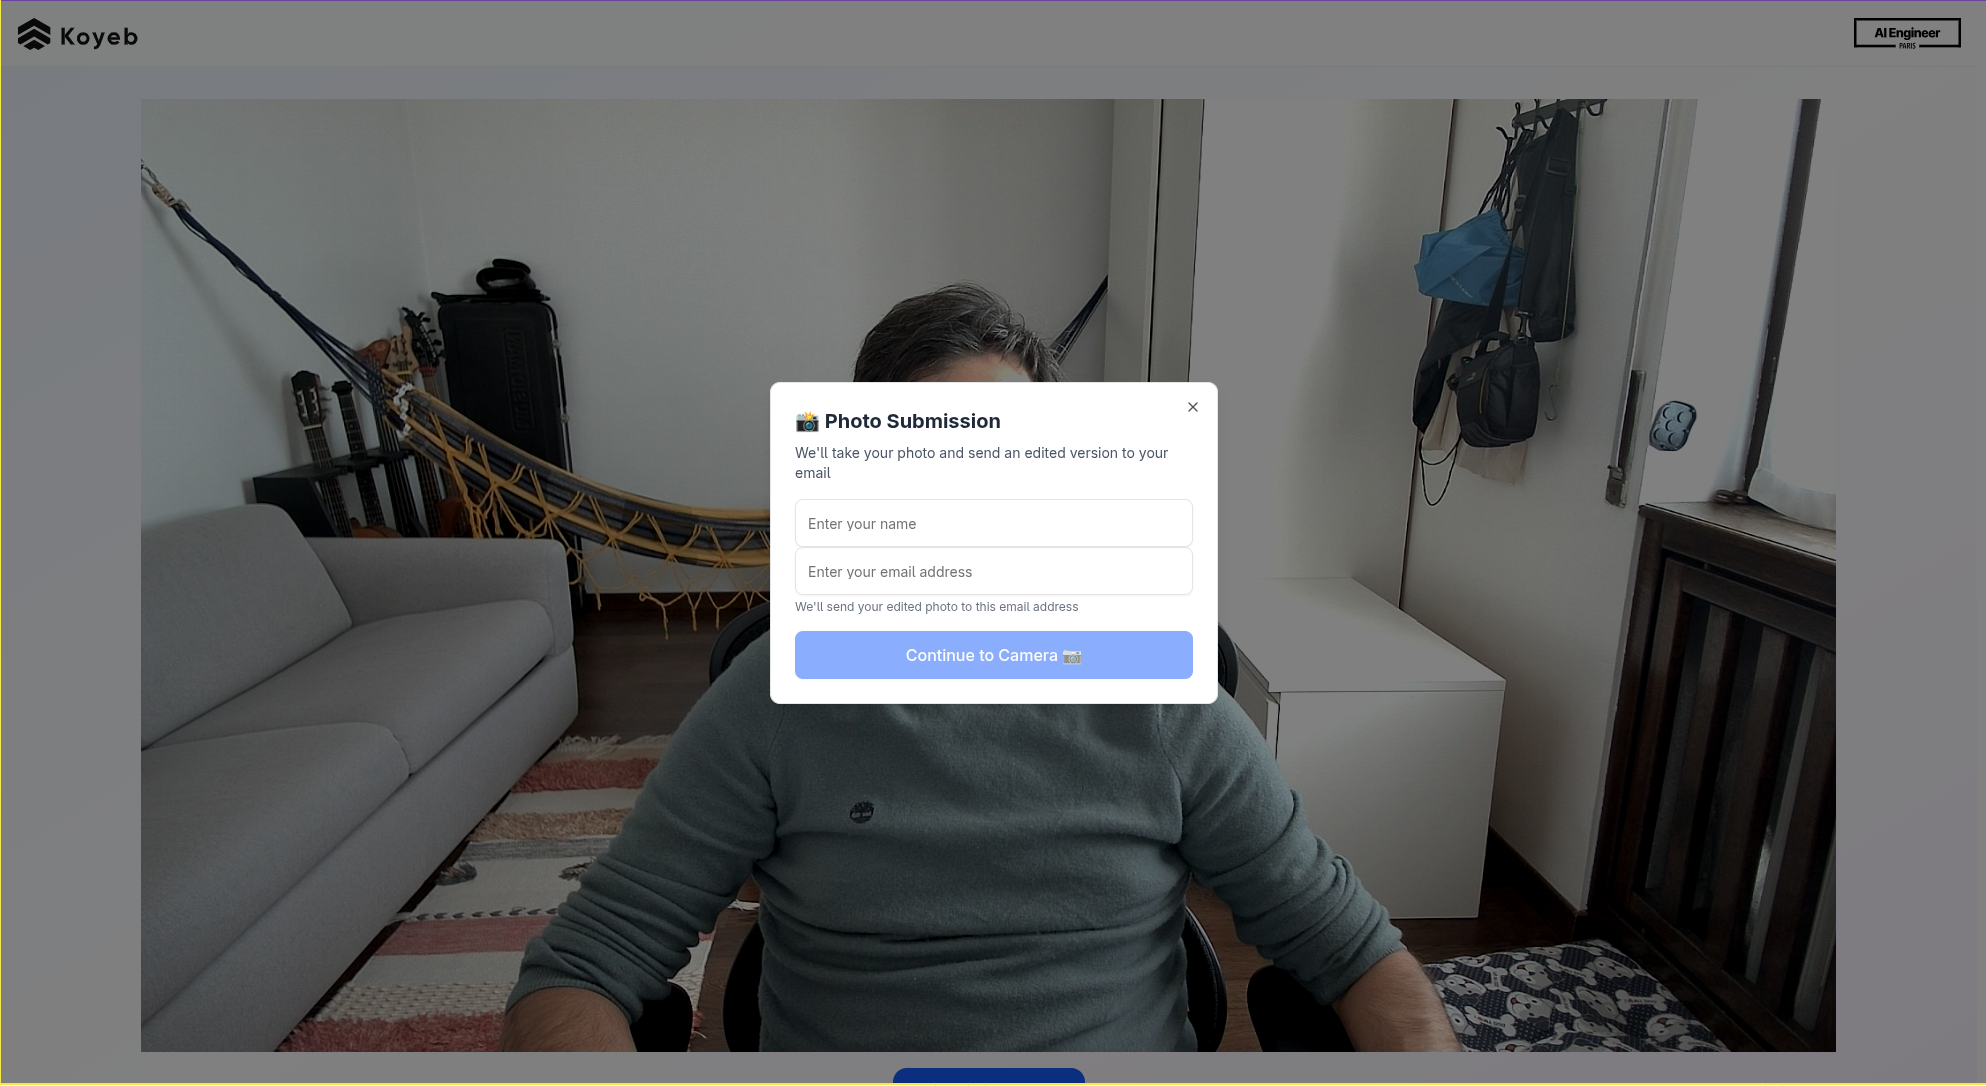
There were two views for the frontend of the application: a client view where the visitors would input their details and take the photo, and an admin view where we could watch the queue of images, view the prompts that were created, and approve the results.
Client View
Since we’re both backend engineers with little knowledge about how to build a React app, we decided to embrace AI and vibe code the frontend. Our code was not going into production, so we were not too concerned about quality or maintenance. And it gave us the opportunity to see what codegen LLMs are currently capable of.
We spun up the interface using app.build from our friends at Neon, which let us get a working React UI running on Vite without prior knowledge of these technologies. Once we had our foundation frontend from app.build, we layered in manual tweaks to keep things polished while using Github Copilot to expand on the code quickly.
The client view’s implementation was incredibly simple, as it just needed to gather the user’s photo, name, and email (for sending a copy of the photo). This information was then passed as an API call to the backend using fetch:
  submitEmailAndPicture: {
      //...

      const apiBaseUrl = getApiBaseUrl();
      const endpoint = `${apiBaseUrl}/v1/scene`;

      try {
        const response = await fetch(endpoint, {
          method: 'POST',
          headers: {
            'Content-Type': 'application/json',
          },
          body: JSON.stringify({
            name: data.name,
            email: data.email,
            original_data: data.picture_data,
          }),
        });
    // ...
  }
And that's really it for the client view. It was a lean application designed to collect images.
Admin View

In the admin view, we pull all images and display them for reference and review using a GET request to the /v1/admin/scenes endpoint:
    getScenes: async (): Promise<ScenesResponse> => {
      const apiBaseUrl = getApiBaseUrl();
      const endpoint = `${apiBaseUrl}/v1/admin/scenes`;

      try {
        const response = await fetch(endpoint, {
          method: 'GET',
          headers: {
            'Content-Type': 'application/json',
          },
        });

        if (!response.ok) {
          throw new Error(`HTTP error! status: ${response.status}`);
        }

        const data = await response.json();

        // Validate the response using the schema
        const validatedData = scenesResponseSchema.parse(data);
        return validatedData;
      } catch (error) {
        console.error('Failed to fetch scenes:', error);
        throw new Error(error instanceof Error ? error.message : 'Failed to fetch scenes');
      }
    },
When we’re satisfied with an imagine, we can approve it using a POST request to the /v1/admin/scene/${sceneId} endpoint:
    approveScene: async (sceneId: string): Promise<Boolean> => {
      const apiBaseUrl = getApiBaseUrl();
      const endpoint = `${apiBaseUrl}/v1/admin/scene/${sceneId}`;

      try {
        const response = await fetch(endpoint, {
          method: 'POST',
          headers: {
            'Content-Type': 'application/json',
          },
        });

        if (!response.ok) {
          throw new Error(`HTTP error! status: ${response.status}`);
        }

        return true;
      } catch (error) {
        console.error('Failed to approve scene:', error);
        throw new Error(error instanceof Error ? error.message : 'Failed to approve scene');
      }
    }
  }
The API endpoints called from the client and admin views go to our backend running on Koyeb.
Backend
For the photo booth’s backend, we used Python and FastAPI. Photo editing can take up to a minute depending on which hardware is used to run the model, so we used background tasks to make sure photo processing didn’t block the app. This also gave us the perfect window of time to chat with visitors about the benefits of Koyeb.
The whole process was easy and smooth…
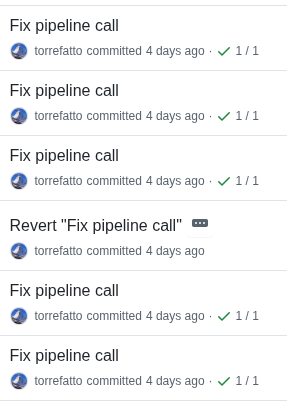
Or you could say it was more of a learning experience! Given the number of failed attempts at fixing the pipeline call, it's worth sharing the code that we finally got working.
First, we import AsyncSession from Asynchronous I/O (asyncio), and use it to lock all steps of the image processing pipeline. Asyncio locks ensure that only one coroutine at a time can enter the corresponding step, avoiding race conditions if multiple pipeline executions overlap.
from sqlalchemy.ext.asyncio import AsyncSession
// ...

step_describe_lock = asyncio.Lock()
step_prompt_lock = asyncio.Lock()
step_edit_lock = asyncio.Lock()
Then in our pipeline function, we get the URL to the image stored in Google Cloud Storage (GCS), and run the image through each step of the process:
async def pipeline(scene: Scene):
    # Create a new database session for the pipeline run
    async with db.SessionLocal() as session:
        try:
            # Generate a presigned URL to access the original input data
            url = await storage.get_presigned_url(scene.original_data)

            # Run the pipeline steps in sequence:
            # 1. Generate description
            scene = await step_describe(session, scene, url)
            # 2. Generate edit prompt
            scene = await step_prompt(session, scene)
            # 3. Edit image and save result
            scene = await step_edit(session, scene, url)

        except Exception:
            # Log full exception if pipeline execution fails
            logger.exception("failed to run the pipeline", scene_id=scene.id)
Zooming in on each step of the pipeline, the step_describe function passes the image URL to the run function of the Describer class:
@with_lock(step_describe_lock)   # Prevent concurrent access to this step
@with_retry(3, 1)               # Retry up to 3 times, waiting 1s between retries
async def step_describe(session: AsyncSession, scene: Scene, url: str) -> Scene:
    # Reload the scene from the database to ensure the latest state
    scene = await db.get_scene(session, scene.id)

    # Run the describer service on the given image URL
    description = await describer.run(url)
    logger.info("description returned", description=description)

    # Store the description in the scene and update the database
    scene.description = description
    await db.update_scene(session, scene)
    return scene
The Describer class uses the following code to generate the image description:
SYSTEM_PROMPT = "You are a helpful assistant whose aim is to give the best possible description of any given image, with particular focus on identifying content and position of any text appearing in the image"
USER_PROMPT = (
    "Describe the provided image. What is written on the image and where is it located?"
)
// ...
class Describer(object):
// ...

    async def run(self, content: str, ftype: str = "png") -> str:
        res = await self.ai.chat.completions.create(
            messages=[
                {
                    "role": "system",
                    "content": [
                        {
                            "type": "text",
                            "text": SYSTEM_PROMPT,
                        }
                    ],
                },
                {
                    "role": "user",
                    "content": [
                        {
                            "type": "image_url",
                            "image_url": {
                                "url": content,
                            },
                        },
                        {
                            "type": "text",
                            "text": USER_PROMPT,
                        },
                    ],
                },
            ],
            model="Qwen/Qwen3-VL-235B-A22B-Instruct",
            max_tokens=100,
        )

        if not res or len(res.choices) == 0 or not res.choices[0].message:
            raise RuntimeError("Missing value")

        return res.choices[0].message.content
As you can see, for our image-processing model, we opted to use Qwen 3 VL 235B A22B Instruct because we wanted to try out this new model. Koyeb also has other image-processing models available to deploy in just one click that work well for this use case.
For our next step in the pipeline, the step_prompt function takes the description of the scene, and uses it to generate a prompt that will be used to instruction the image-editing model:
@with_lock(step_prompt_lock)
@with_retry(3, 1)
async def step_prompt(session: AsyncSession, scene: Scene) -> Scene:
    # Refresh the scene from the database
    await session.refresh(scene)

    # Generate an edit prompt based on the description
    prompt = await prompter.run(scene.description)
    logger.info("prompt prepared", prompt=prompt)

    # Save the generated prompt to the scene and persist it
    scene.edit_prompt = prompt
    await db.update_scene(session, scene)
    return scene
The run function of the Prompter class uses the following description to generate the image-editing prompt:
USER_PROMPT_TEMPLATE = """

Your job is to create a prompt that I'm going to pass to an image editing model
based on the description of the image.

The goal of the prompt is to get the model to replace any item with text on it
with the object described in the text.

For example, if the original image had a woman holding a sign up to their head
that says "red curly wig", you would instruct the model to put a red curly wig
on the woman.

Here is a description you've received:

---
%s
---

Make it a model-friendly version that often works best for diffusion/image-editing models.
Only include the prompt and nothing else.
"""
In the final step of the pipeline, the image URL and newly-created prompt are passed to a FastAPI endpoint running on Koyeb to generate the new image:
@with_lock(step_edit_lock)
@with_retry(3, 1)
async def step_edit(session: AsyncSession, scene: Scene, url: str) -> Scene:
    # Refresh the scene to ensure latest state
    await session.refresh(scene)

    # Use the image editor service to modify the original image using the prompt
    image = await image_editor.run(url, scene.edit_prompt)
    logger.info("image edited", image=image)

    # Add a frame around the edited image
    framed_image = framer.frame("static/frame.png", image)

    # Save the final result image to storage (e.g., S3) and store the URL in the scene
    result_url = await storage.save(framed_image)
    scene.result = result_url
    await db.update_scene(session, scene)
    return scene
The models making the magic
To summarize the complexity of our pipeline, here are the three models that worked together to make the photo booth tick:
- Qwen 3 VL 235B A22B Instruct: looked at the original photo and described it. Deploy on Koyeb.
- Qwen 3 14B: turned that description into a clean, targeted editing prompt. Deploy on Koyeb.
- FLUX.1 Kontext [dev]: did the actual editing. Swapping the paper note with the object you wrote down. Deploy on Koyeb.
In plain terms: one model “understood” your photo, another translated that into instructions, and the last one worked the magic of editing.
Thanks to Black Forest Labs for their amazing model! If you were at AI Engineer Paris, I hope you got a chance to visit their booth.
We chose to “glue together” these three models through API calls, hosting them on separate Koyeb Instances, because they were readily available from our list of one-click deployment models! If we were to productize this a bit more, we would have probably packed them together in just one Instance. But we wanted to be lean and iterate fast and reaching out to our catalog was the path of least resistance.
You can view the code for here:
Note that we've released this code in its true raw form including the rough edges, as we want to give an honest glimpse at what we achieved in just 3 days. If you're interested in finding out more about implementation, including what we'd do differently for production, then reach out to Koyeb on Twitter or LinkedIn.
The Result
By the end of day three, the photo booth was live. Attendees walked up, wrote something down, and in under a minute were laughing at their transformed photos. And even left with a printed copy!
It wasn’t just about showing off tech, it was about sharing some fun around a janky little project, which is the kind of thing people remember when they leave a booth.
What We Learned
If you're looking to create a cool booth demo experience, here are some helpful things we've learned along the way:
- Constraints spark creativity. It always feels like there is never enough time to build the demo you want, but don't let that stop you from trying. Knowing we had just three days forced us to simplify and focus on the core experience. For example, we could have spent hours making the frontend align to the design of the Koyeb website, but nobody noticed the design of the site. Instead, we allocated design resources to the photo border, which created a permanent reminder of the booth.
- Pick the right tools. Having Koyeb’s GPU Instances and fast deployments saved us hours. This is incredibly useful when you're prototyping.
- Keep it fun. People don’t remember specs, they remember how something made them feel. If you're not sure where to start, think back to the most memorable experience you've had at a conference. Interactive demos don't just bring people to your booth the day-of, they your product back to mind whenever a developer thinks of their time at the event.
We’ll be bringing the photo booth to future events, because at the end of the day, building tools is great, but building something that makes people smile? That’s even better.
👉 If you saw us at AI Engineer Paris, thanks for testing the booth and sharing a laugh.
👉 If not, catch us at the next one and maybe try out the photo booth yourself.